
User manual, English (US)
Page 1
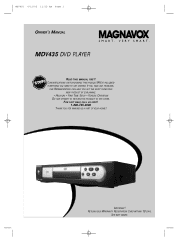
CONGRATULATIONS ON PURCHASING THIS PRODUCT.WE'VE INCLUDED EVERYTHING YOU NEED TO GET STARTED. IF YOU HAVE ANY PROBLEMS, OUR REPRESENTATIVES CAN HELP YOU GET THE MOST FROM YOUR NEW PRODUCT BY EXPLAINING: • HOOKUPS • FIRST TIME SETUP • FEATURE OPERATION DO NOT ATTEMPT TO RETURN THIS PRODUCT TO THE STORE. FOR FAST HELP, CALL US FIRST! 1-800-705-2000 THANK YOU FOR MAKING US A PART OF YOUR HOME! IMPORTANT! SEE WHY INSIDE. MDV435 4/12/02 11:55 AM Page 1 OWNER'S MANUAL MDV435 DVD PLAYER READ THIS MANUAL FIRST! RETURN YOUR WARRANTY REGISTRATION CARD WITHIN 10 DAYS.
CONGRATULATIONS ON PURCHASING THIS PRODUCT.WE'VE INCLUDED EVERYTHING YOU NEED TO GET STARTED. IF YOU HAVE ANY PROBLEMS, OUR REPRESENTATIVES CAN HELP YOU GET THE MOST FROM YOUR NEW PRODUCT BY EXPLAINING: • HOOKUPS • FIRST TIME SETUP • FEATURE OPERATION DO NOT ATTEMPT TO RETURN THIS PRODUCT TO THE STORE. FOR FAST HELP, CALL US FIRST! 1-800-705-2000 THANK YOU FOR MAKING US A PART OF YOUR HOME! IMPORTANT! SEE WHY INSIDE. MDV435 4/12/02 11:55 AM Page 1 OWNER'S MANUAL MDV435 DVD PLAYER READ THIS MANUAL FIRST! RETURN YOUR WARRANTY REGISTRATION CARD WITHIN 10 DAYS.

User manual, English (US)
Page 3
... Display Information, MP3 Track Selection 30 Random MP3 Playback, Programmed MP3 Playback 31 Audio Language, Stereo Sound Mode 32 Subtitle Language 33 Camera Angles 34 DVD Player Setup and Features On-Screen Display 35 Parental Controls Password 36 Parental Controls Levels 37 Marker Setup Screen 38 Audio Controls 39 Display Controls 40...
... Display Information, MP3 Track Selection 30 Random MP3 Playback, Programmed MP3 Playback 31 Audio Language, Stereo Sound Mode 32 Subtitle Language 33 Camera Angles 34 DVD Player Setup and Features On-Screen Display 35 Parental Controls Password 36 Parental Controls Levels 37 Marker Setup Screen 38 Audio Controls 39 Display Controls 40...

User manual, English (US)
Page 5
...only by your choices and the materials available on page 20. The possibilities are on the DVD. It describes how to the producer's comments, or play your DVD viewing - DVD Player Setup Menus... Available Disc Features... To get the most enjoyment from SRS Labs, Inc....the current Disc does not include that is not available on the remote control when Disc playback is available on the remote control. Access the DVD Player's Setup menu by -Step Playback • Program Playback • Random Playback • Repeat, A-B Repeat • Specific Time/Title/ Chapter...
...only by your choices and the materials available on page 20. The possibilities are on the DVD. It describes how to the producer's comments, or play your DVD viewing - DVD Player Setup Menus... Available Disc Features... To get the most enjoyment from SRS Labs, Inc....the current Disc does not include that is not available on the remote control when Disc playback is available on the remote control. Access the DVD Player's Setup menu by -Step Playback • Program Playback • Random Playback • Repeat, A-B Repeat • Specific Time/Title/ Chapter...

User manual, English (US)
Page 6
...you play must be recorded in the United States and North America, PAL, and SECAM. This DVD Player uses the NTSC color system. Discs that you can not play the DVD on this DVD Player. Look for Region Codes and Color Systems as described below on the Disc case. If these ...North America, Bermuda, the U.S. For example, if a Disc is used primarily in the NTSC system. You can only play on this DVD Player. • CD-ROM • DVD-RAM • DVD-ROM • Super Audio CD (SACD) (The Audio CD layer of a hybrid SACD may be accessible. • Compact Disc-Graphic ...
...you play must be recorded in the United States and North America, PAL, and SECAM. This DVD Player uses the NTSC color system. Discs that you can not play the DVD on this DVD Player. Look for Region Codes and Color Systems as described below on the Disc case. If these ...North America, Bermuda, the U.S. For example, if a Disc is used primarily in the NTSC system. You can only play on this DVD Player. • CD-ROM • DVD-RAM • DVD-ROM • Super Audio CD (SACD) (The Audio CD layer of a hybrid SACD may be accessible. • Compact Disc-Graphic ...
User manual, English (US)
Page 7
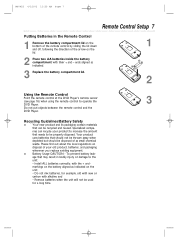
..., with the + and markings on the battery aligned as indicated. 3 Replace the battery compartment lid. 2 Using the Remote Control Point the remote control at the DVD Player's remote sensor (see page 16) when using the remote control to be used for example, old with new or carbon with their + and - Your product... as indicated on the lid. 2 Place two AA batteries inside the battery compartment with alkaline; Do not put objects between the remote control and the DVD Player. To prevent battery leakage that needs to operate the...
..., with the + and markings on the battery aligned as indicated. 3 Replace the battery compartment lid. 2 Using the Remote Control Point the remote control at the DVD Player's remote sensor (see page 16) when using the remote control to be used for example, old with new or carbon with their + and - Your product... as indicated on the lid. 2 Place two AA batteries inside the battery compartment with alkaline; Do not put objects between the remote control and the DVD Player. To prevent battery leakage that needs to operate the...

User manual, English (US)
Page 8
... of your TV, Stereo or other devices as necessary. q Disconnect all equipment from the power outlets. However, the following pages. Connect the DVD Player's DIGITAL AUDIO OUT COAXIAL jack to your Stereo for the best sound quality. ૽૽૽ If digital connections are located near channel 00...keep changing channels at the TV until you determine the best option, find your choice on pages 9-13. Before you do not connect the DVD Player to a VCR, then connect the VCR to the TV. Never make or change connections with equipment connected to the correct Video In channel....
... of your TV, Stereo or other devices as necessary. q Disconnect all equipment from the power outlets. However, the following pages. Connect the DVD Player's DIGITAL AUDIO OUT COAXIAL jack to your Stereo for the best sound quality. ૽૽૽ If digital connections are located near channel 00...keep changing channels at the TV until you determine the best option, find your choice on pages 9-13. Before you do not connect the DVD Player to a VCR, then connect the VCR to the TV. Never make or change connections with equipment connected to the correct Video In channel....
User manual, English (US)
Page 9
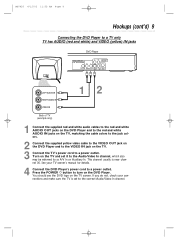
... VIDEO IN 1 2 Back of TV (example only) 1 Connect the supplied red and white audio cables to the red and white AUDIO OUT jacks on the DVD Player and to the red and white AUDIO IN jacks on the TV, matching the cable colors to the jack colors. 2 Connect the supplied yellow video... the POWER y button to a power outlet. Turn on the TV screen. If you do not, check your TV owner's manual for details. 4 Connect the DVD Player's power cord to as A/V In or Auxiliary In. This channel usually is set it to the Audio/Video In channel, which also may be referred ...
... VIDEO IN 1 2 Back of TV (example only) 1 Connect the supplied red and white audio cables to the red and white AUDIO OUT jacks on the DVD Player and to the red and white AUDIO IN jacks on the TV, matching the cable colors to the jack colors. 2 Connect the supplied yellow video... the POWER y button to a power outlet. Turn on the TV screen. If you do not, check your TV owner's manual for details. 4 Connect the DVD Player's power cord to as A/V In or Auxiliary In. This channel usually is set it to the Audio/Video In channel, which also may be referred ...

User manual, English (US)
Page 10
... S-VIDEO IN Back of TV (example only) 1 Connect the supplied red and white audio cables to the red and white AUDIO OUT jacks on the DVD Player and to the red and white AUDIO IN jacks on the TV, matching the cable colors to the jack colors. 2 Connect an S-Video cable (not... supplied) to the S-VIDEO OUT jack on the DVD Player and to the S-VIDEO IN jack on the TV screen. Press the POWER y button to turn on the TV and set it to the S-VIDEO...
... S-VIDEO IN Back of TV (example only) 1 Connect the supplied red and white audio cables to the red and white AUDIO OUT jacks on the DVD Player and to the red and white AUDIO IN jacks on the TV, matching the cable colors to the jack colors. 2 Connect an S-Video cable (not... supplied) to the S-VIDEO OUT jack on the DVD Player and to the S-VIDEO IN jack on the TV screen. Press the POWER y button to turn on the TV and set it to the S-VIDEO...

User manual, English (US)
Page 11
... 2 VIDEO 1 L/MONO AUDIO R VIDEO IN Back of TV (example only) 1 Connect a coaxial digital audio cable (not supplied) to the COAXIAL jack on the DVD Player and to the COAXIAL DIGITAL AUDIO IN jack on the Stereo. 2 Connect the supplied yellow video cable to the yellow VIDEO OUT jack on page... 39. See pages 10 and 12 for details. 5 Connect the DVD Player's power cord to ON. See your TV. Details are on the DVD Player and to a Dolby Digital-compatible Stereo. Details are on your Stereo owner's manual for details. 4 Plug in a 5.1...
... 2 VIDEO 1 L/MONO AUDIO R VIDEO IN Back of TV (example only) 1 Connect a coaxial digital audio cable (not supplied) to the COAXIAL jack on the DVD Player and to the COAXIAL DIGITAL AUDIO IN jack on the Stereo. 2 Connect the supplied yellow video cable to the yellow VIDEO OUT jack on page... 39. See pages 10 and 12 for details. 5 Connect the DVD Player's power cord to ON. See your TV. Details are on the DVD Player and to a Dolby Digital-compatible Stereo. Details are on your Stereo owner's manual for details. 4 Plug in a 5.1...
User manual, English (US)
Page 12
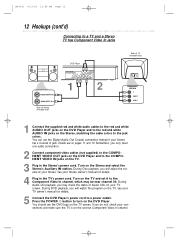
... channel. If you only need one audio connection. 2 Connect component video cables (not supplied) to the COMPONENT VIDEO OUT jacks on the DVD Player and to the COMPONENT VIDEO IN jacks on the Stereo and select the Stereo's Auxiliary IN station. See your TV owner's manual for details...(cont'd) Connecting to a TV and a Stereo TV has Component Video In Jacks AUDIO (RIGHT) IN AUDIO (LEFT) IN Back of Stereo (example only) DVD Player DIGITAL AUDIO OUT PCM / MULTICHANNEL R L Y Cr COMPONENT VIDEO OUT COAXIAL AUDIO OUT VIDEO OUT Cb S-VIDEO OUT 1 2 Back of Audio CDs on the...
... channel. If you only need one audio connection. 2 Connect component video cables (not supplied) to the COMPONENT VIDEO OUT jacks on the DVD Player and to the COMPONENT VIDEO IN jacks on the Stereo and select the Stereo's Auxiliary IN station. See your TV owner's manual for details...(cont'd) Connecting to a TV and a Stereo TV has Component Video In Jacks AUDIO (RIGHT) IN AUDIO (LEFT) IN Back of Stereo (example only) DVD Player DIGITAL AUDIO OUT PCM / MULTICHANNEL R L Y Cr COMPONENT VIDEO OUT COAXIAL AUDIO OUT VIDEO OUT Cb S-VIDEO OUT 1 2 Back of Audio CDs on the...

User manual, English (US)
Page 13
... the COAXIAL DIGITAL AUDIO IN jack on the Stereo. 2 Connect the supplied yellow video cable to the yellow VIDEO OUT jack on the DVD Player and to turn on the DVD Player. See pages 10 and 12 for details. 4 Plug in the TV's power cord. During Audio CD playback, you may use S-Video ..., you cannot copy the Disc in digital sound using a Mini-Disc or Digital Audio Tape Deck. 1 COAXIAL DIGITAL AUDIO IN Back of Stereo (example only) DVD Player DIGITAL AUDIO OUT PCM / MULTICHANNEL R L Y Cr COMPONENT VIDEO OUT COAXIAL AUDIO OUT VIDEO Cb OUT S-VIDEO OUT 2 Back of the Disc on your TV....
... the COAXIAL DIGITAL AUDIO IN jack on the Stereo. 2 Connect the supplied yellow video cable to the yellow VIDEO OUT jack on the DVD Player and to turn on the DVD Player. See pages 10 and 12 for details. 4 Plug in the TV's power cord. During Audio CD playback, you may use S-Video ..., you cannot copy the Disc in digital sound using a Mini-Disc or Digital Audio Tape Deck. 1 COAXIAL DIGITAL AUDIO IN Back of Stereo (example only) DVD Player DIGITAL AUDIO OUT PCM / MULTICHANNEL R L Y Cr COMPONENT VIDEO OUT COAXIAL AUDIO OUT VIDEO Cb OUT S-VIDEO OUT 2 Back of the Disc on your TV....

User manual, English (US)
Page 14
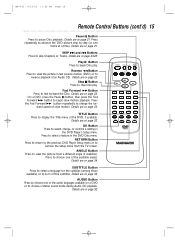
... remove the Search display, which allows you select. P-ON or P-OFF appears briefly on and off. Number Buttons Press to access or remove the DVD Player's Setup menu. Details are on page 38. SETUP Button When Disc playback is stopped, press to repeat playback of the current Disc or Track (...to erase incorrect information when setting up features. CLEAR Button Press to remove the status display. MENU Button Press to select an item in the DVD Player's Setup menu or in the Disc menu. Arrow Buttons Press to display the Disc menu. Details are on page 35. Details are on ...
... remove the Search display, which allows you select. P-ON or P-OFF appears briefly on and off. Number Buttons Press to access or remove the DVD Player's Setup menu. Details are on page 38. SETUP Button When Disc playback is stopped, press to repeat playback of the current Disc or Track (...to erase incorrect information when setting up features. CLEAR Button Press to remove the status display. MENU Button Press to select an item in the DVD Player's Setup menu or in the Disc menu. Arrow Buttons Press to display the Disc menu. Details are on page 35. Details are on ...
User manual, English (US)
Page 15
...press the Fast Forward g button to change , or confirm a setting in the DVD Player's Setup menu. Details are on page 23. Fast Forward gButton Press to skip Chapters... OK SETUP RETURN MARKER Press repeatedly to begin slow motion playback. Play B Button Press to advance the DVD picture step by step (or one of the available angles. ward speed of the audio languages available on...to view the picture in fast reverse motion (DVD) or to view the picture from the TV screen. RETURN Button Press to return to the previous DVD Player Setup menu or to display the Title menu of...
...press the Fast Forward g button to change , or confirm a setting in the DVD Player's Setup menu. Details are on page 23. Fast Forward gButton Press to skip Chapters... OK SETUP RETURN MARKER Press repeatedly to begin slow motion playback. Play B Button Press to advance the DVD picture step by step (or one of the available angles. ward speed of the audio languages available on...to view the picture in fast reverse motion (DVD) or to view the picture from the TV screen. RETURN Button Press to return to the previous DVD Player Setup menu or to display the Title menu of...
User manual, English (US)
Page 16
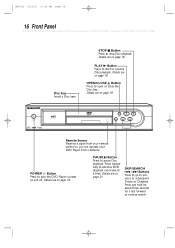
... are on page 19. P3 MP3 CD PLAYBACK OPEN/CLOSE H G SKIP/SEARCH Remote Sensor Receives a signal from your remote control so you can operate your DVD Player from a distance. Press repeatedly to start or resume Disc playback. Details are on and off. MDV435 4/12/02 11:55 AM Page 16 16 Front... Panel Disc tray Insert a Disc here. PLAY B Button Press to advance DVD playback one frame at a time. POWER y Button Press to turn the DVD Player's power on page 21. SKIP/SEARCH j / G Buttons Press to go to open or close the Disc tray. Details are...
... are on page 19. P3 MP3 CD PLAYBACK OPEN/CLOSE H G SKIP/SEARCH Remote Sensor Receives a signal from your remote control so you can operate your DVD Player from a distance. Press repeatedly to start or resume Disc playback. Details are on and off. MDV435 4/12/02 11:55 AM Page 16 16 Front... Panel Disc tray Insert a Disc here. PLAY B Button Press to advance DVD playback one frame at a time. POWER y Button Press to turn the DVD Player's power on page 21. SKIP/SEARCH j / G Buttons Press to go to open or close the Disc tray. Details are...
User manual, English (US)
Page 17
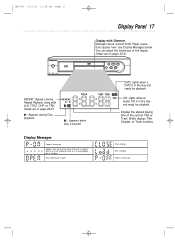
... elapsed playing time of the display. Details are on pages 26-27. Details are on . B: Appears during Repeat Playback, along with Dimmer Messages about current DVD Player operations appear here. DVD: Lights when a DVD is turning on pages 40-41.
... elapsed playing time of the display. Details are on pages 26-27. Details are on . B: Appears during Repeat Playback, along with Dimmer Messages about current DVD Player operations appear here. DVD: Lights when a DVD is turning on pages 40-41.
User manual, English (US)
Page 18
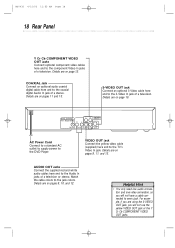
... OUT Cb S-VIDEO OUT AC Power Cord Connect to a standard AC outlet to supply power to the jack colors. Match the cable colors to the DVD Player. Details are using the S-VIDEO OUT jack, you will not have a cable connected to the TV's Video In jack. For example, if you will not...
... OUT Cb S-VIDEO OUT AC Power Cord Connect to a standard AC outlet to supply power to the jack colors. Match the cable colors to the DVD Player. Details are using the S-VIDEO OUT jack, you will not have a cable connected to the TV's Video In jack. For example, if you will not...

User manual, English (US)
Page 19
...remove the Disc and turn off the DVD Player. Clean the Disc, then turn on the DVD Player again and reinsert the Disc for details. This is not available on the Disc, or the DVD Player can not access the feature at this DVD Player will not begin , turn on the DVD Player. Details are set to the second ...Disc in the top right corner of the TV screen when you try a feature. Helpful Hints • An "X" may appear in the tray with the DVD Player. • If a Disc is sitting properly in the recessed groove of the TV, stereo, and any other equipment connected to play only certain Discs....
...remove the Disc and turn off the DVD Player. Clean the Disc, then turn on the DVD Player again and reinsert the Disc for details. This is not available on the Disc, or the DVD Player can not access the feature at this DVD Player will not begin , turn on the DVD Player. Details are set to the second ...Disc in the top right corner of the TV screen when you try a feature. Helpful Hints • An "X" may appear in the tray with the DVD Player. • If a Disc is sitting properly in the recessed groove of the TV, stereo, and any other equipment connected to play only certain Discs....
User manual, English (US)
Page 21
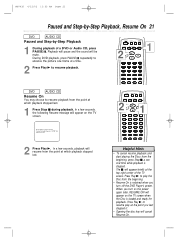
...ready for playback. Press Play B to play at the top right corner of a DVD or Audio CD, press PAUSE F. To play from the beginning, press Stop C a second time while playback is retained when you turn off the DVD Player's power. MDV435 4/12/02 11:55 AM Page 21 Paused and Step-by-Step... Playback, Resume On 21 DVD AUDIO CD Paused and Step-by-Step Playback 1 During playback of the TV screen. Helpful Hints...
...ready for playback. Press Play B to play at the top right corner of a DVD or Audio CD, press PAUSE F. To play from the beginning, press Stop C a second time while playback is retained when you turn off the DVD Player's power. MDV435 4/12/02 11:55 AM Page 21 Paused and Step-by-Step... Playback, Resume On 21 DVD AUDIO CD Paused and Step-by-Step Playback 1 During playback of the TV screen. Helpful Hints...

User manual, English (US)
Page 25
...REPEAT A-B OPEN/ CLOSE DISPLAY SKIP PAUSE 2-3 2 1 2 4 5 7 8 CLEAR 0 MENU AUDIO 3 SUBTITLE 6 ANGLE 9 SEARCH MODE +10 TITLE MODE ZOOM OK SETUP RETURN MARKER 1 DVD AUDIO CD Specific Time Playback 1 During playback, press SEARCH MODE repeatedly so the Time Search display appears on the TV screen. 2 Within 30 seconds, press... +10 TITLE MODE ZOOM OK SETUP RETURN MARKER 1 2 Within 30 seconds, use the Number buttons to enter the Chapter number. The DVD Player will begin playback at which you enter is selected and within the total time of the current Chapter.
...REPEAT A-B OPEN/ CLOSE DISPLAY SKIP PAUSE 2-3 2 1 2 4 5 7 8 CLEAR 0 MENU AUDIO 3 SUBTITLE 6 ANGLE 9 SEARCH MODE +10 TITLE MODE ZOOM OK SETUP RETURN MARKER 1 DVD AUDIO CD Specific Time Playback 1 During playback, press SEARCH MODE repeatedly so the Time Search display appears on the TV screen. 2 Within 30 seconds, press... +10 TITLE MODE ZOOM OK SETUP RETURN MARKER 1 2 Within 30 seconds, use the Number buttons to enter the Chapter number. The DVD Player will begin playback at which you enter is selected and within the total time of the current Chapter.

User manual, English (US)
Page 27
The DVD Player will automatically set the starting point (A). The segment will automatically set the ...and let you make a mistake, press CLEAR. Helpful Hints • A-B Repeat playback is not available with some DVDs. • With DVDs, the entire A-B repeat section must be within a single Title. Follow these steps to set up the section that...a section of the Title is reached. • With Audio CDs, the A-B repeat section must be within a single Track. The DVD Player will play . REPEAT [OFF] will begin . 2 Press A-B REPEAT to the point at the end of the Track if you...
The DVD Player will automatically set the starting point (A). The segment will automatically set the ...and let you make a mistake, press CLEAR. Helpful Hints • A-B Repeat playback is not available with some DVDs. • With DVDs, the entire A-B repeat section must be within a single Title. Follow these steps to set up the section that...a section of the Title is reached. • With Audio CDs, the A-B repeat section must be within a single Track. The DVD Player will play . REPEAT [OFF] will begin . 2 Press A-B REPEAT to the point at the end of the Track if you...


