User manual, English (US)
Page 1
IF YOU HAVE READ YOUR INSTRUCTIONS AND STILL NEED ASSISTANCE, YOU MAY ACCESS OUR ONLINE HELP AT WWW.MAGNAVOX.COM/SUPPORT OR CALL 1-800-605-8610 WHILE WITH YOUR PRODUCT. Editing Function Setup Others Español NEED HELP FAST? INSTRUCCIONES EN... ESPAÑOL INCLUIDAS. © 2010 Funai Electric Co., Ltd. READ YOUR QUICK GUIDE AND/OR OWNER'S MANUAL FIRST FOR QUICK TIPS THAT MAKE USING YOUR MAGNAVOX PRODUCT MORE ENJOYABLE. Introduction Connections Basic Setup Recording Playback Owner's Manual MDR513H / F7 HDD & DVD PLAYER / RECORDER WITH DIGITAL TUNER THANK YOU FOR CHOOSING...
IF YOU HAVE READ YOUR INSTRUCTIONS AND STILL NEED ASSISTANCE, YOU MAY ACCESS OUR ONLINE HELP AT WWW.MAGNAVOX.COM/SUPPORT OR CALL 1-800-605-8610 WHILE WITH YOUR PRODUCT. Editing Function Setup Others Español NEED HELP FAST? INSTRUCCIONES EN... ESPAÑOL INCLUIDAS. © 2010 Funai Electric Co., Ltd. READ YOUR QUICK GUIDE AND/OR OWNER'S MANUAL FIRST FOR QUICK TIPS THAT MAKE USING YOUR MAGNAVOX PRODUCT MORE ENJOYABLE. Introduction Connections Basic Setup Recording Playback Owner's Manual MDR513H / F7 HDD & DVD PLAYER / RECORDER WITH DIGITAL TUNER THANK YOU FOR CHOOSING...

User manual, English (US)
Page 2
... specified by the manufacturer. 12. The symbol for future reference. Follow all servicing to the presence of important operating and maintenance (servicing) instructions in the manual. Install in use. Refer all instructions. 5. This Class B digital apparatus complies with dry cloth. 7. Disconnect the mains plug to shut off and on, the user...
... specified by the manufacturer. 12. The symbol for future reference. Follow all servicing to the presence of important operating and maintenance (servicing) instructions in the manual. Install in use. Refer all instructions. 5. This Class B digital apparatus complies with dry cloth. 7. Disconnect the mains plug to shut off and on, the user...
User manual, English (US)
Page 4
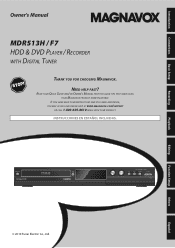
... a digital camera (including built-in camera of cellular phone). RF coaxial cable (WPZ0901TM002 / WPZ0901TM005) RCA audio/video cables (WPZ0102TM018/WPZ0102LTE01) owner's manual (EN/FR) (1VMN29193/1VMN29194) quick guide (EN/FR) (1VMN29195) Maintenance Servicing • Please refer to remote control, press and hold a button... on pages 114-118 before returning the product. • If this owner's manual, the laser optical pickup unit may be dirty. Cleaning the disc lens • If this unit still does not perform properly although...
... a digital camera (including built-in camera of cellular phone). RF coaxial cable (WPZ0901TM002 / WPZ0901TM005) RCA audio/video cables (WPZ0102TM018/WPZ0102LTE01) owner's manual (EN/FR) (1VMN29193/1VMN29194) quick guide (EN/FR) (1VMN29195) Maintenance Servicing • Please refer to remote control, press and hold a button... on pages 114-118 before returning the product. • If this owner's manual, the laser optical pickup unit may be dirty. Cleaning the disc lens • If this unit still does not perform properly although...
User manual, English (US)
Page 5
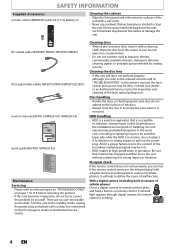
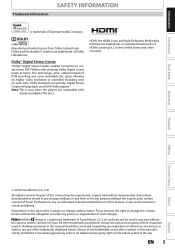
...Note: This is strictly prohibited. Information in any of the trademarks displayed herein. EN 5 Español No part of this manual is subject to change the content herein without the express written consent of Funai. with stunning Dolby Digital sound tracks at home. Misuse... of any trademarks or any way without the obligation to notify any storage medium, in this manual should be reproduced, copied, transmitted, disseminated, transcribed, downloaded or stored in any person or organization of such changes. HDMI, the HDMI...
...Note: This is strictly prohibited. Information in any of the trademarks displayed herein. EN 5 Español No part of this manual is subject to change the content herein without the express written consent of Funai. with stunning Dolby Digital sound tracks at home. Misuse... of any trademarks or any way without the obligation to notify any storage medium, in this manual should be reproduced, copied, transmitted, disseminated, transcribed, downloaded or stored in any person or organization of such changes. HDMI, the HDMI...
User manual, English (US)
Page 6
CONTENTS Introduction SAFETY INFORMATION 2 FEATURES 8 Symbols Used in this Owner's Manual 9 FUNCTIONAL OVERVIEW 10 Front Panel 10 Rear Panel 11 Remote Control 12 Front Panel Display 14 Connections CONNECTION 15 Antenna Connection (Required 15 Overview 15 ... Insert a Disc 27 INITIAL SETTING 28 CHANNEL SETTING 29 Auto Channel Scan 29 Adding / Deleting Channels 30 SETTING THE CLOCK 32 Auto Clock Setting 32 Manual Clock Setting 34 Daylight Saving Time 34 TUNER SETTINGS 35 Switching Analog Mode / Digital Mode 35 Channel Selection 35 Selecting TV Audio 36 DTV Closed...
CONTENTS Introduction SAFETY INFORMATION 2 FEATURES 8 Symbols Used in this Owner's Manual 9 FUNCTIONAL OVERVIEW 10 Front Panel 10 Rear Panel 11 Remote Control 12 Front Panel Display 14 Connections CONNECTION 15 Antenna Connection (Required 15 Overview 15 ... Insert a Disc 27 INITIAL SETTING 28 CHANNEL SETTING 29 Auto Channel Scan 29 Adding / Deleting Channels 30 SETTING THE CLOCK 32 Auto Clock Setting 32 Manual Clock Setting 34 Daylight Saving Time 34 TUNER SETTINGS 35 Switching Analog Mode / Digital Mode 35 Channel Selection 35 Selecting TV Audio 36 DTV Closed...
User manual, English (US)
Page 9
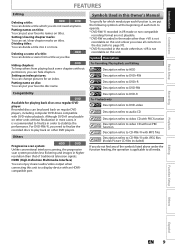
... DVD Unlike conventional interlace scanning, the progressive scan system provides less flickering and images in higher resolution than +VR is not recordable on this Owner's Manual To specify for playing back discs on a regular DVD player: Recorded discs can be played back on titles. Setting / clearing chapter marks: You can set...
... DVD Unlike conventional interlace scanning, the progressive scan system provides less flickering and images in higher resolution than +VR is not recordable on this Owner's Manual To specify for playing back discs on a regular DVD player: Recorded discs can be played back on titles. Setting / clearing chapter marks: You can set...
User manual, English (US)
Page 22
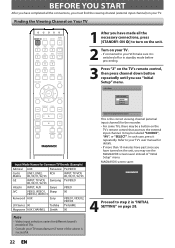
... This is the correct viewing channel (external input channel) for the recorder. • For some TVs, there may be labeled "SOURCE", "AV", or "SELECT". MAGNAVOX screen saver: 4 Proceed to step 2 in standby mode before proceeding. 3 Press "2" on the unit, you may be a button on page 28. Finding the ... the necessary connections, press [STANDBY-ON y] to turn on the unit. 2 Turn on your TV. • If connected to your TV's user manual for different brand's models of the above is switched off or in "INITIAL SETTING" on the TV's remote control that accesses the external input channel...
... This is the correct viewing channel (external input channel) for the recorder. • For some TVs, there may be labeled "SOURCE", "AV", or "SELECT". MAGNAVOX screen saver: 4 Proceed to step 2 in standby mode before proceeding. 3 Press "2" on the unit, you may be a button on page 28. Finding the ... the necessary connections, press [STANDBY-ON y] to turn on the unit. 2 Turn on your TV. • If connected to your TV's user manual for different brand's models of the above is switched off or in "INITIAL SETTING" on the TV's remote control that accesses the external input channel...
User manual, English (US)
Page 28
... / Digital) RAPID PLAY D.DUBBING TIMER HDD DVD REC MODE REC Auto Preset will be performed and the correct clock will start getting channels available in "Manual Clock Setting" on this unit for the first time. Antenna: (When using basic cable) The channels broadcasted in the area will scan all terrestrial channels...
... / Digital) RAPID PLAY D.DUBBING TIMER HDD DVD REC MODE REC Auto Preset will be performed and the correct clock will start getting channels available in "Manual Clock Setting" on this unit for the first time. Antenna: (When using basic cable) The channels broadcasted in the area will scan all terrestrial channels...
User manual, English (US)
Page 30
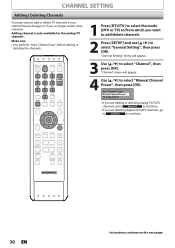
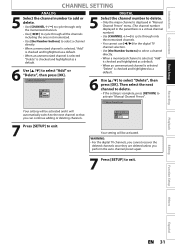
... sure • You perform "Auto Channel Scan" before adding or deleting the channels. "General Setting" menu will appear. 4 Use [K / L] to select "Manual Channel Preset", then press [OK]. Auto Channel Preset Manual Channel Preset TV Audio Select • If you are adding or deleting analog TV/CATV channels, go to ANALOG to continue...
... sure • You perform "Auto Channel Scan" before adding or deleting the channels. "General Setting" menu will appear. 4 Use [K / L] to select "Manual Channel Preset", then press [OK]. Auto Channel Preset Manual Channel Preset TV Audio Select • If you are adding or deleting analog TV/CATV channels, go to ANALOG to continue...
User manual, English (US)
Page 31
...When a memorized channel is selected, "Add" is checked and highlighted as a default. 6 Use [K / L] to select "Add" or "Delete", then press [OK]. Manual Channel Preset CH 2 Add Delete DIGITAL 5 Select the channel number to delete. • Only the major channel is displayed in...; When an unmemorized channel is selected "Delete" is checked and highlighted as a default. 6 Use [K / L] to select "Delete", then press [OK]. Manual Channel Preset Your setting will automatically switch to the next channel so that you perform the auto channel preset again. 7 Press [SETUP] to exit. Recording...
...When a memorized channel is selected, "Add" is checked and highlighted as a default. 6 Use [K / L] to select "Add" or "Delete", then press [OK]. Manual Channel Preset CH 2 Add Delete DIGITAL 5 Select the channel number to delete. • Only the major channel is displayed in...; When an unmemorized channel is selected "Delete" is checked and highlighted as a default. 6 Use [K / L] to select "Delete", then press [OK]. Manual Channel Preset Your setting will automatically switch to the next channel so that you perform the auto channel preset again. 7 Press [SETUP] to exit. Recording...
User manual, English (US)
Page 32
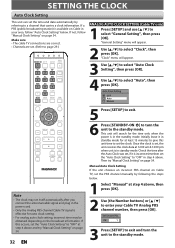
... to set , the unit receives the clock data at step 4 above, then press [OK]. 2 Use [the Number buttons] or [K / L] to enter your area, follow "Manual Clock Setting" on page 34. "Clock" menu will appear. 3 Use [K / L] to select "Auto Clock Setting", then press [OK]. 4 Use [K / L] to the ... • The cable TV connections are correct. • Channels are set. (Refer to a channel that carries a clock information. Auto Clock Setting OFF Auto Manual 5 Press [SETUP] to exit. 6 Press [STANDBY-ON y] to turn the unit to select "Clock", then press [OK]. SETTING THE CLOCK Auto Clock Setting...
... to set , the unit receives the clock data at step 4 above, then press [OK]. 2 Use [the Number buttons] or [K / L] to enter your area, follow "Manual Clock Setting" on page 34. "Clock" menu will appear. 3 Use [K / L] to select "Auto Clock Setting", then press [OK]. 4 Use [K / L] to the ... • The cable TV connections are correct. • Channels are set. (Refer to a channel that carries a clock information. Auto Clock Setting OFF Auto Manual 5 Press [SETUP] to exit. 6 Press [STANDBY-ON y] to turn the unit to select "Clock", then press [OK]. SETTING THE CLOCK Auto Clock Setting...
User manual, English (US)
Page 33
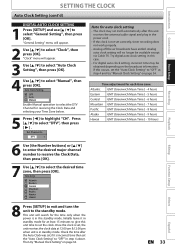
...Press [SETUP] and use [K / L] to select "DTV", then press [ B] . Once the clock is set, the unit receives the clock data at step 4 and try "Manual Clock Setting" on the broadcast information. EN 33 Press [K / L] to select "General Setting", then press [OK]. DTV 1 6 Use [the Number buttons] or [K / L]..., set the clock. If this unit receives the antenna/cable signal and plug in step 4 above. Auto Clock Setting OFF Auto Manual Enable Manual operation to select the DTV Channel for auto clock setting • The clock may be available except via Cable TV. Time Zone ...
...Press [SETUP] and use [K / L] to select "DTV", then press [ B] . Once the clock is set, the unit receives the clock data at step 4 and try "Manual Clock Setting" on the broadcast information. EN 33 Press [K / L] to select "General Setting", then press [OK]. DTV 1 6 Use [the Number buttons] or [K / L]..., set the clock. If this unit receives the antenna/cable signal and plug in step 4 above. Auto Clock Setting OFF Auto Manual Enable Manual operation to select the DTV Channel for auto clock setting • The clock may be available except via Cable TV. Time Zone ...
User manual, English (US)
Page 34
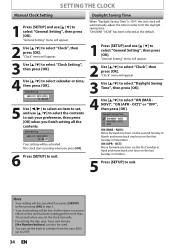
... to select "General Setting", then press [OK]. Clock Setting JAN / 01 / 2010 ( FRI ) 12 : 00 AM 5 Use [{ / B] to select an item to set the clock manually. • For setting the day, year, hour, and minute, [the Number buttons] can set the built-in order to exit. Daylight Saving Time When "Daylight... Sunday in April and move back one hour on the first Sunday in October. 5 Press [SETUP] to fit the daylight saving time. SETTING THE CLOCK Manual Clock Setting 1 Press [SETUP] and use [K / L] to exit. "ON (MAR - NOV): Move forward one hour on the second Sunday in March and move back ...
... to select "General Setting", then press [OK]. Clock Setting JAN / 01 / 2010 ( FRI ) 12 : 00 AM 5 Use [{ / B] to select an item to set the clock manually. • For setting the day, year, hour, and minute, [the Number buttons] can set the built-in order to exit. Daylight Saving Time When "Daylight... Sunday in April and move back one hour on the first Sunday in October. 5 Press [SETUP] to fit the daylight saving time. SETTING THE CLOCK Manual Clock Setting 1 Press [SETUP] and use [K / L] to exit. "ON (MAR - NOV): Move forward one hour on the second Sunday in March and move back ...
User manual, English (US)
Page 35
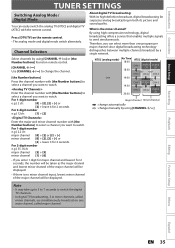
... its picture and sound quality. Channel Selection Select channels by using [CHANNEL / ] or [the Number buttons] found on remote control. [CHANNEL / ] Use [CHANNEL / ] to change manually by a single network. Enter the channel number with the remote control. Therefore, you can easily switch the analog TV (NTSC) and digital TV (ATSC) with...
... its picture and sound quality. Channel Selection Select channels by using [CHANNEL / ] or [the Number buttons] found on remote control. [CHANNEL / ] Use [CHANNEL / ] to change manually by a single network. Enter the channel number with the remote control. Therefore, you can easily switch the analog TV (NTSC) and digital TV (ATSC) with...
User manual, English (US)
Page 46
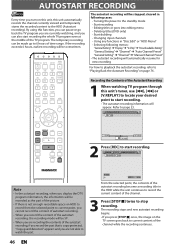
... in following menus: "General Setting" ➔ "Display" ➔ "V-Chip" ➔ "Downloadable Rating" "General Setting" ➔ "Channel" ➔ "Auto Channel Preset" "General Setting" ➔ "Channel" ➔ "Manual Channel Preset" • The autostart recording will appear. Changing input channels - GHI JKL MNO CHANNEL PQRS TUV WXYZ SPACE CLEAR SETUP AUDIO REPEAT HDMI DISC...
... in following menus: "General Setting" ➔ "Display" ➔ "V-Chip" ➔ "Downloadable Rating" "General Setting" ➔ "Channel" ➔ "Auto Channel Preset" "General Setting" ➔ "Channel" ➔ "Manual Channel Preset" • The autostart recording will appear. Changing input channels - GHI JKL MNO CHANNEL PQRS TUV WXYZ SPACE CLEAR SETUP AUDIO REPEAT HDMI DISC...
User manual, English (US)
Page 47
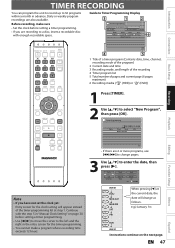
... enough recordable space. Date FEB/05 CH DTV69. 1 Start - - : - Daily or weekly program recordings are recording to a disc, insert a recordable disc with the step 5 in "Manual Clock Setting" on the next page. Introduction TIMER RECORDING You can program the unit to record up to 36 programs within a month in the entry...
... enough recordable space. Date FEB/05 CH DTV69. 1 Start - - : - Daily or weekly program recordings are recording to a disc, insert a recordable disc with the step 5 in "Manual Clock Setting" on the next page. Introduction TIMER RECORDING You can program the unit to record up to 36 programs within a month in the entry...

User manual, English (US)
Page 102
... Page 43 OFF Clock Clock Setting Pages 32-34 Auto Clock Setting OFF Daylight Saving Time Auto Manual ON(MAR-NOV) ON(APR-OCT) OFF Channel Pages 29-31 HDMI Page 112 Auto Channel Preset Manual Channel Preset TV Audio Select Page 37 Format HDMI Audio RGB Range HDMI Control Antenna Cable... ON OFF Reset All Page 113 Yes No Contents To set to output the HDMI audio signal or not. Set the clock. Tune the channels manually. Set to prohibiting additional recording (OFF) or to the default setting. Set to replace the title list after recording (ON). Set to the progressive scan...
... Page 43 OFF Clock Clock Setting Pages 32-34 Auto Clock Setting OFF Daylight Saving Time Auto Manual ON(MAR-NOV) ON(APR-OCT) OFF Channel Pages 29-31 HDMI Page 112 Auto Channel Preset Manual Channel Preset TV Audio Select Page 37 Format HDMI Audio RGB Range HDMI Control Antenna Cable... ON OFF Reset All Page 113 Yes No Contents To set to output the HDMI audio signal or not. Set the clock. Tune the channels manually. Set to prohibiting additional recording (OFF) or to the default setting. Set to replace the title list after recording (ON). Set to the progressive scan...
User manual, English (US)
Page 114
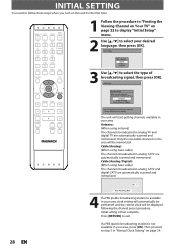
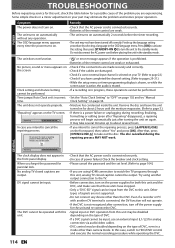
The OSD language menu appears every time the power turns on page 102 and try "Manual time. Press [OK] to activate the setting, then press [STANDBY-ON y] to the TV. Clock setting and channel setting cannot be performed. • If a recording ...
The OSD language menu appears every time the power turns on page 102 and try "Manual time. Press [OK] to activate the setting, then press [STANDBY-ON y] to the TV. Clock setting and channel setting cannot be performed. • If a recording ...
User manual, English (US)
Page 116
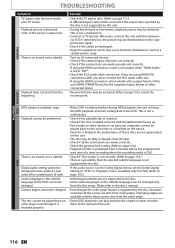
Color of the unit. If you are damaged. • Keep the equipment which may be distorted. Refer to page 72 to the disc's manual. • Even though the multi-angle feature is supported by the disc, that the selected subtitle language is not a malfunction. • Connect to the DVD. ... you must connect the RCA audio cable, too. • If using the HDMI connection, sound is not output when "HDMI Audio" is set to the manual of the picture is no sound, or no subtitle. Playback does not start time of other connected device. • Resume function may be played back...
Color of the unit. If you are damaged. • Keep the equipment which may be distorted. Refer to page 72 to the disc's manual. • Even though the multi-angle feature is supported by the disc, that the selected subtitle language is not a malfunction. • Connect to the DVD. ... you must connect the RCA audio cable, too. • If using the HDMI connection, sound is not output when "HDMI Audio" is set to the manual of the picture is no sound, or no subtitle. Playback does not start time of other connected device. • Resume function may be played back...


