User manual, English (US)
Page 8
...process is cancelled halfway This feature is selected as you set before attempting to the HDD. Dubbing With this unit automatically records the channel currently viewed and temporarily stores the recorded content to record. Auto recording mode dubbing: When dubbing, if you prefer. Playback HDD ...the titles will be increased by title, chapter or time. Recording This unit allows you turn on a DVD - Automatic title list making: The unit makes a title list with one -touch timer recording. If there is specified in "Playback" menu in the main menu. Not available for timer...
...process is cancelled halfway This feature is selected as you set before attempting to the HDD. Dubbing With this unit automatically records the channel currently viewed and temporarily stores the recorded content to record. Auto recording mode dubbing: When dubbing, if you prefer. Playback HDD ...the titles will be increased by title, chapter or time. Recording This unit allows you turn on a DVD - Automatic title list making: The unit makes a title list with one -touch timer recording. If there is specified in "Playback" menu in the main menu. Not available for timer...
User manual, English (US)
Page 13
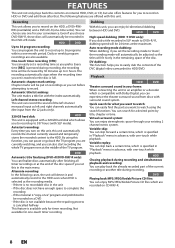
...to fast reverse the playback. • When playback is in pause, press repeatedly to exit from the title list. 31. CHANNEL / buttons • Press to confirm the major / minor channel selection made by step. 11. HDMI button • Press to the previously displayed menu screen. 26. ...keeping the sound output. 15. Confirm ( • ) button Analog mode: • Press to display the timer programming list. 17. TIMER button • Press to confirm the channel selection made by [the Number buttons]. 5. HDD button • Press to the standby mode. (To completely shut down...
...to fast reverse the playback. • When playback is in pause, press repeatedly to exit from the title list. 31. CHANNEL / buttons • Press to confirm the major / minor channel selection made by step. 11. HDMI button • Press to the previously displayed menu screen. 26. ...keeping the sound output. 15. Confirm ( • ) button Analog mode: • Press to display the timer programming list. 17. TIMER button • Press to confirm the channel selection made by [the Number buttons]. 5. HDD button • Press to the standby mode. (To completely shut down...
User manual, English (US)
Page 25
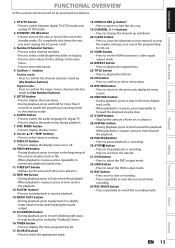
...is available only when a recordable disc is inserted into the unit. 1 General Setting 2 Playback 3 Display 4 Video Recording 5 Clock 26 Channel HDMI 37 Reset All 48 Parental Lock Disc Audio Disc Menu Language Audio Language Subtitle Language Angle Icon Still Mode Variable Skip / Replay General... Setting Menu 1. Timer Programming: To program a timer recording. 3. Title List: To call up the HDMI connection setting. 8. Clock: To set up the title list. 4. Channel: To adjust the channel setting of the unit as you prefer. 7. Reset All: To reset the setting to...
...is available only when a recordable disc is inserted into the unit. 1 General Setting 2 Playback 3 Display 4 Video Recording 5 Clock 26 Channel HDMI 37 Reset All 48 Parental Lock Disc Audio Disc Menu Language Audio Language Subtitle Language Angle Icon Still Mode Variable Skip / Replay General... Setting Menu 1. Timer Programming: To program a timer recording. 3. Title List: To call up the HDMI connection setting. 8. Clock: To set up the title list. 4. Channel: To adjust the channel setting of the unit as you prefer. 7. Reset All: To reset the setting to...
User manual, English (US)
Page 27
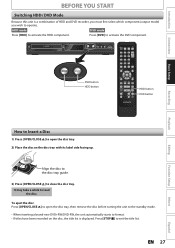
...inserting a brand-new DVD+RW/DVD-RW, the unit automatically starts to open the disc tray. 2) Place the disc on the disc, the title list is a combination of HDD and DVD recorder, you must first select which component (output mode) you wish to load the disc. Align the disc ...to the disc tray guide. 3) Press [OPEN/CLOSE A] to exit the title list. DVD button HDD button OPEN/ STANDBY-ON DTV/TV SOURCE CLOSE .@/: ABC DEF GHI JKL MNO CHANNEL PQRS TUV WXYZ SPACE CLEAR SETUP AUDIO REPEAT HDMI DISC MENU TITLE OK DISPLAY RETURN V.REPLAY V.SKIP...
...inserting a brand-new DVD+RW/DVD-RW, the unit automatically starts to open the disc tray. 2) Place the disc on the disc, the title list is a combination of HDD and DVD recorder, you must first select which component (output mode) you wish to load the disc. Align the disc ...to the disc tray guide. 3) Press [OPEN/CLOSE A] to exit the title list. DVD button HDD button OPEN/ STANDBY-ON DTV/TV SOURCE CLOSE .@/: ABC DEF GHI JKL MNO CHANNEL PQRS TUV WXYZ SPACE CLEAR SETUP AUDIO REPEAT HDMI DISC MENU TITLE OK DISPLAY RETURN V.REPLAY V.SKIP...
User manual, English (US)
Page 44
... [REC MODE] repeatedly to record. Press [DTV/TV] to select analog TV or digital TV, then use [CHANNEL / ] or [the Number buttons] and [ • ] (for the list of compatible discs.) It may take a while to load the disc. • When inserting a brand-new DVD+RW/DVDRW, the unit automatically... starts to "Switching Analog Mode/Digital Mode" and "Channel Selection" on the disc, the title list is displayed. Refer to format. (Except when HDD is recording, or when there is compatible with this unit. (Refer to page...
... [REC MODE] repeatedly to record. Press [DTV/TV] to select analog TV or digital TV, then use [CHANNEL / ] or [the Number buttons] and [ • ] (for the list of compatible discs.) It may take a while to load the disc. • When inserting a brand-new DVD+RW/DVDRW, the unit automatically... starts to "Switching Analog Mode/Digital Mode" and "Channel Selection" on the disc, the title list is displayed. Refer to format. (Except when HDD is recording, or when there is compatible with this unit. (Refer to page...
User manual, English (US)
Page 45
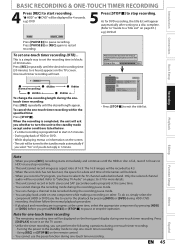
...45 Español Press [PAUSE F]] or [REC] again to exit the title list. Press [REC] repeatedly until the desired length appear. I 0h30m 0h30m (normal recording) 1h00m 6h00m 5h30m To change a channel to be displayed on other . While displaying menus or information on the TV screen.... standby mode automatically if you select "Yes" or if you like to stop one -touch timer recording. Refer to select the TV channel audio beforehand. Introduction Connections Basic Setup BASIC RECORDING & ONE-TOUCH TIMER RECORDING 4 Press [REC] to pause recording. Press [DISPLAY] ...
...45 Español Press [PAUSE F]] or [REC] again to exit the title list. Press [REC] repeatedly until the desired length appear. I 0h30m 0h30m (normal recording) 1h00m 6h00m 5h30m To change a channel to be displayed on other . While displaying menus or information on the TV screen.... standby mode automatically if you select "Yes" or if you like to stop one -touch timer recording. Refer to select the TV channel audio beforehand. Introduction Connections Basic Setup BASIC RECORDING & ONE-TOUCH TIMER RECORDING 4 Press [REC] to pause recording. Press [DISPLAY] ...
User manual, English (US)
Page 47
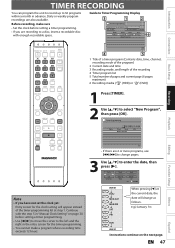
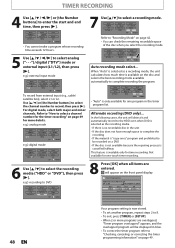
... 1 6 New Program Connections Basic Setup Recording Playback Editing OPEN/ STANDBY-ON DTV/TV SOURCE CLOSE .@/: ABC DEF GHI JKL MNO CHANNEL PQRS TUV WXYZ SPACE CLEAR SETUP AUDIO REPEAT HDMI DISC MENU TITLE OK DISPLAY RETURN V.REPLAY V.SKIP RAPID PLAY D.DUBBING TIMER HDD ... 4 5 1 Title of a timer program (Contains date, time, channel, recording mode of the program) 2 Current date and time 3 Recording mode, and length of the recording 4 Timer program list 5 Total number of the timer programming list at the current date, the date will appear instead of pages and ...
... 1 6 New Program Connections Basic Setup Recording Playback Editing OPEN/ STANDBY-ON DTV/TV SOURCE CLOSE .@/: ABC DEF GHI JKL MNO CHANNEL PQRS TUV WXYZ SPACE CLEAR SETUP AUDIO REPEAT HDMI DISC MENU TITLE OK DISPLAY RETURN V.REPLAY V.SKIP RAPID PLAY D.DUBBING TIMER HDD ... 4 5 1 Title of a timer program (Contains date, time, channel, recording mode of the program) 2 Current date and time 3 Recording mode, and length of the recording 4 Timer program list 5 Total number of the timer programming list at the current date, the date will appear instead of pages and ...
User manual, English (US)
Page 48
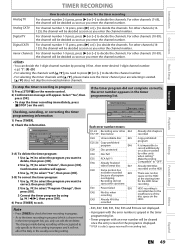
... calculates how much time is available only for more details. Not available for one program in the unit - Refer to "How to select a channel number for one -touch timer recording. 8 Press [OK] when all items are overlapped, "Timer program overlapped" appears, and the overlapped program will...10:30AM 11:30AM DTV69. 1 New Program 48 EN 1/1 Your program setting is no recordable disc in the timer program list. Use [K / L] or [the Number buttons] to select the channel number to select analog digital ("DTV") mode or external input (L1 / L2), then press [B]. In the following cases...
... calculates how much time is available only for more details. Not available for one program in the unit - Refer to "How to select a channel number for one -touch timer recording. 8 Press [OK] when all items are overlapped, "Timer program overlapped" appears, and the overlapped program will...10:30AM 11:30AM DTV69. 1 New Program 48 EN 1/1 Your program setting is no recordable disc in the timer program list. Use [K / L] or [the Number buttons] to select the channel number to select analog digital ("DTV") mode or external input (L1 / L2), then press [B]. In the following cases...
User manual, English (US)
Page 49
... be recognized as only specific to that recording in the timer program list), you need to press [B] or [ • ] to exit. Digital TV For channel number 1-9 press, press [B] or [ • ] to decide the channels. Recording did not complete correctly, the error number appears in progress ... E34 are not displayed. • A program with the error number is grayed in the timer programming list. • Timer program with [K / L], please make sure the minor channel your are selecting is cancelled due to select "Delete", then press [OK]. Editing Function Setup Others Espa...
... be recognized as only specific to that recording in the timer program list), you need to press [B] or [ • ] to exit. Digital TV For channel number 1-9 press, press [B] or [ • ] to decide the channels. Recording did not complete correctly, the error number appears in progress ... E34 are not displayed. • A program with the error number is grayed in the timer programming list. • Timer program with [K / L], please make sure the minor channel your are selecting is cancelled due to select "Delete", then press [OK]. Editing Function Setup Others Espa...
User manual, English (US)
Page 50
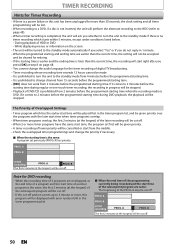
...time, the program set previously (PROG. The Priority of Overlapped Settings • Timer program which starts within 5 minutes, except under conditions listed below. - TIMER RECORDING Hints for Timer Recording • If there is a power failure or this program will be displayed with the later...When timer programs overlap, the first 2 minutes (at the longest) will be cancelled or start time of another program is prohibited to change channel from 15 seconds before the programmed starting time. • [REC] does not work from 2 minutes before the programmed starting time. During ...
...time, the program set previously (PROG. The Priority of Overlapped Settings • Timer program which starts within 5 minutes, except under conditions listed below. - TIMER RECORDING Hints for Timer Recording • If there is a power failure or this program will be displayed with the later...When timer programs overlap, the first 2 minutes (at the longest) will be cancelled or start time of another program is prohibited to change channel from 15 seconds before the programmed starting time. • [REC] does not work from 2 minutes before the programmed starting time. During ...

User manual, English (US)
Page 51
... title from the selected position. 1) Follow the steps 1, 2 and 4 on how to select a channel.) e.g.) DVD+RW selected title number to select a channel.) 6) Press [REC] again. Make sure that includes a title to be completed. 5) Use [K / L] to be overwritten. Title list will not be overwritten, then press [OK]. 1 SP(2Hr) NOV/21/10 11:00AM...
... title from the selected position. 1) Follow the steps 1, 2 and 4 on how to select a channel.) e.g.) DVD+RW selected title number to select a channel.) 6) Press [REC] again. Make sure that includes a title to be completed. 5) Use [K / L] to be overwritten. Title list will not be overwritten, then press [OK]. 1 SP(2Hr) NOV/21/10 11:00AM...
User manual, English (US)
Page 59
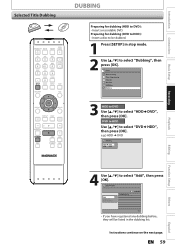
... 59 Español Preparing for dubbing (HDD to DVD): • Insert a recordable DVD. HDD DVD Add Delete All Dubbing Start Dubbing List 3000 MB 1/1 • If you have registered any dubbing before, they will be dubbed. 1 Press [SETUP] in the dubbing...to select "Add", then press [OK]. Introduction Connections Basic Setup Selected Title Dubbing OPEN/ STANDBY-ON DTV/TV SOURCE CLOSE .@/: ABC DEF GHI JKL MNO CHANNEL PQRS TUV WXYZ SPACE CLEAR SETUP AUDIO REPEAT HDMI DISC MENU TITLE OK DISPLAY RETURN V.REPLAY V.SKIP RAPID PLAY D.DUBBING TIMER HDD DVD REC MODE...
... 59 Español Preparing for dubbing (HDD to DVD): • Insert a recordable DVD. HDD DVD Add Delete All Dubbing Start Dubbing List 3000 MB 1/1 • If you have registered any dubbing before, they will be dubbed. 1 Press [SETUP] in the dubbing...to select "Add", then press [OK]. Introduction Connections Basic Setup Selected Title Dubbing OPEN/ STANDBY-ON DTV/TV SOURCE CLOSE .@/: ABC DEF GHI JKL MNO CHANNEL PQRS TUV WXYZ SPACE CLEAR SETUP AUDIO REPEAT HDMI DISC MENU TITLE OK DISPLAY RETURN V.REPLAY V.SKIP RAPID PLAY D.DUBBING TIMER HDD DVD REC MODE...
User manual, English (US)
Page 61
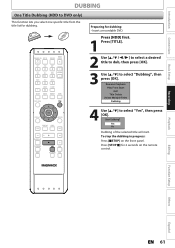
... remote control. Introduction Connections Basic Setup DUBBING One Title Dubbing (HDD to DVD only) This function lets you select one specific title from the title list for dubbing: • Insert a recordable DVD. Press [STOP C] for 2 seconds on the front panel. OPEN/ STANDBY-ON DTV/TV SOURCE CLOSE .@/: ABC DEF GHI JKL...
... remote control. Introduction Connections Basic Setup DUBBING One Title Dubbing (HDD to DVD only) This function lets you select one specific title from the title list for dubbing: • Insert a recordable DVD. Press [STOP C] for 2 seconds on the front panel. OPEN/ STANDBY-ON DTV/TV SOURCE CLOSE .@/: ABC DEF GHI JKL...

User manual, English (US)
Page 67
...you press [DVD]. Introduction Connections Basic Setup Direct Playback BASIC PLAYBACK OPEN/ STANDBY-ON DTV/TV SOURCE CLOSE .@/: ABC DEF GHI JKL MNO CHANNEL PQRS TUV WXYZ SPACE CLEAR SETUP AUDIO REPEAT HDMI DISC MENU TITLE OK DISPLAY RETURN V.REPLAY V.SKIP RAPID PLAY D.DUBBING TIMER HDD DVD ...how to insert a disc). If you are playing back a DVD-video or video CD with this unit. (Refer to page 65 for the list of compatible discs.) It may start playback automatically. • You can select images or information on the menu screen by activating PBC (playback control...
...you press [DVD]. Introduction Connections Basic Setup Direct Playback BASIC PLAYBACK OPEN/ STANDBY-ON DTV/TV SOURCE CLOSE .@/: ABC DEF GHI JKL MNO CHANNEL PQRS TUV WXYZ SPACE CLEAR SETUP AUDIO REPEAT HDMI DISC MENU TITLE OK DISPLAY RETURN V.REPLAY V.SKIP RAPID PLAY D.DUBBING TIMER HDD DVD ...how to insert a disc). If you are playing back a DVD-video or video CD with this unit. (Refer to page 65 for the list of compatible discs.) It may start playback automatically. • You can select images or information on the menu screen by activating PBC (playback control...
User manual, English (US)
Page 68
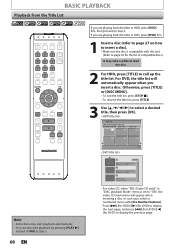
... with [the Number buttons]. • Press [G] (for HDD) / [B] (for DVD) to display the next page, and press [H] (for HDD) / [{] (for the list of compatible discs.) It may start playback automatically. • You can also start playback by pressing [PLAY B] instead of [OK] at step 3. 68 EN If... [HDD] first, then proceed to step 2. For DVD, the title list will appear when inserting a disc. BASIC PLAYBACK Playback from the Title List OPEN/ STANDBY-ON DTV/TV SOURCE CLOSE .@/: ABC DEF GHI JKL MNO CHANNEL PQRS TUV WXYZ SPACE CLEAR SETUP AUDIO REPEAT HDMI DISC MENU TITLE OK ...
... with [the Number buttons]. • Press [G] (for HDD) / [B] (for DVD) to display the next page, and press [H] (for HDD) / [{] (for the list of compatible discs.) It may start playback automatically. • You can also start playback by pressing [PLAY B] instead of [OK] at step 3. 68 EN If... [HDD] first, then proceed to step 2. For DVD, the title list will appear when inserting a disc. BASIC PLAYBACK Playback from the Title List OPEN/ STANDBY-ON DTV/TV SOURCE CLOSE .@/: ABC DEF GHI JKL MNO CHANNEL PQRS TUV WXYZ SPACE CLEAR SETUP AUDIO REPEAT HDMI DISC MENU TITLE OK ...
User manual, English (US)
Page 70
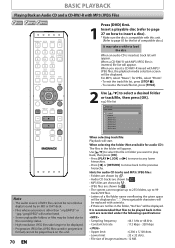
... an Audio CD and a CD-RW/-R with MP3 / JPEG Files OPEN/ STANDBY-ON DTV/TV SOURCE CLOSE .@/: ABC DEF GHI JKL MNO CHANNEL PQRS TUV WXYZ SPACE CLEAR SETUP AUDIO REPEAT HDMI DISC MENU TITLE OK DISPLAY RETURN V.REPLAY V.SKIP RAPID PLAY D.DUBBING TIMER HDD DVD REC MODE... The audio source of MP3 files cannot be recorded as "...". When an audio CD is recommended that files to the previous hierarchy. e.g.) File list File List DISC NAME Folder1 Folder2 JPEG file1 JPEG file2 JPEG file3 JPEG file4 JPEG file5 JPEG file6 1/ 2 When selecting track/file: Playback will be ...
... an Audio CD and a CD-RW/-R with MP3 / JPEG Files OPEN/ STANDBY-ON DTV/TV SOURCE CLOSE .@/: ABC DEF GHI JKL MNO CHANNEL PQRS TUV WXYZ SPACE CLEAR SETUP AUDIO REPEAT HDMI DISC MENU TITLE OK DISPLAY RETURN V.REPLAY V.SKIP RAPID PLAY D.DUBBING TIMER HDD DVD REC MODE... The audio source of MP3 files cannot be recorded as "...". When an audio CD is recommended that files to the previous hierarchy. e.g.) File list File List DISC NAME Folder1 Folder2 JPEG file1 JPEG file2 JPEG file3 JPEG file4 JPEG file5 JPEG file6 1/ 2 When selecting track/file: Playback will be ...
User manual, English (US)
Page 81
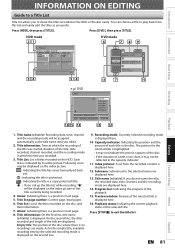
...title in the capacity indicator. 11. I : If you do not name the title, the recorded date, time, channel, and the recording mode are made. Title list: List of the disc where there is displayed here. 16. Progress bar: Indicating the progress of the selected title. Playback ... disc easily. Press [HDD], then press [TITLE]. Title name (editable): Recording date, time, channel and the recording mode will be assigned automatically as you to exit the title list. Recording mode: Currently selected recording mode is displayed here. 10. Submenu: Submenus for the empty ...
...title in the capacity indicator. 11. I : If you do not name the title, the recorded date, time, channel, and the recording mode are made. Title list: List of the disc where there is displayed here. 16. Progress bar: Indicating the progress of the selected title. Playback ... disc easily. Press [HDD], then press [TITLE]. Title name (editable): Recording date, time, channel and the recording mode will be assigned automatically as you to exit the title list. Recording mode: Currently selected recording mode is displayed here. 10. Submenu: Submenus for the empty ...
User manual, English (US)
Page 83
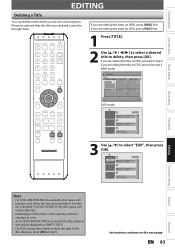
If you are editing the titles on DVD, proceed to step 4. If you press [OK] at step 5. HDD mode Title List Title 1 12:00AM (1:00:00) JAN/ 4/10 1 2 CH10 SP 3 4 5 6 OK DISPLAY RETURN V.REPLAY V.SKIP RAPID PLAY D.DUBBING TIMER HDD DVD REC MODE REC 1 / 1 DVD ... which you are editing the titles on HDD, press [HDD] first. Instructions continue on DVD, press [DVD] first. 1 Press [TITLE]. .@/: ABC DEF GHI JKL MNO CHANNEL PQRS TUV WXYZ SPACE CLEAR SETUP AUDIO REPEAT HDMI DISC MENU TITLE 2 Use [K / L / { / B] to select a desired title to select "Edit", then press [OK]....
If you are editing the titles on DVD, proceed to step 4. If you press [OK] at step 5. HDD mode Title List Title 1 12:00AM (1:00:00) JAN/ 4/10 1 2 CH10 SP 3 4 5 6 OK DISPLAY RETURN V.REPLAY V.SKIP RAPID PLAY D.DUBBING TIMER HDD DVD REC MODE REC 1 / 1 DVD ... which you are editing the titles on HDD, press [HDD] first. Instructions continue on DVD, press [DVD] first. 1 Press [TITLE]. .@/: ABC DEF GHI JKL MNO CHANNEL PQRS TUV WXYZ SPACE CLEAR SETUP AUDIO REPEAT HDMI DISC MENU TITLE 2 Use [K / L / { / B] to select a desired title to select "Edit", then press [OK]....

User manual, English (US)
Page 85
...Playback Play From Start Edit Title Delete Delete Multiple Titles Dubbing Connections Basic Setup Recording .@/: ABC DEF GHI JKL MNO CHANNEL PQRS TUV WXYZ SPACE CLEAR SETUP AUDIO REPEAT HDMI DISC MENU TITLE OK DISPLAY RETURN V.REPLAY V.SKIP RAPID PLAY D..... 1 / 1 Trash mark will appear indicating the title is marked for deletion. 5 Repeat step 4 until you select all the titles you do not need anymore. Title List Title 2 12:00AM (1:00:00) JAN/ 4/10 CH10 SP 1 2 3 4 5 6 Press 'CLEAR' to confirm. 1 / 1 Playback Editing Function Setup Others 1 Press [HDD], then...
...Playback Play From Start Edit Title Delete Delete Multiple Titles Dubbing Connections Basic Setup Recording .@/: ABC DEF GHI JKL MNO CHANNEL PQRS TUV WXYZ SPACE CLEAR SETUP AUDIO REPEAT HDMI DISC MENU TITLE OK DISPLAY RETURN V.REPLAY V.SKIP RAPID PLAY D..... 1 / 1 Trash mark will appear indicating the title is marked for deletion. 5 Repeat step 4 until you select all the titles you do not need anymore. Title List Title 2 12:00AM (1:00:00) JAN/ 4/10 CH10 SP 1 2 3 4 5 6 Press 'CLEAR' to confirm. 1 / 1 Playback Editing Function Setup Others 1 Press [HDD], then...
User manual, English (US)
Page 86
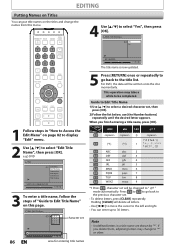
...PLAY 1 Follow steps in a title name are shown by "*". Edit Title Name 1 ABC abc 123 @! ? Press to to go back to the title list. OPEN/ STANDBY-ON DTV/TV SOURCE CLOSE .@/: ABC DEF 4 Use [K / L] to select a desired character set, then press [OK]. 2) Follow the... list below, use [the Number buttons] repeatedly until the desired letter appears. Edit Title Name 1 Yes No GHI JKL MNO CHANNEL PQRS TUV WXYZ SPACE CLEAR MY FAVORITE 1 : 05 : 00 The title name is now updated. Edit...
...PLAY 1 Follow steps in a title name are shown by "*". Edit Title Name 1 ABC abc 123 @! ? Press to to go back to the title list. OPEN/ STANDBY-ON DTV/TV SOURCE CLOSE .@/: ABC DEF 4 Use [K / L] to select a desired character set, then press [OK]. 2) Follow the... list below, use [the Number buttons] repeatedly until the desired letter appears. Edit Title Name 1 Yes No GHI JKL MNO CHANNEL PQRS TUV WXYZ SPACE CLEAR MY FAVORITE 1 : 05 : 00 The title name is now updated. Edit...


