

User manual, English (US)
Page 1
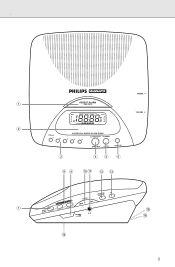
AJ 3720 Clock Radio SLEWEEPEEKREND SET TUNING / RETPIMEEATDAATLEARM ALM 1 SSUUNN PRESET 1 2 SSLLUUMMBBEERR ALM 2 3 4 AJ3720 PLL DIGITAL P3 CLOCK RADIO FM MHz 5 ALARM RESET SLUMBER PLL DIGITAL RADIO OFF CLOCK RADIO BUZZER RADIO ON ALARM 1 TUNING VOLUME ALARM 2 FM•MW•BLAWND Owner's Manual Mode d'emploi Instructivo de manejo
AJ 3720 Clock Radio SLEWEEPEEKREND SET TUNING / RETPIMEEATDAATLEARM ALM 1 SSUUNN PRESET 1 2 SSLLUUMMBBEERR ALM 2 3 4 AJ3720 PLL DIGITAL P3 CLOCK RADIO FM MHz 5 ALARM RESET SLUMBER PLL DIGITAL RADIO OFF CLOCK RADIO BUZZER RADIO ON ALARM 1 TUNING VOLUME ALARM 2 FM•MW•BLAWND Owner's Manual Mode d'emploi Instructivo de manejo
User manual, English (US)
Page 3
. 1 2 7 REPEAT ALARM TIME DATE ALM 1 SUN MON TUE WED THUR FRI SAT AM ZZ PM SLUMBER P1 P2 P3 P4 P5 ALM 2 MW FM MHz kHz ZZ PRESET 1 2 AJ3720 PLL DIGITAL CLOCK RADIO 3 4 5 ALARM RESET SLUMBER RADIO OFF BUZZER RADIO ON 3 45 6 8 9 0! @ # TUNING VOLUME BAND FM•MW ALARM 1 ALARM 2 TUNING / WSELEEKEEPNEDR SET VOLUME $ % ^ 3
. 1 2 7 REPEAT ALARM TIME DATE ALM 1 SUN MON TUE WED THUR FRI SAT AM ZZ PM SLUMBER P1 P2 P3 P4 P5 ALM 2 MW FM MHz kHz ZZ PRESET 1 2 AJ3720 PLL DIGITAL CLOCK RADIO 3 4 5 ALARM RESET SLUMBER RADIO OFF BUZZER RADIO ON 3 45 6 8 9 0! @ # TUNING VOLUME BAND FM•MW ALARM 1 ALARM 2 TUNING / WSELEEKEEPNEDR SET VOLUME $ % ^ 3

User manual, English (US)
Page 4
... your product within 10 days confirms your right to maximum protection under the terms and conditions of lightning" indicates uninsulated material within your unit may cause an electrical shock. NO USER-SERVICEABLE PARTS INSIDE. The "exclamation point" calls attention to features for future reference. Owner Confirmation Your completed Warranty Registration Card serves as the owner of owning a Philips Magnavox product...
... your product within 10 days confirms your right to maximum protection under the terms and conditions of lightning" indicates uninsulated material within your unit may cause an electrical shock. NO USER-SERVICEABLE PARTS INSIDE. The "exclamation point" calls attention to features for future reference. Owner Confirmation Your completed Warranty Registration Card serves as the owner of owning a Philips Magnavox product...
User manual, English (US)
Page 5
... 17.Damage Requiring Service - serviced by items placed upon or against them, paying particular attention to a power supply only of time. The set complies with care. not use instructions 12.Power-Cord Protection - routed so that is located on the appliance and in performance; Ventilation - or impede the flow of the appliance moved with the FCC-Rules, Part 15. SAFETY WARNING...
... 17.Damage Requiring Service - serviced by items placed upon or against them, paying particular attention to a power supply only of time. The set complies with care. not use instructions 12.Power-Cord Protection - routed so that is located on the appliance and in performance; Ventilation - or impede the flow of the appliance moved with the FCC-Rules, Part 15. SAFETY WARNING...
User manual, English (US)
Page 6
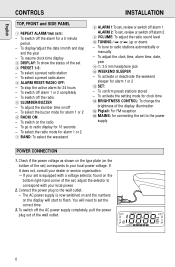
...; If your set , review or switch off the AC power supply completely, pull the power plug out of the set the correct time. 3. To switch off alarm 2 9 VOLUME: To adjust the radio sound level 0 TUNING / ∞ or § (up or down) - English CONTROLS TOP, FRONT and SIDE PANEL 1 REPEAT ALARM/TIME DATE: - To select a preset radio station - To tune to radio display for clock time $ BRIGHTNESS CONTROL: To change the brightness of the set to flash. You will start to the power supply POWER CONNECTION 1. ALM...
...; If your set , review or switch off the AC power supply completely, pull the power plug out of the set the correct time. 3. To switch off alarm 2 9 VOLUME: To adjust the radio sound level 0 TUNING / ∞ or § (up or down) - English CONTROLS TOP, FRONT and SIDE PANEL 1 REPEAT ALARM/TIME DATE: - To select a preset radio station - To tune to radio display for clock time $ BRIGHTNESS CONTROL: To change the brightness of the set to flash. You will start to the power supply POWER CONNECTION 1. ALM...
User manual, English (US)
Page 7
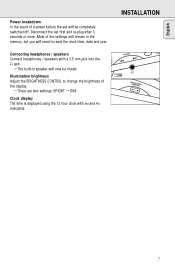
... set will be muted. TUNING / VOLUME BCROIGNHTTRNOELSS ALARM 1 7 Illumination brightness Adjust the BRIGHTNESS CONTROL to reset the clock time, date and year. INSTALLATION Connecting headphones / speakers Connect headphones / speakers with AM and PM indicators. English Power breakdown In the event of the display. ™ There are two settings: BRIGHT ™ DIM Clock display The time is displayed using the 12 hour clock with a 3.5 mm jack into the p jack. ™ The built-in the memory, but you will need to change the brightness of a power failure the set...
... set will be muted. TUNING / VOLUME BCROIGNHTTRNOELSS ALARM 1 7 Illumination brightness Adjust the BRIGHTNESS CONTROL to reset the clock time, date and year. INSTALLATION Connecting headphones / speakers Connect headphones / speakers with AM and PM indicators. English Power breakdown In the event of the display. ™ There are two settings: BRIGHT ™ DIM Clock display The time is displayed using the 12 hour clock with a 3.5 mm jack into the p jack. ™ The built-in the memory, but you will need to change the brightness of a power failure the set...
User manual, English (US)
Page 8
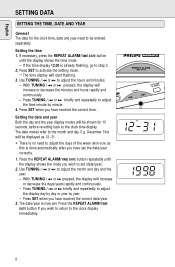
... correct date/year. 3. E.g. Press SET to activate the setting mode. ™ The time display will be entered separately. Press SET when you wish to return to the clock display immediately. Use TUNING / ∞ or § to adjust the hours and minutes. - Use TUNING / ∞ or § to adjust the month and day and the year. - Press the REPEAT ALARM/TIME DATE button repeatedly until the display shows the time mode. - The date/year is already flashing...
... correct date/year. 3. E.g. Press SET to activate the setting mode. ™ The time display will be entered separately. Press SET when you wish to return to the clock display immediately. Use TUNING / ∞ or § to adjust the hours and minutes. - Use TUNING / ∞ or § to adjust the month and day and the year. - Press the REPEAT ALARM/TIME DATE button repeatedly until the display shows the time mode. - The date/year is already flashing...
User manual, English (US)
Page 9
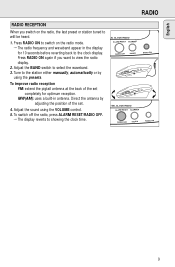
... radio, the last preset or station tuned to will be heard. 1. Adjust the BAND switch to showing the clock time. Direct the antenna by using the VOLUME control. 5. AL CLOCK RADIO ALARM RESET SLUMBER RADIO OFF BUZZER RADIO ON BAND FM•MW•LW ALARM 1 ALARM 2 TUNING / WSELEEKEEPNEDR SET VOLUME BAND FM•MW•LW ALARM 1 ALARM 2 TUNING / WSELEEKEEPNEDR SET VOLUME ITAL CLOCK RADIO ALARM RESET SLUMBER RADIO OFF BUZZER RADIO ON 9 Tune to the station either manually, automatically or by adjusting the position of the set . 4. To improve radio reception...
... radio, the last preset or station tuned to will be heard. 1. Adjust the BAND switch to showing the clock time. Direct the antenna by using the VOLUME control. 5. AL CLOCK RADIO ALARM RESET SLUMBER RADIO OFF BUZZER RADIO ON BAND FM•MW•LW ALARM 1 ALARM 2 TUNING / WSELEEKEEPNEDR SET VOLUME BAND FM•MW•LW ALARM 1 ALARM 2 TUNING / WSELEEKEEPNEDR SET VOLUME ITAL CLOCK RADIO ALARM RESET SLUMBER RADIO OFF BUZZER RADIO ON 9 Tune to the station either manually, automatically or by adjusting the position of the set . 4. To improve radio reception...
User manual, English (US)
Page 10
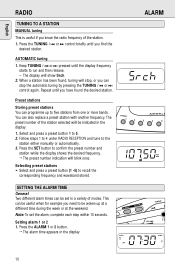
... SETTING THE ALARM TIME General Two different alarm times can also replace a preset station with another frequency. Keep TUNING / ∞ or § pressed until the display frequency starts to the station either manually or automatically. 3. Press the ALARM 1 or 2 button. ™ The alarm time appears in the display ALARM 1 ALARM 2 TUNING / VOLUME ALM 1 AM ALM 2 10 Follow steps 1 to 4 under RADIO RECEPTION and tune to run and then release. - Select and press a preset button 1 to 5. 2. English RADIO ALARM...
... SETTING THE ALARM TIME General Two different alarm times can also replace a preset station with another frequency. Keep TUNING / ∞ or § pressed until the display frequency starts to the station either manually or automatically. 3. Press the ALARM 1 or 2 button. ™ The alarm time appears in the display ALARM 1 ALARM 2 TUNING / VOLUME ALM 1 AM ALM 2 10 Follow steps 1 to 4 under RADIO RECEPTION and tune to run and then release. - Select and press a preset button 1 to 5. 2. English RADIO ALARM...
User manual, English (US)
Page 11
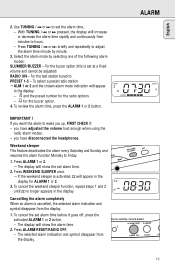
... sleeper function, repeat steps 1 and 2 AM until ZZ no longer appears in the display: AM - To cancel the set at a fixed volume and cannot be adjusted) RADIO ON - With TUNING / ∞ or § pressed, the display will increase or decrease the alarm time rapidly and continuously from the display. 20 PLL DIGITAL CLOCK RADIO ALARM RESET SLUMBER 5 RADIO OFF BUZZER RA 11 To review the alarm time, press the ALARM 1 or 2 button. ZZ WSELEEKEEPNEDR SET...
... sleeper function, repeat steps 1 and 2 AM until ZZ no longer appears in the display: AM - To cancel the set at a fixed volume and cannot be adjusted) RADIO ON - With TUNING / ∞ or § pressed, the display will increase or decrease the alarm time rapidly and continuously from the display. 20 PLL DIGITAL CLOCK RADIO ALARM RESET SLUMBER 5 RADIO OFF BUZZER RA 11 To review the alarm time, press the ALARM 1 or 2 button. ZZ WSELEEKEEPNEDR SET...
User manual, English (US)
Page 12
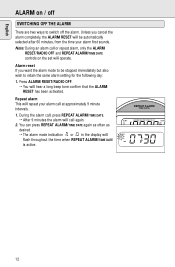
... set will operate. Alarm reset If you cancel the alarm completely, the ALARM RESET will be stopped immediately but also wish to be automatically selected after 60 minutes, from the time your alarm call again. 2. Unless you want the alarm mode to retain the same alarm setting for the following day: 1. Repeat alarm This will call at approximately 9 minute intervals. 1. Press ALARM RESET/RADIO OFF. ™ You will flash throughout the time when REPEAT ALARM/TIME DATE...
... set will operate. Alarm reset If you cancel the alarm completely, the ALARM RESET will be stopped immediately but also wish to be automatically selected after 60 minutes, from the time your alarm call again. 2. Unless you want the alarm mode to retain the same alarm setting for the following day: 1. Repeat alarm This will call at approximately 9 minute intervals. 1. Press ALARM RESET/RADIO OFF. ™ You will flash throughout the time when REPEAT ALARM/TIME DATE...
User manual, English (US)
Page 13
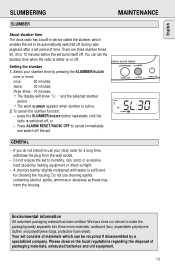
... DIGITAL CLOCK RADIO ALARM RESET SLUMBER RADIO OFF BUZZER ALM 1 AM SLUMBER P1 P2 P3 P4 P5 RADIO ON GENERAL - We have done our utmost to use cleaning agents containing alcohol, spirits, ammonia or abrasives as these may harm the housing. Setting the slumber 1. To cancel the slumber function, - There are three slumber times: 60, 30 or 10 minutes before the set turns itself...
... DIGITAL CLOCK RADIO ALARM RESET SLUMBER RADIO OFF BUZZER ALM 1 AM SLUMBER P1 P2 P3 P4 P5 RADIO ON GENERAL - We have done our utmost to use cleaning agents containing alcohol, spirits, ammonia or abrasives as these may harm the housing. Setting the slumber 1. To cancel the slumber function, - There are three slumber times: 60, 30 or 10 minutes before the set turns itself...
User manual, English (US)
Page 14
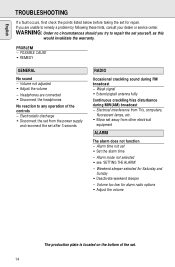
... GENERAL No sound - Headphones are unable to remedy a problem by following these hints, consult your dealer or service center. Alarm time not set . 14 Volume not adjusted • Adjust the volume - Volume too low for alarm radio options • Adjust the volume The production plate is located on the bottom of the controls - Weekend sleeper selected for repair. If you try to any operation of the set • Set the alarm time - PROBLEM - Electrical interference...
... GENERAL No sound - Headphones are unable to remedy a problem by following these hints, consult your dealer or service center. Alarm time not set . 14 Volume not adjusted • Adjust the volume - Volume too low for alarm radio options • Adjust the volume The production plate is located on the bottom of the controls - Weekend sleeper selected for repair. If you try to any operation of the set • Set the alarm time - PROBLEM - Electrical interference...
User manual, English (US)
Page 15
... PORTABLE AUDIO One Year Free Exchange This product must have other warranties. A sales receipt or other cause not within the control of merchantability or fitness for a particular purpose, are expressed or implied, including any implied warranties of Philips Consumer Electronics Company. • reception problems caused by signal conditions or cable or antenna systems outside of the product. • product repair and/or part replacement...
... PORTABLE AUDIO One Year Free Exchange This product must have other warranties. A sales receipt or other cause not within the control of merchantability or fitness for a particular purpose, are expressed or implied, including any implied warranties of Philips Consumer Electronics Company. • reception problems caused by signal conditions or cable or antenna systems outside of the product. • product repair and/or part replacement...

User manual, English (US)
Page 40
Clock Radio PHILIPS CONSUMER ELECTRONICS COMPANY A Division of Philips Electronics North America Corporation Knoxville, Tennessee 37914-1810, U.S.A. 3140 115 2495.1 Printed in Hong Kong TCtext/CvB/9806 AJ 3720 -
Clock Radio PHILIPS CONSUMER ELECTRONICS COMPANY A Division of Philips Electronics North America Corporation Knoxville, Tennessee 37914-1810, U.S.A. 3140 115 2495.1 Printed in Hong Kong TCtext/CvB/9806 AJ 3720 -


