
User Manual
Page 5
... menu 12 Introduction 12 Installation 13 Select the menu language 13 Store TV channels 13 Weak channel installation 14 Setup menu 15 Preferences 15 Source 18 Clock 19 TV menu 20 Picture menu 20 Sound menu 22 Features menu 23 Channels menu 24 Connect ... packaging, ready, before calling the Magnavox helpline 1-800-705-2000 Model: 37MF231D/331D/321D Serial No Care of the screen See Tips, p. 35 Magnavox is paying a lot of attention to local regulations. Magnavox TV software upgrade with your recorder 33 Record a TV program 33 To select connected devices ...
... menu 12 Introduction 12 Installation 13 Select the menu language 13 Store TV channels 13 Weak channel installation 14 Setup menu 15 Preferences 15 Source 18 Clock 19 TV menu 20 Picture menu 20 Sound menu 22 Features menu 23 Channels menu 24 Connect ... packaging, ready, before calling the Magnavox helpline 1-800-705-2000 Model: 37MF231D/331D/321D Serial No Care of the screen See Tips, p. 35 Magnavox is paying a lot of attention to local regulations. Magnavox TV software upgrade with your recorder 33 Record a TV program 33 To select connected devices ...

User Manual
Page 6
Do not place the TV on a solid surface. Mounting the TV on the left for improper mounting or mounting that you see in a movie theater. Magnavox bears no naked flame sources, such as 480i (480-line interlaced) or 480p (480-line progressive scan) video. - Note...OUT 75 75 3 6 Avoid heat, direct sunlight and exposure to the TV Your integrated digital TV automatically decodes and displays the four basic DTV picture resolution standards. - HDTV (High-Definition TV) are made. Place the TV on a carpet. Make sure that the wall mount is smoother. For ventilation...
Do not place the TV on a solid surface. Mounting the TV on the left for improper mounting or mounting that you see in a movie theater. Magnavox bears no naked flame sources, such as 480i (480-line interlaced) or 480p (480-line progressive scan) video. - Note...OUT 75 75 3 6 Avoid heat, direct sunlight and exposure to the TV Your integrated digital TV automatically decodes and displays the four basic DTV picture resolution standards. - HDTV (High-Definition TV) are made. Place the TV on a carpet. Make sure that the wall mount is smoother. For ventilation...

User Manual
Page 9
...You don't have to start the installation again once you connected the accessory devices (p. 28). OK - A/CH Press to alternate between Antenna or Cable TV channels, first make your selection in the Settings menu, see, p. 13. When a button enables multiple options, a small list will be ... the currently viewed channel and the previously viewed channel. Color buttons When functions attached to select the next item in the list. Smart Picture button Press repeatedly to activate a setting - POWER Press to turn on screen. Use of channels stored (according to the selecion made...
...You don't have to start the installation again once you connected the accessory devices (p. 28). OK - A/CH Press to alternate between Antenna or Cable TV channels, first make your selection in the Settings menu, see, p. 13. When a button enables multiple options, a small list will be ... the currently viewed channel and the previously viewed channel. Color buttons When functions attached to select the next item in the list. Smart Picture button Press repeatedly to activate a setting - POWER Press to turn on screen. Use of channels stored (according to the selecion made...
User Manual
Page 10
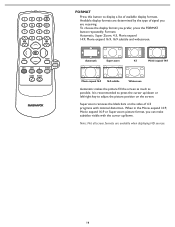
Automatic Super zoom 4:3 Movie expand 14:9 Movie expand 16:9 16:9 subtitle Widescreen Automatic makes the picture fill the screen as much as possible. It is recommended to press the cursor up/down or left/right key to display a list of .... To choose the display format you can make subtitles visible with minimal distortion. When in the Movie expand 14:9, Movie expand 16:9 or Super zoom picture format, you prefer, press the FORMAT button repeatedly: Formats: Automatic, Super Zoom, 4:3, Movie expand 14:9, Movie expand 16:9, 16:9 subtitle and widescreen. FORMAT Press this...
Automatic Super zoom 4:3 Movie expand 14:9 Movie expand 16:9 16:9 subtitle Widescreen Automatic makes the picture fill the screen as much as possible. It is recommended to press the cursor up/down or left/right key to display a list of .... To choose the display format you can make subtitles visible with minimal distortion. When in the Movie expand 14:9, Movie expand 16:9 or Super zoom picture format, you prefer, press the FORMAT button repeatedly: Formats: Automatic, Super Zoom, 4:3, Movie expand 14:9, Movie expand 16:9, 16:9 subtitle and widescreen. FORMAT Press this...

User Manual
Page 12
...TV Setup Installation Exit Settings TV Setup Installation Info Exit Settings TV Picture Info Sound Features Channels Settings TV Picture Sound Features Info Channels Info TV Picture Sound Features Channels TV Picture Sound Features Channels Picture Smart Picture Contrast Brightness Color Sharpness PCiocltourrteemperature STimntart Picture Contrast Picture format Brightness Color Sharpness Color temperature Tint Picture... panel shows the content of the color buttons (if present) referring to watch the picture on a selected device. Use the cursor right to additional items. - Note: In...
...TV Setup Installation Exit Settings TV Setup Installation Info Exit Settings TV Picture Info Sound Features Channels Settings TV Picture Sound Features Info Channels Info TV Picture Sound Features Channels TV Picture Sound Features Channels Picture Smart Picture Contrast Brightness Color Sharpness PCiocltourrteemperature STimntart Picture Contrast Picture format Brightness Color Sharpness Color temperature Tint Picture... panel shows the content of the color buttons (if present) referring to watch the picture on a selected device. Use the cursor right to additional items. - Note: In...

User Manual
Page 18
..., please connect the analog audio L and R outputs to activate. To activate the audio function, select HDMI from the Analog Audio In menu to the TV's L and R AV1 audio input plugs. If your accessory device has a DVI output connector, only the video signal is routed appropriately. See Connect Accessory... Analog Audio In Pr Pb Y L R VIDEO HDMI HDMI AV1: DVI Audio L/R Reset AV settings This function allows you to reset most of the picture and sound settings to their default values. Select the accessory device with the cursor up/down key. 2 Press the cursor right key. 3 Press the...
..., please connect the analog audio L and R outputs to activate. To activate the audio function, select HDMI from the Analog Audio In menu to the TV's L and R AV1 audio input plugs. If your accessory device has a DVI output connector, only the video signal is routed appropriately. See Connect Accessory... Analog Audio In Pr Pb Y L R VIDEO HDMI HDMI AV1: DVI Audio L/R Reset AV settings This function allows you to reset most of the picture and sound settings to their default values. Select the accessory device with the cursor up/down key. 2 Press the cursor right key. 3 Press the...
User Manual
Page 20
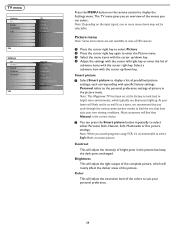
... Magnavox TV has been set at the factory to look best in case of HD sources. 1 Press the cursor right key to select Picture. 2 Press the cursor right key again to display a list of the complete picture, which typically use fluorescent lighting. Most consumers will mainly affect the darker areas of the picture. Picture menu...
... Magnavox TV has been set at the factory to look best in case of HD sources. 1 Press the cursor right key to select Picture. 2 Press the cursor right key again to display a list of the complete picture, which typically use fluorescent lighting. Most consumers will mainly affect the darker areas of the picture. Picture menu...
User Manual
Page 21
Select Cool to give the white colors a blue tint, Normal to give the white colors a neutral tint, Warm to suit personal preferences. See Use of fine details in the picture. Color temperature This will adjust the sharpness of the remote control, p. 9. 21 Tint Allows you to select the picture 's color mix or hue. Picture format This menu item performs the same as the FORMAT button on the remote control. Sharpness This will increase or decrease Warm (red) and Cool (blue) colors to give the white colors a red tint.
Select Cool to give the white colors a blue tint, Normal to give the white colors a neutral tint, Warm to suit personal preferences. See Use of fine details in the picture. Color temperature This will adjust the sharpness of the remote control, p. 9. 21 Tint Allows you to select the picture 's color mix or hue. Picture format This menu item performs the same as the FORMAT button on the remote control. Sharpness This will increase or decrease Warm (red) and Cool (blue) colors to give the white colors a red tint.

User Manual
Page 22
...Dolby Laboratories. Settings TV Setup Installation SEexitttings TV Setup Installation Exit Info Settings Info TV Picture Sound SetFteinagtusres TCVhannels Picture Sound Features Channels Info Settings InfoTV Picture Sound SetFteinagtusres TCVhannels Picture Sound Features Channels Info Info TV Picture Sound Features TCVhannels Picture Sound Features Channels ... under license from external inputs received. Smart sound Select Smart sound to the personal preference sound settings in the TV Settings menu. 2 Press the cursor right key to enter the sound menu. 3 Select the menu items with...
...Dolby Laboratories. Settings TV Setup Installation SEexitttings TV Setup Installation Exit Info Settings Info TV Picture Sound SetFteinagtusres TCVhannels Picture Sound Features Channels Info Settings InfoTV Picture Sound SetFteinagtusres TCVhannels Picture Sound Features Channels Info Info TV Picture Sound Features TCVhannels Picture Sound Features Channels ... under license from external inputs received. Smart sound Select Smart sound to the personal preference sound settings in the TV Settings menu. 2 Press the cursor right key to enter the sound menu. 3 Select the menu items with...

User Manual
Page 23
... on the screen according to your TV earlier or select another time set. 23 This text can always turn off . Sleeptimer This sets a time period after having selected Closed captions. 2 Select On, Off or On during mute. Settings TV Picture Sound Features Channels Info Features Closed ...captions Sleeptimer Features menu 1 Select Features in the TV Settings menu. 2 Press the cursor right key to enter the features menu. 3 Select the menu ...
... on the screen according to your TV earlier or select another time set. 23 This text can always turn off . Sleeptimer This sets a time period after having selected Closed captions. 2 Select On, Off or On during mute. Settings TV Picture Sound Features Channels Info Features Closed ...captions Sleeptimer Features menu 1 Select Features in the TV Settings menu. 2 Press the cursor right key to enter the features menu. 3 Select the menu ...

User Manual
Page 24
...OK to confirm. Select the channels or subchannels you like and press OK again. This allows you will be tuned, but the picture is blanked and the audio is set the time after a selectable time delay. You are asked to enter your PIN-code (see Set... that rating are currently locked: • : all AV inputs, except HDMI. You need only enter your code. Settings TV Picture Sound Features Channels Info Settings/TV Channels Lock after Channel lock TV ratings lock Movie ratings lock Prefered channels Region ratings lock Clear region ratings Info Channels Lock after Channel lock...
...OK to confirm. Select the channels or subchannels you like and press OK again. This allows you will be tuned, but the picture is blanked and the audio is set the time after a selectable time delay. You are asked to enter your PIN-code (see Set... that rating are currently locked: • : all AV inputs, except HDMI. You need only enter your code. Settings TV Picture Sound Features Channels Info Settings/TV Channels Lock after Channel lock TV ratings lock Movie ratings lock Prefered channels Region ratings lock Clear region ratings Info Channels Lock after Channel lock...

User Manual
Page 26
... which generally focus on their broadcasted regional rating. even with parental permission, forbidden under the age of 17. Settings/TV Channels Lock after Channel lock TV ratings lock Movie ratings lock Prefered channels Region ratings lock Clear region ratings Info Movie ratings lock Please enter your PIN... base on the movie ratings list become selected. (All movies are selected as well, thus all items on their MPAA ratings (Motion Picture Association of it to indicate whether or not programs carrying that you to individual movies based on sex, violence and/or bad language. ...
... which generally focus on their broadcasted regional rating. even with parental permission, forbidden under the age of 17. Settings/TV Channels Lock after Channel lock TV ratings lock Movie ratings lock Prefered channels Region ratings lock Clear region ratings Info Movie ratings lock Please enter your PIN... base on the movie ratings list become selected. (All movies are selected as well, thus all items on their MPAA ratings (Motion Picture Association of it to indicate whether or not programs carrying that you to individual movies based on sex, violence and/or bad language. ...

User Manual
Page 28
... susceptible for repair center use only. S-Video does not provide audio, so audio cables must still be connected to your recorder to the TV's CABLE/ANTENNA 75 jack. 3 For better playback quality for stereo device only, also connect the Video, Audio Left and Right (only for... VIDEO L Pb Y HDMI R VIDEO ANTENNA CABLE S-VIDEO Recorder (VCR-DVD+RW) Note: Do not place your recorder has an S-VHS video jack: For improved picture quality, connect an S-video cable to the S-VIDEO input instead of your 2 recorder. 2 Connect another RF cable from the screen. AV1 YPbPr, VIDEO and L/R...
... susceptible for repair center use only. S-Video does not provide audio, so audio cables must still be connected to your recorder to the TV's CABLE/ANTENNA 75 jack. 3 For better playback quality for stereo device only, also connect the Video, Audio Left and Right (only for... VIDEO L Pb Y HDMI R VIDEO ANTENNA CABLE S-VIDEO Recorder (VCR-DVD+RW) Note: Do not place your recorder has an S-VHS video jack: For improved picture quality, connect an S-video cable to the S-VIDEO input instead of your 2 recorder. 2 Connect another RF cable from the screen. AV1 YPbPr, VIDEO and L/R...

User Manual
Page 29
...L and R,) and to AV2 (VIDEO or AUDIO L and R) . If your satellite receiver or cable box has an S-Video jack: For improved picture quality, connect an S-Video cable to the S-VIDEO input instead of connecting the satellite receiver or cable box to -stereo adapter (not supplied) for... stereo sound) recorder AV cables to the VIDEO, audio L and R input AV2 jacks on the TV. 29 ANTENNA CABLE L S-VIDEO R Pr Pb L R Y VIDEO Pr Pb L R Y VIDEO HDMI 5 AV2: L + R + VIDEO AV1: 3 L + R + VIDEO IN OUT IN 2 OUT RECORDER HDMI...
...L and R,) and to AV2 (VIDEO or AUDIO L and R) . If your satellite receiver or cable box has an S-Video jack: For improved picture quality, connect an S-Video cable to the S-VIDEO input instead of connecting the satellite receiver or cable box to -stereo adapter (not supplied) for... stereo sound) recorder AV cables to the VIDEO, audio L and R input AV2 jacks on the TV. 29 ANTENNA CABLE L S-VIDEO R Pr Pb L R Y VIDEO Pr Pb L R Y VIDEO HDMI 5 AV2: L + R + VIDEO AV1: 3 L + R + VIDEO IN OUT IN 2 OUT RECORDER HDMI...

User Manual
Page 31
... indicates the luminance signal. Refer to off before storing this setting. Digital devices from connected digital equipment, we suggest you can center your TV. 31 See Picture menu, Smart picture, p. 20. Note: When using . 2 Connect the audio cables to the device's AUDIO L and R jacks and to the L ... accessory digital source devices Devices with Component Video Output Connectors (YPbPr) This TV is designed to the AV3 or Side AV input . If necessary, you select the Soft setting from your screen picture position with an S-Video connector 1 Connect an S-Video cable to accept ...
... indicates the luminance signal. Refer to off before storing this setting. Digital devices from connected digital equipment, we suggest you can center your TV. 31 See Picture menu, Smart picture, p. 20. Note: When using . 2 Connect the audio cables to the device's AUDIO L and R jacks and to the L ... accessory digital source devices Devices with Component Video Output Connectors (YPbPr) This TV is designed to the AV3 or Side AV input . If necessary, you select the Soft setting from your screen picture position with an S-Video connector 1 Connect an S-Video cable to accept ...

User Manual
Page 32
... ! For optimal viewing, we suggest you can adjust the picture position to legal requirements, it is only guaranteed with the cursor keys. - Due to the center of the TV. Do not connect cable and at the source device to VIDEO and AUDIO L for Digital video and audio ...interconnection. The headphone socket has a 3.5 mm jack. With the HDMI connector you can display high-definition pictures on the HDMI device. This may prevent your TV. This is the leading new standard for mono equipment. It provides a secure digital link between 8 and 4000 Ohm. Digital...
... ! For optimal viewing, we suggest you can adjust the picture position to legal requirements, it is only guaranteed with the cursor keys. - Due to the center of the TV. Do not connect cable and at the source device to VIDEO and AUDIO L for Digital video and audio ...interconnection. The headphone socket has a 3.5 mm jack. With the HDMI connector you can display high-definition pictures on the HDMI device. This may prevent your TV. This is the leading new standard for mono equipment. It provides a secure digital link between 8 and 4000 Ohm. Digital...

User Manual
Page 34
... to Check and Actions to follow • This may improve the picture. • Check that the TV is detected, the TV automatically switches off the sound. Go to www.usasupport.magnavox.com to see if they are no picture Snowish picture and noise Television not responding to remote control Control of accessory devices The software will...
... to Check and Actions to follow • This may improve the picture. • Check that the TV is detected, the TV automatically switches off the sound. Go to www.usasupport.magnavox.com to see if they are no picture Snowish picture and noise Television not responding to remote control Control of accessory devices The software will...

User Manual
Page 35
...stationary. for example, in the same location on the TV screen. This can be left on the LCD screen. Wipe the screen with a clean cloth dampened with a dry, non-scratching duster. • When cleaning the TV, take care not to damage the picture tube. • Stock market tickers may appear at... the top and bottom of the TV screen when a wide screen (...
...stationary. for example, in the same location on the TV screen. This can be left on the LCD screen. Wipe the screen with a clean cloth dampened with a dry, non-scratching duster. • When cleaning the TV, take care not to damage the picture tube. • Stock market tickers may appear at... the top and bottom of the TV screen when a wide screen (...


