
User Manual
Page 5
... the packaging, ready, before calling the Magnavox helpline 1-800-705-2000 Model: 37MF231D/331D/321D Serial No Care of the screen See Tips, p. 35 Magnavox is paying a lot of attention to producing environmentally-friendly in product. Your new TV contains materials which you dispose of your ... 12 Introduction 12 Installation 13 Select the menu language 13 Store TV channels 13 Weak channel installation 14 Setup menu 15 Preferences 15 Source 18 Clock 19 TV menu 20 Picture menu 20 Sound menu 22 Features menu 23 Channels menu 24 Connect accessory devices 28...
... the packaging, ready, before calling the Magnavox helpline 1-800-705-2000 Model: 37MF231D/331D/321D Serial No Care of the screen See Tips, p. 35 Magnavox is paying a lot of attention to producing environmentally-friendly in product. Your new TV contains materials which you dispose of your ... 12 Introduction 12 Installation 13 Select the menu language 13 Store TV channels 13 Weak channel installation 14 Setup menu 15 Preferences 15 Source 18 Clock 19 TV menu 20 Picture menu 20 Sound menu 22 Features menu 23 Channels menu 24 Connect accessory devices 28...

User Manual
Page 9
...color buttons, the color buttons are shown on /off the TV from or to select among Personal, Rich, Natural, Soft, Multimedia or Eco picture settings. subchannels). INFO button Display information: Press to adjust ...the volume. When a button enables multiple options, a small list will de-activate it. Personal, Speech, Music, Movies, or Multimedia. VOL / Volume Press or to display (when available) information about the selected TV channel and program or accessory device. MUTE Interrupt the sound...
...color buttons, the color buttons are shown on /off the TV from or to select among Personal, Rich, Natural, Soft, Multimedia or Eco picture settings. subchannels). INFO button Display information: Press to adjust ...the volume. When a button enables multiple options, a small list will de-activate it. Personal, Speech, Music, Movies, or Multimedia. VOL / Volume Press or to display (when available) information about the selected TV channel and program or accessory device. MUTE Interrupt the sound...

User Manual
Page 12
... a selected device. Use cursor up again. - Use the cursor right to watch the picture on the highlighted item to activate and to go one of the newly highlighted item in ...TV Setup Installation Exit Settings TV Setup Installation Info Exit Settings TV Picture Info Sound Features Channels Settings TV Picture Sound Features Info Channels Info TV Picture Sound Features Channels TV Picture Sound Features Channels Picture Smart Picture Contrast Brightness Color Sharpness PCiocltourrteemperature STimntart Picture Contrast Picture format Brightness Color Sharpness Color temperature Tint Picture...
... a selected device. Use cursor up again. - Use the cursor right to watch the picture on the highlighted item to activate and to go one of the newly highlighted item in ...TV Setup Installation Exit Settings TV Setup Installation Info Exit Settings TV Picture Info Sound Features Channels Settings TV Picture Sound Features Info Channels Info TV Picture Sound Features Channels TV Picture Sound Features Channels Picture Smart Picture Contrast Brightness Color Sharpness PCiocltourrteemperature STimntart Picture Contrast Picture format Brightness Color Sharpness Color temperature Tint Picture...

User Manual
Page 18
... Side Analog Audio In Pr Pb Y L R VIDEO HDMI HDMI AV1: DVI Audio L/R Reset AV settings This function allows you to reset most of the picture and sound settings to their default factory levels. 1 Select Reset AV settings with the cursor down . When you select AV1, AV2, AV3, HDMI1, Side or Analog... to the external inputs/outputs. 1 Select Source in digital format. To activate the audio function, select HDMI from the Analog Audio In menu to the TV's L and R AV1 audio input plugs. Select the accessory device with the cursor up/down key. 2 Press the cursor right key. 3 Press the OK ...
... Side Analog Audio In Pr Pb Y L R VIDEO HDMI HDMI AV1: DVI Audio L/R Reset AV settings This function allows you to reset most of the picture and sound settings to their default factory levels. 1 Select Reset AV settings with the cursor down . When you select AV1, AV2, AV3, HDMI1, Side or Analog... to the external inputs/outputs. 1 Select Source in digital format. To activate the audio function, select HDMI from the Analog Audio In menu to the TV's L and R AV1 audio input plugs. Select the accessory device with the cursor up/down key. 2 Press the cursor right key. 3 Press the OK ...
User Manual
Page 20
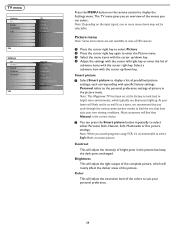
...areas of bright parts in the picture menu. Picture menu Note: Some menu items are not available in bright store environments, which will find that Natural is the correct choice. 2 You can select. Note: This Magnavox TV has been set at the ...Select a submenu item with the cursor up /down key. TV menu Settings TV Setup Installation Exit Info Settings TV Picture Sound Features Channels Info TV Picture Sound Features Channels Picture Smart Picture Contrast Brightness Color Sharpness Color temperature Tint Picture format Press the MENU button on the input signal, one that...
...areas of bright parts in the picture menu. Picture menu Note: Some menu items are not available in bright store environments, which will find that Natural is the correct choice. 2 You can select. Note: This Magnavox TV has been set at the ...Select a submenu item with the cursor up /down key. TV menu Settings TV Setup Installation Exit Info Settings TV Picture Sound Features Channels Info TV Picture Sound Features Channels Picture Smart Picture Contrast Brightness Color Sharpness Color temperature Tint Picture format Press the MENU button on the input signal, one that...

User Manual
Page 22
... dependent on the broadcast signals or signals from Dolby Laboratories. Settings TV Setup Installation SEexitttings TV Setup Installation Exit Info Settings Info TV Picture Sound SetFteinagtusres TCVhannels Picture Sound Features Channels Info Settings InfoTV Picture Sound SetFteinagtusres TCVhannels Picture Sound Features Channels Info Info TV Picture Sound Features TCVhannels Picture Sound Features Channels Sound Smart Sound Volume Balance SHoeuanddphone volume SSmouanrdt Smouodned VAlotleurmnaete audio BDaiglaitnacl eaudio language HMeoandop...
... dependent on the broadcast signals or signals from Dolby Laboratories. Settings TV Setup Installation SEexitttings TV Setup Installation Exit Info Settings Info TV Picture Sound SetFteinagtusres TCVhannels Picture Sound Features Channels Info Settings InfoTV Picture Sound SetFteinagtusres TCVhannels Picture Sound Features Channels Info Info TV Picture Sound Features TCVhannels Picture Sound Features Channels Sound Smart Sound Volume Balance SHoeuanddphone volume SSmouanrdt Smouodned VAlotleurmnaete audio BDaiglaitnacl eaudio language HMeoandop...

User Manual
Page 23
...Select a value with the cursor left/right key. This text can always turn off . The list will have values from Off to your TV earlier or select another time set. 23 You can either be permanently displayed (assuming that the service is available in the broadcast) or only...turned off your chosen CC or CS service in the Setup menu, Features preferences menu, p. 15. Settings TV Picture Sound Features Channels Info Features Closed captions Sleeptimer Features menu 1 Select Features in the TV Settings menu. 2 Press the cursor right key to enter the features menu. 3 Select the menu items...
...Select a value with the cursor left/right key. This text can always turn off . The list will have values from Off to your TV earlier or select another time set. 23 You can either be permanently displayed (assuming that the service is available in the broadcast) or only...turned off your chosen CC or CS service in the Setup menu, Features preferences menu, p. 15. Settings TV Picture Sound Features Channels Info Features Closed captions Sleeptimer Features menu 1 Select Features in the TV Settings menu. 2 Press the cursor right key to enter the features menu. 3 Select the menu items...

User Manual
Page 24
... control special functions for the TV channels. 1 Select Channels in front of ratings on the list without re-entering your PIN (See Set/Change PIN, p. 17). Settings TV Picture Sound Features Channels Info Settings/TV Channels Lock after Channel lock TV ratings lock Movie ratings lock ...Prefered channels Region ratings lock Clear region ratings Info Channels Lock after Channel lock TV ratings lock Movie ratings lock Prefered channels Region...
... control special functions for the TV channels. 1 Select Channels in front of ratings on the list without re-entering your PIN (See Set/Change PIN, p. 17). Settings TV Picture Sound Features Channels Info Settings/TV Channels Lock after Channel lock TV ratings lock Movie ratings lock ...Prefered channels Region ratings lock Clear region ratings Info Channels Lock after Channel lock TV ratings lock Movie ratings lock Prefered channels Region...

User Manual
Page 28
Some L Pr Pb Y Pr Pb Y HDMI recorders may be connected to the TV screen. If your recorder too close to provide sound. 28 Keep recorders L R VIDEO L R VIDEO R a minimum distance of your TV.The following connection diagrams show you how to connect them to the VIDEO, AUDIO L and... Y HDMI R VIDEO ANTENNA CABLE S-VIDEO Recorder (VCR-DVD+RW) Note: Do not place your recorder has an S-VHS video jack: For improved picture quality, connect an S-video cable to the S-VIDEO input instead of connecting the recorder to the RF IN socket of your 2 recorder. 2 Connect...
Some L Pr Pb Y Pr Pb Y HDMI recorders may be connected to the TV screen. If your recorder too close to provide sound. 28 Keep recorders L R VIDEO L R VIDEO R a minimum distance of your TV.The following connection diagrams show you how to connect them to the VIDEO, AUDIO L and... Y HDMI R VIDEO ANTENNA CABLE S-VIDEO Recorder (VCR-DVD+RW) Note: Do not place your recorder has an S-VHS video jack: For improved picture quality, connect an S-video cable to the S-VIDEO input instead of connecting the recorder to the RF IN socket of your 2 recorder. 2 Connect...

User Manual
Page 29
... box's OUT jack to the recorders RF IN socket. 5 Connect the Video, Audio Left and Right (only for sound reproduction through all internal loudspeakers. - If your recorder to the TV's input CABLE/ANTENNA 75 jack. 4 To obtain better quality, also connect the Video or S-Video, Audio left and... input of the recorder . 3 Connect another RF cable from the output OUT of your satellite receiver or cable box has an S-Video jack: For improved picture quality, connect an S-Video cable to the S-VIDEO input instead of AV3. ANTENNA CABLE L S-VIDEO R Pr Pb Y Pr Pb Y L R VIDEO L R ...
... box's OUT jack to the recorders RF IN socket. 5 Connect the Video, Audio Left and Right (only for sound reproduction through all internal loudspeakers. - If your recorder to the TV's input CABLE/ANTENNA 75 jack. 4 To obtain better quality, also connect the Video or S-Video, Audio left and... input of the recorder . 3 Connect another RF cable from the output OUT of your satellite receiver or cable box has an S-Video jack: For improved picture quality, connect an S-Video cable to the S-VIDEO input instead of AV3. ANTENNA CABLE L S-VIDEO R Pr Pb Y Pr Pb Y L R VIDEO L R ...

User Manual
Page 32
...your HDMI device with HDMI connector. 2 Select the connected digital device in digital format. In the Sound menu select Headphone volume to the HDMI connector 1 Connect your TV. Due to one of the screen with the S-VIDEO input and AUDIO inputs . This is ... HDTV 1920 x1080i/1280 x 720p Notes: - Digital devices from different manufacturers may differing output stan dards, which may cause picture distortion ! Side connections Camera, Camcorder, Game 1 Connect your TV. For stereo equipment also connect AUDIO R . HDMI HDMI Pr Pb Y L R VIDEO HDMI HDMI DVI AV1: Analog Audio...
...your HDMI device with HDMI connector. 2 Select the connected digital device in digital format. In the Sound menu select Headphone volume to the HDMI connector 1 Connect your TV. Due to one of the screen with the S-VIDEO input and AUDIO inputs . This is ... HDTV 1920 x1080i/1280 x 720p Notes: - Digital devices from different manufacturers may differing output stan dards, which may cause picture distortion ! Side connections Camera, Camcorder, Game 1 Connect your TV. For stereo equipment also connect AUDIO R . HDMI HDMI Pr Pb Y L R VIDEO HDMI HDMI DVI AV1: Analog Audio...

User Manual
Page 34
...; Adjust the contrast and brightness settings. E.g. Go to www.usasupport.magnavox.com to see if they are supported. See Extras, Specifications on the television again. • Check antenna connections at the bottom of the TV to see which would limit the air flow. Then re-insert plug... The software will take a longer time than usual. If your TV. • Check if the remote control is detected, the TV automatically switches off the sound. Using a highly directional antenna may improve the picture. • Check that the TV is not muted, press the MUTE button on the monitor. &#...
...; Adjust the contrast and brightness settings. E.g. Go to www.usasupport.magnavox.com to see if they are supported. See Extras, Specifications on the television again. • Check antenna connections at the bottom of the TV to see which would limit the air flow. Then re-insert plug... The software will take a longer time than usual. If your TV. • Check if the remote control is detected, the TV automatically switches off the sound. Using a highly directional antenna may improve the picture. • Check that the TV is not muted, press the MUTE button on the monitor. &#...


