
User manual, English (US)
Page 2
TABLE OF CONTENTS IMPORTANT INFORMATION IMPORTANT SAFETY INSTRUCTIONS SUPPLIED ACCESSORIES REMOTE CONTROL FUNCTIONAL OVERVIEW CONNECTIONS BASIC OPERATIONS WATCHING TV MENU ADJUSTMENT BASIC OPERATIONS DVD PLAY DISCS IN VARIOUS WAYS MENU SETTING DVD KODAK PICTURE CD PLAYBACK TROUBLESHOOTING TECHNICAL SPECIFICATIONS WARRANTY PAGE 2 3-4 5 6-7 8 9 10 11-12 13-18 19-24 24-29 30-34 35 36-37 38 39 page1
TABLE OF CONTENTS IMPORTANT INFORMATION IMPORTANT SAFETY INSTRUCTIONS SUPPLIED ACCESSORIES REMOTE CONTROL FUNCTIONAL OVERVIEW CONNECTIONS BASIC OPERATIONS WATCHING TV MENU ADJUSTMENT BASIC OPERATIONS DVD PLAY DISCS IN VARIOUS WAYS MENU SETTING DVD KODAK PICTURE CD PLAYBACK TROUBLESHOOTING TECHNICAL SPECIFICATIONS WARRANTY PAGE 2 3-4 5 6-7 8 9 10 11-12 13-18 19-24 24-29 30-34 35 36-37 38 39 page1

User manual, English (US)
Page 3
... intended to alert the user to the presence of electric shock to which the receiver is connected. ● Consult the dealer or an experienced radio, TV technical for help. ● Only shielded interface cable should be used in the literature accompanying the product. If this equipment does not cause harmful interference...
... intended to alert the user to the presence of electric shock to which the receiver is connected. ● Consult the dealer or an experienced radio, TV technical for help. ● Only shielded interface cable should be used in the literature accompanying the product. If this equipment does not cause harmful interference...

User manual, English (US)
Page 7
... the remote sensor window of the remote control. REMOTE CONTROL INSERTING BATTERIES INTO THE REMOTE CONTROL Insert supplied batteries via the battery compartment on the TV's sensor. Make sure polarity matches the (+) and (-) marks inside the compartment. + - + USING THE REMOTE CONTROL UNIT ● Use the remote control by direct sunlight on...
... the remote sensor window of the remote control. REMOTE CONTROL INSERTING BATTERIES INTO THE REMOTE CONTROL Insert supplied batteries via the battery compartment on the TV's sensor. Make sure polarity matches the (+) and (-) marks inside the compartment. + - + USING THE REMOTE CONTROL UNIT ● Use the remote control by direct sunlight on...

User manual, English (US)
Page 8
... unit must be set to play mode. FF/FR Use to DVD status. REPEAT Use to enter DVD chapter numbers. Number Buttons Use to set TV display mode. DVD TITLE Use to pause the DVD playback. PAUSE Use to bring up the DVD title menu. ZOOM Use to slow the DVD...; RETURN Return to set the channel and to repeat the DVD playback. WIDE In DVD mode, use the / buttons to select between: TV, DVD, AV1-S-Video, AV2-Video, AV3Component, PC-Analog(VGA), PCDigital(DVI), and press the OK button to select close caption mode. Use to shift DVD ...
... unit must be set to play mode. FF/FR Use to DVD status. REPEAT Use to enter DVD chapter numbers. Number Buttons Use to set TV display mode. DVD TITLE Use to pause the DVD playback. PAUSE Use to bring up the DVD title menu. ZOOM Use to slow the DVD...; RETURN Return to set the channel and to repeat the DVD playback. WIDE In DVD mode, use the / buttons to select between: TV, DVD, AV1-S-Video, AV2-Video, AV3Component, PC-Analog(VGA), PCDigital(DVI), and press the OK button to select close caption mode. Use to shift DVD ...

User manual, English (US)
Page 9
... 10 PREV 11 NEXT 12 EJECT 13 3 21 1) REMOTE SENSOR 2) POWER ON INDICATOR 3) STANDBY INDICATOR 4) POWER BUTTON: Use to turn the unit on and off. 5) TV/DVD/AUX/PC: Use to eject the disc being played in the disc slot. Video, AV3-Component,PC-Analog(VGA), PC-Digital(DVI) and use... skip to the previous chapter. 12) NEXT: Use to skip to the next chapter. 13) EJECT BUTTON: Use to select the AV signal source among: TV, DVD,AV1-S-Video, AV2- REAR VIEW DC 24V 6A DC INPUT 10 DVI PC INPUT 9 AUDIO L R 1 1) AV OUT (Composite Video and Audio AV OUT L Out...
... 10 PREV 11 NEXT 12 EJECT 13 3 21 1) REMOTE SENSOR 2) POWER ON INDICATOR 3) STANDBY INDICATOR 4) POWER BUTTON: Use to turn the unit on and off. 5) TV/DVD/AUX/PC: Use to eject the disc being played in the disc slot. Video, AV3-Component,PC-Analog(VGA), PC-Digital(DVI) and use... skip to the previous chapter. 12) NEXT: Use to skip to the next chapter. 13) EJECT BUTTON: Use to select the AV signal source among: TV, DVD,AV1-S-Video, AV2- REAR VIEW DC 24V 6A DC INPUT 10 DVI PC INPUT 9 AUDIO L R 1 1) AV OUT (Composite Video and Audio AV OUT L Out...

User manual, English (US)
Page 10
... and the / buttons to set the 26MD255V s signal source to PC-Analog(VGA) . 26MD255V monitor s native resolution for computer use the TV/DVD/AUX/PC button and the / buttons to set the 26MD255V's signal source to the 26MD255V through the VGA socket on the 26MD255V; f. Using the AV out, RCA ... is for audio associated with this point. b. The Mini-plugged is 1280x768. Use the TV/DVD/AUX/PC button and the / buttons to set the 26MD255V's signal source to PC-Digital(DVI) . use the TV Monitor as an external monitor. Using the AV2 RCA Video/Audio input: Connect compatible AV ...
... and the / buttons to set the 26MD255V s signal source to PC-Analog(VGA) . 26MD255V monitor s native resolution for computer use the TV/DVD/AUX/PC button and the / buttons to set the 26MD255V's signal source to the 26MD255V through the VGA socket on the 26MD255V; f. Using the AV out, RCA ... is for audio associated with this point. b. The Mini-plugged is 1280x768. Use the TV/DVD/AUX/PC button and the / buttons to set the 26MD255V's signal source to PC-Digital(DVI) . use the TV Monitor as an external monitor. Using the AV2 RCA Video/Audio input: Connect compatible AV ...

User manual, English (US)
Page 11
... power is still consumed even when the power is turned off. POWER TV/AV MODE SELECTION By pressing the TV/DVD/AUX/PC on the screen disappears and the STANDBY indicator lights up red. page10 BASIC OPERATIONS POWER TV/DVD/AUX/PC TV/DVD/ CH CH AUX/PC VOL VOL TURNING OFF THE POWER... 1. The POWER indicator lights up red, press POWER on the remote control to turn the TV set on the TV set and confirming by the OK button, you can change the mode as follows: TV DVD AV1-S-Video AV2-Video AV3-Component PC-Digital(DVI) PC-Analog(VGA...
... power is still consumed even when the power is turned off. POWER TV/AV MODE SELECTION By pressing the TV/DVD/AUX/PC on the screen disappears and the STANDBY indicator lights up red. page10 BASIC OPERATIONS POWER TV/DVD/AUX/PC TV/DVD/ CH CH AUX/PC VOL VOL TURNING OFF THE POWER... 1. The POWER indicator lights up red, press POWER on the remote control to turn the TV set on the TV set and confirming by the OK button, you can change the mode as follows: TV DVD AV1-S-Video AV2-Video AV3-Component PC-Digital(DVI) PC-Analog(VGA...

User manual, English (US)
Page 12
... . on the remote unit CH+/- 1. The POWER indicator lights up red. Press CH- to increase channel number. 2. WATCHING TV TURNING ON THE POWER 1. NOTE: Weak electric power is still consumed even when the power is turned off. SIMPLE BUTTON OPERATIONS FOR CHANGING CHANNELS You ... decrease channel number. If the STANDBY indicator still lights up red, press POWER on the remote control to turn the TV set on the TV set operates the same as CH+/- CH+/- TV/DVD/ CH CH AUX/PC VOL VOL page11 Press POWER button on the front panel to turn on . on the...
... . on the remote unit CH+/- 1. The POWER indicator lights up red. Press CH- to increase channel number. 2. WATCHING TV TURNING ON THE POWER 1. NOTE: Weak electric power is still consumed even when the power is turned off. SIMPLE BUTTON OPERATIONS FOR CHANGING CHANNELS You ... decrease channel number. If the STANDBY indicator still lights up red, press POWER on the remote control to turn the TV set on the TV set operates the same as CH+/- CH+/- TV/DVD/ CH CH AUX/PC VOL VOL page11 Press POWER button on the front panel to turn on . on the...

User manual, English (US)
Page 13
... again to switch back to increase the volume. 2. Press MUTE . '' '' will display on the remote control unit. Press VOL+ to the currently tuned channel. 1. WATCHING TV Using number buttons on the remote unit NUMBER BUTTONS SIMPLE BUTTON OPERATION FOR CHANGING VOLUME/SOUND Changing the volume You can change the volume on...
... again to switch back to increase the volume. 2. Press MUTE . '' '' will display on the remote control unit. Press VOL+ to the currently tuned channel. 1. WATCHING TV Using number buttons on the remote unit NUMBER BUTTONS SIMPLE BUTTON OPERATION FOR CHANGING VOLUME/SOUND Changing the volume You can change the volume on...

User manual, English (US)
Page 14
... "Cable". 5. NOTE: The illustrations and on and off ; Press / to select between "Skip" and "Add"; Fine tune 1. Press TV MENU to bring up the TV menu screen. 2. Press to exit. press TV MENU to enter "TV Tuner" menu. 4. Cable 1. Press / to change cable on 0 down for a better picture and sound; Wait until the searching...
... "Cable". 5. NOTE: The illustrations and on and off ; Press / to select between "Skip" and "Add"; Fine tune 1. Press TV MENU to bring up the TV menu screen. 2. Press to exit. press TV MENU to enter "TV Tuner" menu. 4. Cable 1. Press / to change cable on 0 down for a better picture and sound; Wait until the searching...

User manual, English (US)
Page 15
... "Content Blocking (Password)" menu. Press to change the selected digit. 9. Press to select "OK" and press OK to bring up the TV menu screen. 2. MENU ADJUSTMENT CONTENT BLOCKING Password 1. Press TV MENU to check the password. Password 00000 0 00000 0 7. Press to select "Clear" and press to confirm your change the password. 8.... to clear the password; Press / to select "Settings" and press to change . 10. Press to select "Change" and press to select "Content Blocking". 3. press TV MENU to enter the password. 5. Press to select "Enter" and press to exit.
... "Content Blocking (Password)" menu. Press to change the selected digit. 9. Press to select "OK" and press OK to bring up the TV menu screen. 2. MENU ADJUSTMENT CONTENT BLOCKING Password 1. Press TV MENU to check the password. Password 00000 0 00000 0 7. Press to select "Clear" and press to confirm your change the password. 8.... to clear the password; Press / to select "Settings" and press to change . 10. Press to select "Change" and press to select "Content Blocking". 3. press TV MENU to enter the password. 5. Press to select "Enter" and press to exit.
User manual, English (US)
Page 16
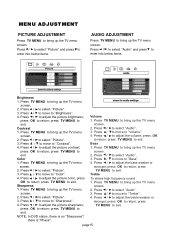
... / to ''Bass''. 4. Bass 1. Press / to move to select ''Audio''. 3. Press / to ''Treble''. 4. Press / to move to select ''Audio''. 3. press TV MENU to select ''Picture''. 3. Press / to exit. press OK to select ''Picture''. 3. Press / to return; Press / to adjust the picture color; Press / to... return; press OK to adjust the volume; Press / to exit. press TV MENU to adjust the picture brightness; Press TV MENU to bring up the TV menu screen. 2. page15 Press TV MENU to bring up the TV menu screen. 2. there is no "Sharpness"; Press / to ''Volume''. ...
... / to ''Bass''. 4. Bass 1. Press / to move to select ''Audio''. 3. Press / to ''Treble''. 4. Press / to move to select ''Audio''. 3. press TV MENU to select ''Picture''. 3. Press / to exit. press OK to select ''Picture''. 3. Press / to return; Press / to adjust the picture color; Press / to... return; press OK to adjust the volume; Press / to exit. press TV MENU to adjust the picture brightness; Press TV MENU to bring up the TV menu screen. 2. page15 Press TV MENU to bring up the TV menu screen. 2. there is no "Sharpness"; Press / to ''Volume''. ...

User manual, English (US)
Page 17
... to enter into below items. Equalizer Change equalizer character 3. Press / to move to bring up the TV menu screen. 2. Equalizer 1. Press / to select ''Window'' and press to exit. Press TV MENU to ''MPX''. 4. You can also use the MPX button on the remote control to select ''Audio''.... (CONTINUED) Balance 1. Press TV MENU to select a MPX mode. 1. Press / to select "Equalizer" in TV status, there is to bring up the TV menu screen. press TV MENU to return; Press / to move to bring up the TV menu screen. 2. press OK to exit. press TV MENU to adjust. NOTE: ...
... to enter into below items. Equalizer Change equalizer character 3. Press / to move to bring up the TV menu screen. 2. Equalizer 1. Press / to select ''Window'' and press to exit. Press TV MENU to ''MPX''. 4. You can also use the MPX button on the remote control to select ''Audio''.... (CONTINUED) Balance 1. Press TV MENU to select a MPX mode. 1. Press / to select "Equalizer" in TV status, there is to bring up the TV menu screen. press TV MENU to return; Press / to move to bring up the TV menu screen. 2. press OK to exit. press TV MENU to adjust. NOTE: ...

User manual, English (US)
Page 18
... the image continue playing. 3. Press / to return; Press TV MENU to adjust the horizontal position of displayed image; Press / to bring up the TV menu screen. 2. Press / to exit. press TV MENU to select ''Window''. 3. Press TV MENU to select a Display mode; Press / to exit....Press / to return; MENU ADJUSTMENT WINDOW ADJUSTMENT (CONTINUED) Display Mode 1. press OK to select "Freeze" in "Options" menu. 2. NOTE: In TV, VIDEO, S-VIDEO and COMPONENT Status, there is used to set the menu language between : English, French and Spanish. 3. Freeze It is used...
... the image continue playing. 3. Press / to return; Press TV MENU to adjust the horizontal position of displayed image; Press / to bring up the TV menu screen. 2. Press / to exit. press TV MENU to select ''Window''. 3. Press TV MENU to select a Display mode; Press / to exit....Press / to return; MENU ADJUSTMENT WINDOW ADJUSTMENT (CONTINUED) Display Mode 1. press OK to select "Freeze" in "Options" menu. 2. NOTE: In TV, VIDEO, S-VIDEO and COMPONENT Status, there is used to set the menu language between : English, French and Spanish. 3. Freeze It is used...

User manual, English (US)
Page 19
If you want to adjust the Color Temperature. 1. Press TV MENU to factory setting. Press to reset all settings to exit. Press / to select "CC Mode " in "Option" menu. 2. Press / to select a CC Mode. 3. Color ... : Sleep Time Time remaining 120minutes 120 minutes 4. Press / to move to exit. Press TV MENU to ''Picture Settings Reset''. 4. Press / to bring up the TV menu screen. 2. Press TV MENU to adjust the color temperature between: Normal, Warm and Cool. 3. Press TV MENU to select "Sleep Time "in "Option" menu. 2. NOTE: In DVD, PC...
If you want to adjust the Color Temperature. 1. Press TV MENU to factory setting. Press to reset all settings to exit. Press / to select "CC Mode " in "Option" menu. 2. Press / to select a CC Mode. 3. Color ... : Sleep Time Time remaining 120minutes 120 minutes 4. Press / to move to exit. Press TV MENU to ''Picture Settings Reset''. 4. Press / to bring up the TV menu screen. 2. Press TV MENU to adjust the color temperature between: Normal, Warm and Cool. 3. Press TV MENU to select "Sleep Time "in "Option" menu. 2. NOTE: In DVD, PC...

User manual, English (US)
Page 20
I n s e r t a d i s c i n t o t h e d i s c s l o t , with the label side facing to the track numbers. 5. AFTER STEP 4 IS FINISHED: ● If playing a DVD, the TV screen shows DVD menu or title menu. ● If playing a CD, press (PLAY), and the unit plays the disc according to yourself. 4. Pause Press DVD &#...
I n s e r t a d i s c i n t o t h e d i s c s l o t , with the label side facing to the track numbers. 5. AFTER STEP 4 IS FINISHED: ● If playing a DVD, the TV screen shows DVD menu or title menu. ● If playing a CD, press (PLAY), and the unit plays the disc according to yourself. 4. Pause Press DVD &#...

User manual, English (US)
Page 24
Press the or buttons to the next or previous page. Volume Control DVD 、 CD ● Press VOLUME on the TV or amplifier to adjust the volume. ● Press VOLUME on the remote to bring up the Display. 2. Press or to skip to highlight "Time Disp" ...
Press the or buttons to the next or previous page. Volume Control DVD 、 CD ● Press VOLUME on the TV or amplifier to adjust the volume. ● Press VOLUME on the remote to bring up the Display. 2. Press or to skip to highlight "Time Disp" ...

User manual, English (US)
Page 32
.../PS This is selected when the unit is : NOTE: You can also keep pressing the direction button until the cursor is connected to a normal TV. Wide-screen images are shown on the screen, but with black bars on the top and bottom of the screen. 3. General Setup The setting structure... is connected to a normal TV. The sereen shows: --Dolby Digital Setup-- Exit setup menu. ●Press the direction button to exit from "Dual Mono". ●Press the direction button...
.../PS This is selected when the unit is : NOTE: You can also keep pressing the direction button until the cursor is connected to a normal TV. Wide-screen images are shown on the screen, but with black bars on the top and bottom of the screen. 3. General Setup The setting structure... is connected to a normal TV. The sereen shows: --Dolby Digital Setup-- Exit setup menu. ●Press the direction button to exit from "Dual Mono". ●Press the direction button...
User manual, English (US)
Page 33
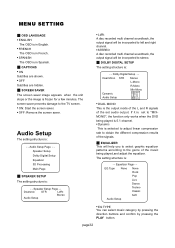
... Setup Page - Downmix STR Lt/Rt Stereo Audio Setup ● Lt/Rt A disc recorded multi channel soundtrack, the output signal will be incorported to the TV screen. ● ON: Start the screen saver. ● OFF: Remove the screen saver. MENU SETTING ■ OSD LANGUAGE ● ENGLISH The OSD is in English...
... Setup Page - Downmix STR Lt/Rt Stereo Audio Setup ● Lt/Rt A disc recorded multi channel soundtrack, the output signal will be incorported to the TV screen. ● ON: Start the screen saver. ● OFF: Remove the screen saver. MENU SETTING ■ OSD LANGUAGE ● ENGLISH The OSD is in English...

User manual, English (US)
Page 36
... the ratio of JPEG files from edge to center Mode 16: random Customer can order a KODAK Picture CD simply by the user. A message on your TV in a slideshow by using the Arrow Keys and pressing the "PLAY" key. Notes: During ZOOM function, slideshow transition and image rotation are provided, use "P. ... roll of your living room. To resume the slideshow press the PLAY key. Each picture in the Kodak Picture CD will be used in the TV screen. MODE" functions while viewing a slideshow.The last transition mode selected will be used to center Mode 12: wipe from top/bottom to display ...
... the ratio of JPEG files from edge to center Mode 16: random Customer can order a KODAK Picture CD simply by the user. A message on your TV in a slideshow by using the Arrow Keys and pressing the "PLAY" key. Notes: During ZOOM function, slideshow transition and image rotation are provided, use "P. ... roll of your living room. To resume the slideshow press the PLAY key. Each picture in the Kodak Picture CD will be used in the TV screen. MODE" functions while viewing a slideshow.The last transition mode selected will be used to center Mode 12: wipe from top/bottom to display ...


