

User manual, English (US)
Page 2
... selection Watching TV ● Turning on the power ● Turning off the power ● Simple button operations for changing channels ● Using last on the remote unit ● Simple button operation for changing volume/sound Menu Adjustment ● TV tuner adjustment ● Content blocking ● Picture adjustment ● Audio adjustment ●... adjustment ● Options adjustment Troubleshooting Specifications 1 2-3 4 5 5 5 5 6-9 6 7 8-9 10-11 10 10 11 12 12 12 12 13-15 13 13 13 14 15 16-24 16-17 18 19 20-21 22-24 25 26 27
... selection Watching TV ● Turning on the power ● Turning off the power ● Simple button operations for changing channels ● Using last on the remote unit ● Simple button operation for changing volume/sound Menu Adjustment ● TV tuner adjustment ● Content blocking ● Picture adjustment ● Audio adjustment ●... adjustment ● Options adjustment Troubleshooting Specifications 1 2-3 4 5 5 5 5 6-9 6 7 8-9 10-11 10 10 11 12 12 12 12 13-15 13 13 13 14 15 16-24 16-17 18 19 20-21 22-24 25 26 27
User manual, English (US)
Page 7
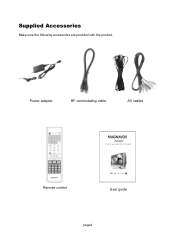
Supplied Accessories Make sure the following accessories are provided with the product. Power adapter RF commutating cable AV cables 17MD250V Remote control User guide page4
Supplied Accessories Make sure the following accessories are provided with the product. Power adapter RF commutating cable AV cables 17MD250V Remote control User guide page4
User manual, English (US)
Page 8
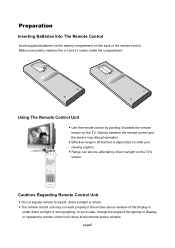
...but is dependant on the TV. Objects between the remote control and the sensor may not work properly if the remote sensor window of the Display is . ● Range can also be affected by pointing it towards the remote sensor on what your viewing angle is under direct sunlight... or strong lighting. Make sure polarity matches the (+) and (-) marks inside the compartment. + - + Using The Remote Control Unit ● Use the remote control by direct sunlight on the TV's sensor...
...but is dependant on the TV. Objects between the remote control and the sensor may not work properly if the remote sensor window of the Display is . ● Range can also be affected by pointing it towards the remote sensor on what your viewing angle is under direct sunlight... or strong lighting. Make sure polarity matches the (+) and (-) marks inside the compartment. + - + Using The Remote Control Unit ● Use the remote control by direct sunlight on the TV's sensor...
User manual, English (US)
Page 9
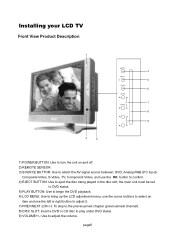
Installing your LCD TV Front View Product Description 1) POWER BUTTON: Use to turn the unit on and off. 2) REMOTE SENSOR 3) SOURCE BUTTON: Use to select the AV signal source between: DVD, Analog RGB (PC input), Composite Video, S-Video, TV, Component Video, and use the ... the previous/next chapter (previous/next channel). 8) DISC SLOT: Insert a DVD or CD disc to play under DVD status. 9) VOLUME+/-: Use to bring up the LCD adjustment menu; use the cursor buttons to select an item and use the OK button to confirm. 4) EJECT BUTTON: Use to eject the disc being...
Installing your LCD TV Front View Product Description 1) POWER BUTTON: Use to turn the unit on and off. 2) REMOTE SENSOR 3) SOURCE BUTTON: Use to select the AV signal source between: DVD, Analog RGB (PC input), Composite Video, S-Video, TV, Component Video, and use the ... the previous/next chapter (previous/next channel). 8) DISC SLOT: Insert a DVD or CD disc to play under DVD status. 9) VOLUME+/-: Use to bring up the LCD adjustment menu; use the cursor buttons to select an item and use the OK button to confirm. 4) EJECT BUTTON: Use to eject the disc being...
User manual, English (US)
Page 11
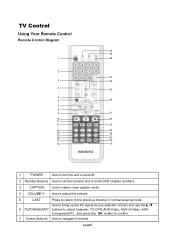
... caption mode. 4 VOLUME+/- Component,PC, and press the OK button to confirm. 7 Cursor Buttons Use to the previous channel in menus. TV Control Using Your Remote Control Remote Control Diagram 34 33 1 32 2 31 3 30 4 29 5 6 28 7 8 9 27 10 26 11 12 25 13 24 14 23 15 22 16 21... 17 20 18 19 1 POWER Use to turn the unit on and off. 2 Number Buttons Use to set the channel and to enter DVD chapter numbers. 3 ...
... caption mode. 4 VOLUME+/- Component,PC, and press the OK button to confirm. 7 Cursor Buttons Use to the previous channel in menus. TV Control Using Your Remote Control Remote Control Diagram 34 33 1 32 2 31 3 30 4 29 5 6 28 7 8 9 27 10 26 11 12 25 13 24 14 23 15 22 16 21... 17 20 18 19 1 POWER Use to turn the unit on and off. 2 Number Buttons Use to set the channel and to enter DVD chapter numbers. 3 ...

User manual, English (US)
Page 12
and exits TV menu by pressing again. 29 CH+/- Use to skip to slow the DVD playback speed. 15 P. TV Control Using Your Remote Control (Continued) 8 OK Use to confirm your selections. 9 DVD TITLE Use to bring up the DVD On-Screen-Display. 34 MPX Use to select MPX ... played in the disc slot, the main unit must be set TV display mode. 23 SETUP Use to display the time of the DVD playback. 17 A. page9 Auto adjustment for PC signals. In DVD status, use to set to DVD status. 33 OSD Use to bring up DVD setup menu. 24...
and exits TV menu by pressing again. 29 CH+/- Use to skip to slow the DVD playback speed. 15 P. TV Control Using Your Remote Control (Continued) 8 OK Use to confirm your selections. 9 DVD TITLE Use to bring up the DVD On-Screen-Display. 34 MPX Use to select MPX ... played in the disc slot, the main unit must be set TV display mode. 23 SETUP Use to display the time of the DVD playback. 17 A. page9 Auto adjustment for PC signals. In DVD status, use to set to DVD status. 33 OSD Use to bring up DVD setup menu. 24...
User manual, English (US)
Page 14
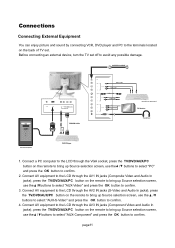
...-Video" and press the OK button to confirm. 3. page11 HEADPHONES 1. Connect a PC computer to the LCD through the AV2 IN jacks (S-Video and Audio In jacks), press the TV/DVD/AUX/PC button on the remote to bring up Source selection screen, use the / buttons to select "PC" and press the OK... to avoid any possible damage. Before connecting an external device, turn the TV set . Connect AV equipment to the LCD through the VGA socket, press the TV/DVD/AUX/PC button on the remote to bring up Source selection screen, use the / buttons to select "AUX-S-Video" and press the OK button...
...-Video" and press the OK button to confirm. 3. page11 HEADPHONES 1. Connect a PC computer to the LCD through the AV2 IN jacks (S-Video and Audio In jacks), press the TV/DVD/AUX/PC button on the remote to bring up Source selection screen, use the / buttons to select "PC" and press the OK... to avoid any possible damage. Before connecting an external device, turn the TV set . Connect AV equipment to the LCD through the VGA socket, press the TV/DVD/AUX/PC button on the remote to bring up Source selection screen, use the / buttons to select "AUX-S-Video" and press the OK button...

User manual, English (US)
Page 15
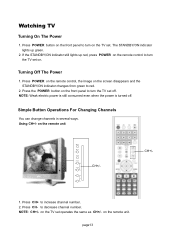
Press the POWER button on the front panel to turn the TV set off . Press POWER on the remote control, the image on . Basic Operations POWER POWER TV/DVD/ AUX/PC SOURCE Turning On The Power 1. NOTE: Small amounts of electric power is still ... change the mode as follows: TV Video S-Video DVD Component PC page12 TV/AV Mode Selection By pressing the TV/DVD/AUX/PC on the remote control to red. 2. The STANDBY/ON indicator lights up red, press POWER on the TV set .
Press the POWER button on the front panel to turn the TV set off . Press POWER on the remote control, the image on . Basic Operations POWER POWER TV/DVD/ AUX/PC SOURCE Turning On The Power 1. NOTE: Small amounts of electric power is still ... change the mode as follows: TV Video S-Video DVD Component PC page12 TV/AV Mode Selection By pressing the TV/DVD/AUX/PC on the remote control to red. 2. The STANDBY/ON indicator lights up red, press POWER on the TV set .
User manual, English (US)
Page 16
... changes from green to red. 2. Press CH+ to decrease channel number. on the TV set off . NOTE: CH+/- Press POWER on the remote control, the image on the remote unit CH+/- CH+/- 1. page13 If the STANDBY/ON indicator still lights up green. 2. Press CH- The STANDBY/ON indicator lights up red, press... POWER on . to increase channel number. 2. Press the POWER button on the front panel to turn on the TV set on the remote control to turn the TV set operates the same as CH+/- Press POWER button on the...
... changes from green to red. 2. Press CH+ to decrease channel number. on the TV set off . NOTE: CH+/- Press POWER on the remote control, the image on the remote unit CH+/- CH+/- 1. page13 If the STANDBY/ON indicator still lights up green. 2. Press CH- The STANDBY/ON indicator lights up red, press... POWER on . to increase channel number. 2. Press the POWER button on the front panel to turn on the TV set on the remote control to turn the TV set operates the same as CH+/- Press POWER button on the...

User manual, English (US)
Page 17
Watching TV Using number buttons on the remote unit NUMBER BUTTONS Select the channels directly by 2 . Press LAST again to switch back to the previous tuned channel. To select a 2-digit channel (e.g. channel 12): ● Press 1 ,followed by pressing the number buttons. page14 Using Last On The Remote Unit LAST Press LAST to switch the currently tuned channel to the currently tuned channel. channel 2): ● Press 2 . EXAMPLE: To select a 1-digit channel (e.g.
Watching TV Using number buttons on the remote unit NUMBER BUTTONS Select the channels directly by 2 . Press LAST again to switch back to the previous tuned channel. To select a 2-digit channel (e.g. channel 12): ● Press 1 ,followed by pressing the number buttons. page14 Using Last On The Remote Unit LAST Press LAST to switch the currently tuned channel to the currently tuned channel. channel 2): ● Press 2 . EXAMPLE: To select a 1-digit channel (e.g.
User manual, English (US)
Page 18
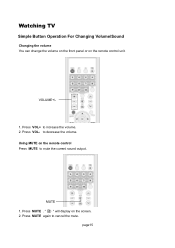
MUTE 1. Press VOL+ to decrease the volume. Press VOL- Press MUTE . '' '' will display on the remote control unit. to increase the volume. 2. Press MUTE again to mute the current sound output. VOLUME+/- 1. page15 Using MUTE on the remote control Press MUTE to cancel the mute. Watching TV Simple Button Operation For Changing Volume/Sound Changing the volume You can change the volume on the front panel or on the screen. 2.
MUTE 1. Press VOL+ to decrease the volume. Press VOL- Press MUTE . '' '' will display on the remote control unit. to increase the volume. 2. Press MUTE again to mute the current sound output. VOLUME+/- 1. page15 Using MUTE on the remote control Press MUTE to cancel the mute. Watching TV Simple Button Operation For Changing Volume/Sound Changing the volume You can change the volume on the front panel or on the screen. 2.

User manual, English (US)
Page 27
... / to move to ''H-Position''. 4. press TV MENU to select ''Window''. 3. press TV MENU to exit. NOTE: You can also use the CAPTION button on the remote control to select close caption; press TV MENU to exit. Press / to move to ''Image Size''. 4. Press / to move to ''Close Caption''. 4. press OK to...
... / to move to ''H-Position''. 4. press TV MENU to select ''Window''. 3. press TV MENU to exit. NOTE: You can also use the CAPTION button on the remote control to select close caption; press TV MENU to exit. Press / to move to ''Image Size''. 4. Press / to move to ''Close Caption''. 4. press OK to...
User manual, English (US)
Page 29
...the antenna toward the broadcasting station. ● Check the ''FINE TUNE ''is set up correctly and if not, adjust the fine tuning properly. Remote control does ● Check if the batteries in black & white. Picture is OK, but no sound. ● Check the volume control is ...9679; Adjust the H-POSITION, and IMAGE SIZE Control. (Refer to the WINDOW ADJUSTMENT.) page26 Troubleshooting Please check the following items before asking for LCD TV: 1024X768 and 60Hz. ● Refer to the table of PC mode input format indicated on page 22. (Not being registered resolution ...
...the antenna toward the broadcasting station. ● Check the ''FINE TUNE ''is set up correctly and if not, adjust the fine tuning properly. Remote control does ● Check if the batteries in black & white. Picture is OK, but no sound. ● Check the volume control is ...9679; Adjust the H-POSITION, and IMAGE SIZE Control. (Refer to the WINDOW ADJUSTMENT.) page26 Troubleshooting Please check the following items before asking for LCD TV: 1024X768 and 60Hz. ● Refer to the table of PC mode input format indicated on page 22. (Not being registered resolution ...
User manual, English (US)
Page 31
... disc according to read the disc. 5. The On-Screen Display (OSD) contains many playback features.To see the Display, press the OSD button on the remote to turn off the unit. ● You have to push "■" button twice to scroll through the different icons in the text box under the... playback of a DVD while it is highlighted, use the / buttons to select "DVD", press the OK button to yourself. 4. Use the or buttons on the remote while a disc is illustrated with an icon. Press POWER to move through the choices displayed in the Display. CD ● Press to play status. OSD...
... disc according to read the disc. 5. The On-Screen Display (OSD) contains many playback features.To see the Display, press the OSD button on the remote to turn off the unit. ● You have to push "■" button twice to scroll through the different icons in the text box under the... playback of a DVD while it is highlighted, use the / buttons to select "DVD", press the OK button to yourself. 4. Use the or buttons on the remote while a disc is illustrated with an icon. Press POWER to move through the choices displayed in the Display. CD ● Press to play status. OSD...

User manual, English (US)
Page 32
... Some discs contain more than one title. ■ Select a Chapter Because DVD discs use the or buttons to the preceding chapter by pressing on the remote to bring up the Display. 2. DVD DVD discs have any function. To select a title: 1. You can also the changed through the audio languages that... into chapters. The audio language can also advance to the next chapter by pressing on a CD). Press the or buttons to tracks on the remote. ■ Changing the Audio Language If the disc was created with different language tracks (recorded in the text box below the row of the ...
... Some discs contain more than one title. ■ Select a Chapter Because DVD discs use the or buttons to the preceding chapter by pressing on the remote to bring up the Display. 2. DVD DVD discs have any function. To select a title: 1. You can also the changed through the audio languages that... into chapters. The audio language can also advance to the next chapter by pressing on a CD). Press the or buttons to tracks on the remote. ■ Changing the Audio Language If the disc was created with different language tracks (recorded in the text box below the row of the ...

User manual, English (US)
Page 33
...WCHDEN PLAYING CD CD discs have the following playback features: Track, L/R, and Repeat. ■ Select a Specific Track 1. Press OSD on the remote to scroll through the choices: LEFT MONO, RIGHT MONO, MIXED MONO or STEREO. repeats the track that is turned off . The subtitles will revert...Basic Operations (For DVD Player) 1. When the disc is playing ● Title - To make the Display disappear, press the OSD button on the remote to bring up the Display. 2. repeats the disc that is playing ● Track - How to Cancel Repeat: There are 3 different angles, the...
...WCHDEN PLAYING CD CD discs have the following playback features: Track, L/R, and Repeat. ■ Select a Specific Track 1. Press OSD on the remote to scroll through the choices: LEFT MONO, RIGHT MONO, MIXED MONO or STEREO. repeats the track that is turned off . The subtitles will revert...Basic Operations (For DVD Player) 1. When the disc is playing ● Title - To make the Display disappear, press the OSD button on the remote to bring up the Display. 2. repeats the disc that is playing ● Track - How to Cancel Repeat: There are 3 different angles, the...
User manual, English (US)
Page 34
... previous page. Menu 13. 14. 15. 2. The selected repeat option will loop repeatedly until the Repeat option you want is playing, press OSD on the remote to scroll through the Repeat options until you turn Repeat off. DVD Menu Play DVD Some DVDs have title menus and chapter menus. Press or... on the TV or amplifier to select track 13. Highlight the Repeat icon. 3. Root 12. Volume Control DVD 、 CD ● Press VOLUME on the remote control. Root 2. Press to lower the volume. to enter the next menu.
... previous page. Menu 13. 14. 15. 2. The selected repeat option will loop repeatedly until the Repeat option you want is playing, press OSD on the remote to scroll through the Repeat options until you turn Repeat off. DVD Menu Play DVD Some DVDs have title menus and chapter menus. Press or... on the TV or amplifier to select track 13. Highlight the Repeat icon. 3. Root 12. Volume Control DVD 、 CD ● Press VOLUME on the remote control. Root 2. Press to lower the volume. to enter the next menu.

User manual, English (US)
Page 39
.... 5. Program Play DVD CD P.MODE To use the program playback feature, you must enter the order in the box. Use the number buttons on the remote to enter the title (and chapter) you want the titles (and chapters) on the DVD or the tracks on the CD to play first. The...
.... 5. Program Play DVD CD P.MODE To use the program playback feature, you must enter the order in the box. Use the number buttons on the remote to enter the title (and chapter) you want the titles (and chapters) on the DVD or the tracks on the CD to play first. The...

User manual, English (US)
Page 40
... (01-20) 01 _ _ 06 _ _ 02 _ _ 07 _ _ 03 _ _ 08 _ _ 04 _ _ 09 _ _ 05 _ _ 10 _ _ EXIT NEXT 2. Remove shuffle or random play . Use the number buttons on the remote to enter the track number you want to play DVD chapters or audio tracks in the same way 1-10 were programmed. 5. The cursor jumps to...
... (01-20) 01 _ _ 06 _ _ 02 _ _ 07 _ _ 03 _ _ 08 _ _ 04 _ _ 09 _ _ 05 _ _ 10 _ _ EXIT NEXT 2. Remove shuffle or random play . Use the number buttons on the remote to enter the track number you want to play DVD chapters or audio tracks in the same way 1-10 were programmed. 5. The cursor jumps to...
User manual, English (US)
Page 42
.../PS Normal/LB Wide Captions On On Off Screen Save On On Off Main Page ■ TV DISPLAY 1. Wide-screen images are shown on the remote control to a normal TV. Wide-screen images are shown on the screen, but with black bars on the top and bottom of the screen. 3. Set...
.../PS Normal/LB Wide Captions On On Off Screen Save On On Off Main Page ■ TV DISPLAY 1. Wide-screen images are shown on the remote control to a normal TV. Wide-screen images are shown on the screen, but with black bars on the top and bottom of the screen. 3. Set...


