User Manual
Page 3
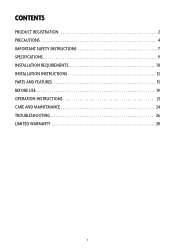
CONTENTS PRODUCT REGISTRATION 2 PRECAUTIONS 4 IMPORTANT SAFETY INSTRUCTIONS 7 SPECIFICATIONS 9 INSTALLATION REQUIREMENTS 10 INSTALLATION INSTRUCTIONS 12 PARTS AND FEATURES 15 BEFORE USE 19 OPERATION INSTRUCTIONS 21 CARE AND MAINTENANCE 24 TROUBLESHOOTING 26 LIMITED WARRANTY 28 3
CONTENTS PRODUCT REGISTRATION 2 PRECAUTIONS 4 IMPORTANT SAFETY INSTRUCTIONS 7 SPECIFICATIONS 9 INSTALLATION REQUIREMENTS 10 INSTALLATION INSTRUCTIONS 12 PARTS AND FEATURES 15 BEFORE USE 19 OPERATION INSTRUCTIONS 21 CARE AND MAINTENANCE 24 TROUBLESHOOTING 26 LIMITED WARRANTY 28 3
User Manual
Page 4
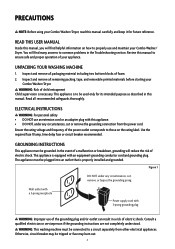
...: Before using your Combo Washer/Dryer, read this manual carefully and keep it for its intended purpose as described in this manual. READ THIS USER MANUAL Inside this manual, you will reduce the risk of the power outlet corresponds to those on how to common problems in the Troubleshooting section. Inspect and remove all remaining packing, tape, and removable printed materials before starting your Combo Washer/Dryer...
...: Before using your Combo Washer/Dryer, read this manual carefully and keep it for its intended purpose as described in this manual. READ THIS USER MANUAL Inside this manual, you will reduce the risk of the power outlet corresponds to those on how to common problems in the Troubleshooting section. Inspect and remove all remaining packing, tape, and removable printed materials before starting your Combo Washer/Dryer...
User Manual
Page 5
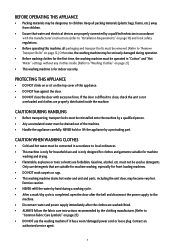
... WASHING CLOTHES • Cold and hot water must be connected in accordance to "Common Fabric Care Symbols" on page 27.) • DO NOT use the washing machine if it has a worn/damaged power cord or loose plug. Exercise caution. • NEVER refill the water by hand during operation. • Before washing clothes for machine washing and drying. • Flammable, explosive or toxic solvents are properly distributed inside . (Refer to "Installation...
... WASHING CLOTHES • Cold and hot water must be connected in accordance to "Common Fabric Care Symbols" on page 27.) • DO NOT use the washing machine if it has a worn/damaged power cord or loose plug. Exercise caution. • NEVER refill the water by hand during operation. • Before washing clothes for machine washing and drying. • Flammable, explosive or toxic solvents are properly distributed inside . (Refer to "Installation...

User Manual
Page 6
... power cord prior to disposal. • Failure to the floor. Check the fill hose connections on a regular basis to ensure they are tight and not leaking. • DO NOT operate the washing machine if parts are unclear. • DO NOT operate the washing machine if any manual instructions that are missing or broken. NOTE: ALWAYS contact the manufacturer or a qualified service agent about any guards, panels...
... power cord prior to disposal. • Failure to the floor. Check the fill hose connections on a regular basis to ensure they are tight and not leaking. • DO NOT operate the washing machine if parts are unclear. • DO NOT operate the washing machine if any manual instructions that are missing or broken. NOTE: ALWAYS contact the manufacturer or a qualified service agent about any guards, panels...
User Manual
Page 7
... wash loads which have traces of any type of oil (including cooking oils). Small particles may be properly installed as described in use. This will be placed in the washer that contain fiberglass materials). DO NOT smoke or use by grasping the plug, not the cord. DO NOT install or store this manual before reaching inside. 14. DO NOT add gasoline, dry-cleaning...
... wash loads which have traces of any type of oil (including cooking oils). Small particles may be properly installed as described in use. This will be placed in the washer that contain fiberglass materials). DO NOT smoke or use by grasping the plug, not the cord. DO NOT install or store this manual before reaching inside. 14. DO NOT add gasoline, dry-cleaning...
User Manual
Page 8
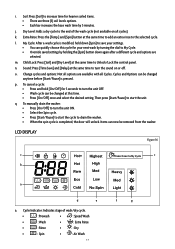
... the power receptacle before opening the door. 16. To reduce the risk of the washing machine. 21. Ensure water inside the drum has been completely drained before attempting any water visible. 19. DO NOT repair or replace any part of the cycle and spread out clothes so heat can be plugged into a properly grounded 3-prong receptacle. Disconnect plug from service or discarded, remove the door and cut off the power cord...
... the power receptacle before opening the door. 16. To reduce the risk of the washing machine. 21. Ensure water inside the drum has been completely drained before attempting any water visible. 19. DO NOT repair or replace any part of the cycle and spread out clothes so heat can be plugged into a properly grounded 3-prong receptacle. Disconnect plug from service or discarded, remove the door and cut off the power cord...
User Manual
Page 10
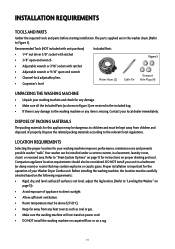
... • Carpenter's level Water Hoses (2) Transport Cable Tie Hole Plugs (4) UNPACKING THE WASHING MACHINE • Unpack your washing machine and check for your unit in a basement, laundry room, closet, or recessed area. INSTALLATION REQUIREMENTS TOOLS AND PARTS Gather the required tools and parts before starting installation. Companion appliance location requirements should also be dangerous to Figure 3). DO NOT install your washing machine improves performance, minimizes noise and prevents possible washer "walk".
... • Carpenter's level Water Hoses (2) Transport Cable Tie Hole Plugs (4) UNPACKING THE WASHING MACHINE • Unpack your washing machine and check for your unit in a basement, laundry room, closet, or recessed area. INSTALLATION REQUIREMENTS TOOLS AND PARTS Gather the required tools and parts before starting installation. Companion appliance location requirements should also be dangerous to Figure 3). DO NOT install your washing machine improves performance, minimizes noise and prevents possible washer "walk".
User Manual
Page 11
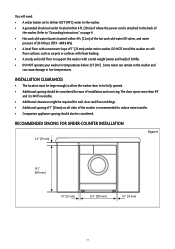
... support the washer with a maximum slope of 1" (25 mm) under entire washer. You will need: • A water heater set to deliver 120°F (49°C) water to the washer. • A grounded electrical outlet located within 4 ft. (1.2 m) of the hot and cold water fill valves, and water pressure of 20-100 psi (137.9 - 689.6 kPa) . • A level floor with a total weight (water and load) of 200lbs. • DO NOT operate...
... support the washer with a maximum slope of 1" (25 mm) under entire washer. You will need: • A water heater set to deliver 120°F (49°C) water to the washer. • A grounded electrical outlet located within 4 ft. (1.2 m) of the hot and cold water fill valves, and water pressure of 20-100 psi (137.9 - 689.6 kPa) . • A level floor with a total weight (water and load) of 200lbs. • DO NOT operate...
User Manual
Page 12
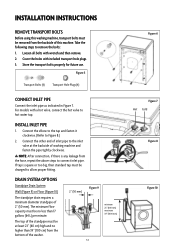
... Bolts (4) Transport Hole Plugs (4) CONNECT INLET PIPE Connect the inlet pipe as indicated in Figure 7. If tap is any leakage from the hose, repeat the above steps to the inlet valve at least 23" (60 cm) high and no less than 39" (100 cm) from the backside of washing machine and fasten the pipe tightly clockwise. INSTALLATION INSTRUCTIONS REMOVE TRANSPORT BOLTS Before using this machine. For models...
... Bolts (4) Transport Hole Plugs (4) CONNECT INLET PIPE Connect the inlet pipe as indicated in Figure 7. If tap is any leakage from the hose, repeat the above steps to the inlet valve at least 23" (60 cm) high and no less than 39" (100 cm) from the backside of washing machine and fasten the pipe tightly clockwise. INSTALLATION INSTRUCTIONS REMOVE TRANSPORT BOLTS Before using this machine. For models...
User Manual
Page 13
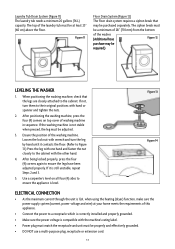
... and turn them to the cabinet with hand or spanner and tighten the nuts. 2. Use a carpenter's level on top cover of washing machine in sequence. After being locked properly, press the four (4) corners again to ensure the appliance is still unstable, repeat Steps 2 and 3. 5. Laundry Tub Drain System (Figure 11) The laundry tub needs a minimum 20 gallons (76 L) capacity. After positioning the washing machine, press...
... and turn them to the cabinet with hand or spanner and tighten the nuts. 2. Use a carpenter's level on top cover of washing machine in sequence. After being locked properly, press the four (4) corners again to ensure the appliance is still unstable, repeat Steps 2 and 3. 5. Laundry Tub Drain System (Figure 11) The laundry tub needs a minimum 20 gallons (76 L) capacity. After positioning the washing machine, press...
User Manual
Page 15
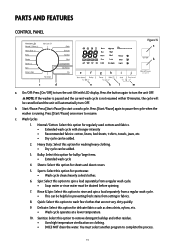
...; Soap water or rinse water must select another program to resume. Normal/Cotton: Select this option to turn the unit OFF. Delicate: Select this option to remove detergent buildup and other residue. • Uses high temperature sterilization on clothing. • DOES NOT drain the water. Spin: Select this option for delicate fabrics such as dress shirts, nylons, etc. • Wash cycle operates at a lower temperature. 10. Press [Start/Pause] again to start a wash cycle. Sheets...
...; Soap water or rinse water must select another program to resume. Normal/Cotton: Select this option to turn the unit OFF. Delicate: Select this option to remove detergent buildup and other residue. • Uses high temperature sterilization on clothing. • DOES NOT drain the water. Spin: Select this option for delicate fabrics such as dress shirts, nylons, etc. • Wash cycle operates at a lower temperature. 10. Press [Start/Pause] again to start a wash cycle. Sheets...
User Manual
Page 16
...: Only use . The dryer is washed, remove half the clothes prior to the load. NOTE: the unit will transit from 1 - 24 hours. The unit will automatically stop drying after washing with a door-locking safety feature to dry a load, then the wash load must be added. 13. Dry Cycles NOTE: Important Notes for the wash to begin. • The delay start time of dryer. (Refer to set your desired washing temperature. De...
...: Only use . The dryer is washed, remove half the clothes prior to the load. NOTE: the unit will transit from 1 - 24 hours. The unit will automatically stop drying after washing with a door-locking safety feature to dry a load, then the wash load must be added. 13. Dry Cycles NOTE: Important Notes for the wash to begin. • The delay start time of dryer. (Refer to set your desired washing temperature. De...
User Manual
Page 17
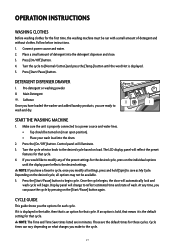
... quickly choose this time. • Press [On/Off] once and select the desired setting. Then press [Start/Pause] to the end of wash/dry cycle. • : Prewash Speed Wash • : Wash Extra Rinse • : Rinse Dry • : Spin Air Wash 17 f g To manually drain the washer: • Press [On/Off] to Unlock/Lock the control panel. LCD DISPLAY Figure 16 c c b a d e a. Extra Rinse: Press the [Temp.] and [Spin] button at the same time to turn the sound...
... quickly choose this time. • Press [On/Off] once and select the desired setting. Then press [Start/Pause] to the end of wash/dry cycle. • : Prewash Speed Wash • : Wash Extra Rinse • : Rinse Dry • : Spin Air Wash 17 f g To manually drain the washer: • Press [On/Off] to Unlock/Lock the control panel. LCD DISPLAY Figure 16 c c b a d e a. Extra Rinse: Press the [Temp.] and [Spin] button at the same time to turn the sound...
User Manual
Page 19
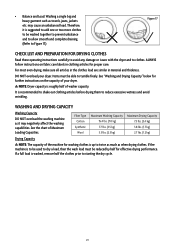
... time. NOTE: All new colored fabrics must be washed separately. • Accessories: Loose accessories on weight of clothes, soil level, local water hardness as well as detergent, bleach, or liquid fabric softener, on fabric care labels in a safe, dry space out of reach of your washer/dryer combo unit. Any loose bands or ribbons must be selected. Use powder or liquid detergents only. • Water-proof materials: It is highly recommended fabrics...
... time. NOTE: All new colored fabrics must be washed separately. • Accessories: Loose accessories on weight of clothes, soil level, local water hardness as well as detergent, bleach, or liquid fabric softener, on fabric care labels in a safe, dry space out of reach of your washer/dryer combo unit. Any loose bands or ribbons must be selected. Use powder or liquid detergents only. • Water-proof materials: It is highly recommended fabrics...
User Manual
Page 20
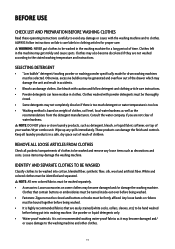
... further instructions on fabric care labels in material and thickness. ALWAYS follow instructions on the capacity of the machine for effective drying performance. Items must be washed together to prevent unbalance and to allow smooth and complete draining. (Refer to Figure 17.) Figure 17 CHECK LIST AND PREPARATION FOR DRYING CLOTHES Read these operating instructions carefully to avoid any damage or issues with the dryer...
... further instructions on fabric care labels in material and thickness. ALWAYS follow instructions on the capacity of the machine for effective drying performance. Items must be washed together to prevent unbalance and to allow smooth and complete draining. (Refer to Figure 17.) Figure 17 CHECK LIST AND PREPARATION FOR DRYING CLOTHES Read these operating instructions carefully to avoid any damage or issues with the dryer...
User Manual
Page 21
... desired cycle, press on load. START THE WASHING MACHINE 1. Once the cycle begins, the door will automatically lock and wash cycle will illuminate. 3. NOTE: If you have loaded the washer and added laundry products, you the options for that means it is displayed in an open position). • Place your wash load into the detergent dispenser and close. 3. Press the [Start/Pause] button to save as My Cycle. Connect power source and water. 2. Control panel will begin cycle. Turn the cycle...
... desired cycle, press on load. START THE WASHING MACHINE 1. Once the cycle begins, the door will automatically lock and wash cycle will illuminate. 3. NOTE: If you have loaded the washer and added laundry products, you the options for that means it is displayed in an open position). • Place your wash load into the detergent dispenser and close. 3. Press the [Start/Pause] button to save as My Cycle. Connect power source and water. 2. Control panel will begin cycle. Turn the cycle...

User Manual
Page 24
... door may need to clean your hoses and inlet filter. 1. CLEANING THE INTERIOR OF THE UNIT NEVER use a soft cloth to wipe around the door, opening, and rubber seal to remove any excess moisture and to avoid odor and/or mildew from the fabric softener compartment (pictured below). 3. You can damage the finish. For powder tub cleaner, add directly to the fabric softener section. 4. Figure 19 2. Place cap back onto fabric softener and insert dispenser drawer...
... door may need to clean your hoses and inlet filter. 1. CLEANING THE INTERIOR OF THE UNIT NEVER use a soft cloth to wipe around the door, opening, and rubber seal to remove any excess moisture and to avoid odor and/or mildew from the fabric softener compartment (pictured below). 3. You can damage the finish. For powder tub cleaner, add directly to the fabric softener section. 4. Figure 19 2. Place cap back onto fabric softener and insert dispenser drawer...
User Manual
Page 25
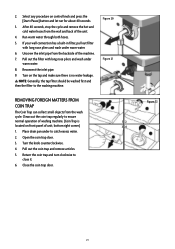
... coin trap and remove articles. 5. Turn on the tap and make sure there is 12 located on control knob and press the [Start/Pause] button and let run for about 40 seconds. 3. Return the coin trap and turn clockwise to the washing machine. Clean out the coin trap regularly to catch excess water. 2. After 40 seconds, stop the cycle and remove the hot and cold water hoses from the wash cycle.
... coin trap and remove articles. 5. Turn on the tap and make sure there is 12 located on control knob and press the [Start/Pause] button and let run for about 40 seconds. 3. Return the coin trap and turn clockwise to the washing machine. Clean out the coin trap regularly to catch excess water. 2. After 40 seconds, stop the cycle and remove the hot and cold water hoses from the wash cycle.
User Manual
Page 26
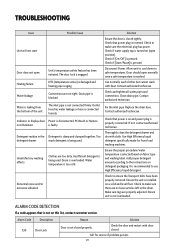
... display does Power is not connected firmly. Door should open Unit's temperature safety feature has been initiated. If not, contact authorized technician. Thoroughly clean the detergent drawer and dry with cloth. Use High Efficiency liquid detergent specifically made for service if problem persists. 26 Add proper detergent amount according to use High Efficiency liquid detergent. Ensure the unit is installed on detergent packaging. TROUBLESHOOTING Issue Unit will not start Possible Cause Door does not open normally once a safe temperature is reached. Water is leaking...
... display does Power is not connected firmly. Door should open Unit's temperature safety feature has been initiated. If not, contact authorized technician. Thoroughly clean the detergent drawer and dry with cloth. Use High Efficiency liquid detergent specifically made for service if problem persists. 26 Add proper detergent amount according to use High Efficiency liquid detergent. Ensure the unit is installed on detergent packaging. TROUBLESHOOTING Issue Unit will not start Possible Cause Door does not open normally once a safe temperature is reached. Water is leaking...
User Manual
Page 27
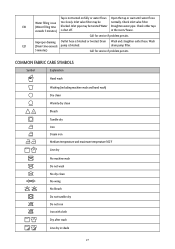
... temperature and maximum temperature 302°F Line dry No machine wash Do not wash No dry clean No wring Cl No bleach Do not tumble dry Do not iron Iron with cloth Dry after wash Line dry in the room/house. Drain Wash and straighten outlet hose. Inlet pipe may be twisted Water Straighten water pipe. in shade 27 drain pump filter. 3 minutes.) Call for service if problem persists. Wash E21 (Drain time...
... temperature and maximum temperature 302°F Line dry No machine wash Do not wash No dry clean No wring Cl No bleach Do not tumble dry Do not iron Iron with cloth Dry after wash Line dry in the room/house. Drain Wash and straighten outlet hose. Inlet pipe may be twisted Water Straighten water pipe. in shade 27 drain pump filter. 3 minutes.) Call for service if problem persists. Wash E21 (Drain time...


