User Manual
Page 1
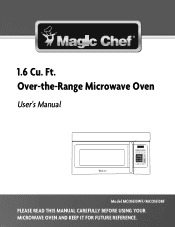
Ft. Over-the-Range Microwave Oven User's Manual Model MCO1610WF/MCO1610BF PLEASE READ THIS MANUAL CAREFULLY BEFORE USING YOUR MICROWAVE OVEN AND KEEP IT FOR FUTURE REFERENCE. 1.6 Cu.
Ft. Over-the-Range Microwave Oven User's Manual Model MCO1610WF/MCO1610BF PLEASE READ THIS MANUAL CAREFULLY BEFORE USING YOUR MICROWAVE OVEN AND KEEP IT FOR FUTURE REFERENCE. 1.6 Cu.
User Manual
Page 3
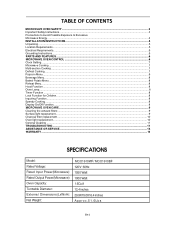
...Function ...8 Oven Lamp...8 Timer Function ...8 Lock Function for Children ...8 Inquiring Function ...8 Speedy Cooking ...8 Display On/Off Function...8 MICROWAVE OVEN CARE...9 Cleaning the exhaust filters ...9 Surface light replacement ...9 Charcoal filter replacement ...10 Oven light replacement...10 General Cleaning .........12 WARRANTY ...13 SPECIFICATIONS Model: Rated Voltage: Rated Input Power(Microwave): Rated Output Power(Microwave): Oven Capacity: Turntable Diameter: External Dimensions(LxWxH): Net Weight: MCO1610WF/ MCO1610BF 120V~60Hz 1550 Watt 1000 Watt 1.6Cu.ft 12.4 inches 29...
...Function ...8 Oven Lamp...8 Timer Function ...8 Lock Function for Children ...8 Inquiring Function ...8 Speedy Cooking ...8 Display On/Off Function...8 MICROWAVE OVEN CARE...9 Cleaning the exhaust filters ...9 Surface light replacement ...9 Charcoal filter replacement ...10 Oven light replacement...10 General Cleaning .........12 WARRANTY ...13 SPECIFICATIONS Model: Rated Voltage: Rated Input Power(Microwave): Rated Output Power(Microwave): Oven Capacity: Turntable Diameter: External Dimensions(LxWxH): Net Weight: MCO1610WF/ MCO1610BF 120V~60Hz 1550 Watt 1000 Watt 1.6Cu.ft 12.4 inches 29...
User Manual
Page 4
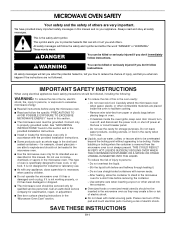
...off, and disconnect the power cord, or shut off the pad and touch electrical parts involving a risk of electric shock. Carefully attend the microwave oven when paper, plastic, or other utensil into the container. ■ Oversized foods or oversized metal utensils should be overheated beyond the .... WARNING You can happen if the instructions are placed inside the oven ignite, keep oven door closed glass jars - Connect only to excessive microwave energy: ■ Read all safety messages. It is not always present. Do not overheat the liquid. - All safety messages will follow ...
...off, and disconnect the power cord, or shut off the pad and touch electrical parts involving a risk of electric shock. Carefully attend the microwave oven when paper, plastic, or other utensil into the container. ■ Oversized foods or oversized metal utensils should be overheated beyond the .... WARNING You can happen if the instructions are placed inside the oven ignite, keep oven door closed glass jars - Connect only to excessive microwave energy: ■ Read all safety messages. It is not always present. Do not overheat the liquid. - All safety messages will follow ...
User Manual
Page 5
... It is damaged. This device complies with metal foil. for example, near a kitchen sink, in operation. ■ Do not store this microwave oven when not in use the microwave oven near a swimming pool, or similar locations. ■ Do not immerse cord or plug in harmful exposure to the: (1) Door (bent),... use . ■ Do not store anything directly on models with such features). ■ Do not store any materials, other part of the microwave oven. ■ Do not cover or block any object between the oven front face and the door or allow soil or cleaner residue to accumulate...
... It is damaged. This device complies with metal foil. for example, near a kitchen sink, in operation. ■ Do not store this microwave oven when not in use the microwave oven near a swimming pool, or similar locations. ■ Do not immerse cord or plug in harmful exposure to the: (1) Door (bent),... use . ■ Do not store anything directly on models with such features). ■ Do not store any materials, other part of the microwave oven. ■ Do not cover or block any object between the oven front face and the door or allow soil or cleaner residue to accumulate...
User Manual
Page 6
...: ■ a door that is properly grounded. INSTALLATION INSTRUCTIONS Unpacking 1. Do not remove ground prong. Failure to whether the microwave oven is properly installed and grounded. GROUNDING INSTRUCTIONS ■ For all governing codes and ordinances. Check for the electric current....electric shock. Recommended: ■ A time-delay fuse or time-delay circuit breaker. ■ A separate circuit serving only this microwave oven. Consult a qualified electrician or serviceman if the grounding instructions are not completely understood, or if doubt exists as poor cooking ...
...: ■ a door that is properly grounded. INSTALLATION INSTRUCTIONS Unpacking 1. Do not remove ground prong. Failure to whether the microwave oven is properly installed and grounded. GROUNDING INSTRUCTIONS ■ For all governing codes and ordinances. Check for the electric current....electric shock. Recommended: ■ A time-delay fuse or time-delay circuit breaker. ■ A separate circuit serving only this microwave oven. Consult a qualified electrician or serviceman if the grounding instructions are not completely understood, or if doubt exists as poor cooking ...
User Manual
Page 7
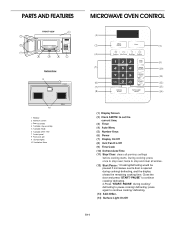
... Window 2 Interlock system 3 Door assembly 4 Turntable ring assembly 5 Turntable Shaft 6 Turntable glass tray 7 Control panel 8 Front vent grill 9 Surface lights 10 Ventilation filters MICROWAVE OVEN CONTROL (1) (2) (4) (5) (6) (7) (8) EXPRESS COOK 1-6 Display On/Off (3) (9) (10) (11) (12) (13) (14) (1) Display Screen (2) ...10) Defrost Auto/Time (11) Stop/Clear: clears all entries. (12) Start/Pause: 1.Cooking/defrosting would be paused if microwave oven's door is opened during cooking/ defrosting to pause cooking/ defrosting; twice to continue cooking/ defrosting. 2.Press "START/ PAUSE"...
... Window 2 Interlock system 3 Door assembly 4 Turntable ring assembly 5 Turntable Shaft 6 Turntable glass tray 7 Control panel 8 Front vent grill 9 Surface lights 10 Ventilation filters MICROWAVE OVEN CONTROL (1) (2) (4) (5) (6) (7) (8) EXPRESS COOK 1-6 Display On/Off (3) (9) (10) (11) (12) (13) (14) (1) Display Screen (2) ...10) Defrost Auto/Time (11) Stop/Clear: clears all entries. (12) Start/Pause: 1.Cooking/defrosting would be paused if microwave oven's door is opened during cooking/ defrosting to pause cooking/ defrosting; twice to continue cooking/ defrosting. 2.Press "START/ PAUSE"...
User Manual
Page 8
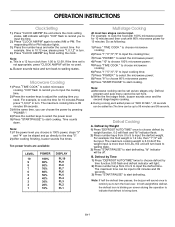
... the cooking time; 3) Press "POWER " to select the microwave power; 4) Press "10" to choose 100% microwave power; 5) Press "TIME COOK " to choose microwave cooking; 6) Press "1","5","0","0" to input cooking time; 7) Press "POWER " to select the microwave power; 8) Press "8" to choose 80% microwave power; 9) Press "START/PAUSE" to select microwave cooking. Defrost by Weight 1) Press "DEFROST AUTO/TIME...
... the cooking time; 3) Press "POWER " to select the microwave power; 4) Press "10" to choose 100% microwave power; 5) Press "TIME COOK " to choose microwave cooking; 6) Press "1","5","0","0" to input cooking time; 7) Press "POWER " to select the microwave power; 8) Press "8" to choose 80% microwave power; 9) Press "START/PAUSE" to select microwave cooking. Defrost by Weight 1) Press "DEFROST AUTO/TIME...
User Manual
Page 9
... 14.2 ounces "3"SET: for 3 seconds, there will be off. 2) Under the mode of display off, press any key, buzzer sound once, the microwave oven is over, buzzer sounds to turn on the lamp; 2) Press "SURFACE LIGHT ON/OFF" twice to indicates off the lamp. Hood Function 1) When...Press "SURFACE LIGHT ON/OFF" once to turn off . 4) Press "TIMER", the timer function or the buzzer sound will be activated. Inquiring Function 1) Under microwave cooking state, press "POWER" to check the power level. 2) During cooking states, press "CLOCK AM/PM" to cook. Display On/Off Function 1) In...
... 14.2 ounces "3"SET: for 3 seconds, there will be off. 2) Under the mode of display off, press any key, buzzer sound once, the microwave oven is over, buzzer sounds to turn on the lamp; 2) Press "SURFACE LIGHT ON/OFF" twice to indicates off the lamp. Hood Function 1) When...Press "SURFACE LIGHT ON/OFF" once to turn off . 4) Press "TIMER", the timer function or the buzzer sound will be activated. Inquiring Function 1) Under microwave cooking state, press "POWER" to check the power level. 2) During cooking states, press "CLOCK AM/PM" to cook. Display On/Off Function 1) In...
User Manual
Page 10
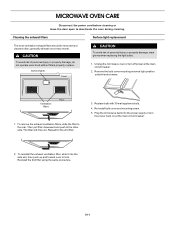
...out. To reinstall the exhaust ventilation filter, slide it into the power supply or turn off power at light position under the microwave. To remove the exhaust ventilation filters, slide the filter to deactivate the oven during cleaning. Remove the bulb cover mounting screw ...at the main circuit breaker. 2. EN-9 Reinstall the 2nd filter using the same procedure. generally at the main circuit breaker. 2. MICROWAVE OVEN CARE Disconnect the power cord before cleaning or leave the door open to the rear. Ventilation filters Rear 1. Repeat for the 2nd filter...
...out. To reinstall the exhaust ventilation filter, slide it into the power supply or turn off power at light position under the microwave. To remove the exhaust ventilation filters, slide the filter to deactivate the oven during cleaning. Remove the bulb cover mounting screw ...at the main circuit breaker. 2. EN-9 Reinstall the 2nd filter using the same procedure. generally at the main circuit breaker. 2. MICROWAVE OVEN CARE Disconnect the power cord before cleaning or leave the door open to the rear. Ventilation filters Rear 1. Repeat for the 2nd filter...
User Manual
Page 11
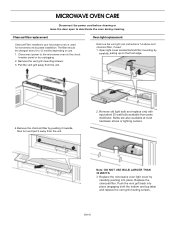
...hardware stores or lighting centers. Remove old light bulb and replace only with equivalent 30 watt bulb available from the unit. Replace the microwave oven light cover by carefully pushing into place (engaging both the bottom and top tabs) and replace the vent grill mouting screws. ... panel or by unplugging. 2. Open light cover located behind filter mounting by carefully pulling up on use. 1. Replace the charcoal filter. MICROWAVE OVEN CARE Disconnect the power cord before cleaning or leave the door open to 12 months depending on the front edge. 4.Remove the charcoal...
...hardware stores or lighting centers. Remove old light bulb and replace only with equivalent 30 watt bulb available from the unit. Replace the microwave oven light cover by carefully pushing into place (engaging both the bottom and top tabs) and replace the vent grill mouting screws. ... panel or by unplugging. 2. Open light cover located behind filter mounting by carefully pulling up on use. 1. Replace the charcoal filter. MICROWAVE OVEN CARE Disconnect the power cord before cleaning or leave the door open to 12 months depending on the front edge. 4.Remove the charcoal...
User Manual
Page 12
... Stainless Steel Cleaner and Polish (not included): ■ Liquid detergent or all controls are suggested here first in microwave oven. To avoid damage to the microwave oven cavity, do not use soap-filled scouring pads, abrasive cleaners, steel-wool pads, gritty washcloths or some ...recycled paper towels. Remove packaging spacer, then firmly close door. ■ Is the electronic microwave oven control set ? Open and close door. ■ Has a household fuse blown, or has a circuit breaker tripped? Is the Control ...
... Stainless Steel Cleaner and Polish (not included): ■ Liquid detergent or all controls are suggested here first in microwave oven. To avoid damage to the microwave oven cavity, do not use soap-filled scouring pads, abrasive cleaners, steel-wool pads, gritty washcloths or some ...recycled paper towels. Remove packaging spacer, then firmly close door. ■ Is the electronic microwave oven control set ? Open and close door. ■ Has a household fuse blown, or has a circuit breaker tripped? Is the Control ...
User Manual
Page 13
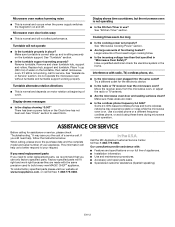
... ■ Specialized customer assistance (Spanish speaking). EN-12 Replace hub, support and turntable. Display shows time countdown, but the microwave oven is not operating ■ Is the Kitchen Timer in the home. This information will not affect performance. If you need...not operate the microwave oven without turntable and turntable support working , call . Try a different outlet for assistance or service, please check "Troubleshooting." Display shows messages ■ Is the display showing "0:00?" See "Clock" section to build every new MAGIC CHEF® appliance. ...
... ■ Specialized customer assistance (Spanish speaking). EN-12 Replace hub, support and turntable. Display shows time countdown, but the microwave oven is not operating ■ Is the Kitchen Timer in the home. This information will not affect performance. If you need...not operate the microwave oven without turntable and turntable support working , call . Try a different outlet for assistance or service, please check "Troubleshooting." Display shows messages ■ Is the display showing "0:00?" See "Clock" section to build every new MAGIC CHEF® appliance. ...
User Manual
Page 14
...; Failure of this unit to the factory without the prior written consent of MC Appliance Corporation. Limited Warranty MC Appliance Corporation warrants each new Counvertop Microwave Oven to be free from defects in material and workmanship for a period of eight years. Parts and labor expenses are hereby limited to one -year...
...; Failure of this unit to the factory without the prior written consent of MC Appliance Corporation. Limited Warranty MC Appliance Corporation warrants each new Counvertop Microwave Oven to be free from defects in material and workmanship for a period of eight years. Parts and labor expenses are hereby limited to one -year...


