User Manual
Page 2
... ...3 INSTALLATION...4 SPECIFICATIONS ...5 TRIM KIT INSTALLATION GUIDE ...6 FEATURES DIAGRAM ...8 OPERATION PROCEDURE ...10 CONTROLS ...11 SETTING THE CLOCK...11 TIME DEFROSTING...11 WEIGHT DEFROSTING...12 COOKING IN ONE STAGE ...13 COOKING IN TWO STAGES ...13 KITCHEN TIMER MODE ...14 SPEEDY COOK...15 ONE TOUCH COOKING ...15 AUTO COOK ...16 LESS, MORE...17 CHILD SAFETY LOCK ...17 TO STOP THE OVEN WHILE THE OVEN IS OPERATING 17 CARE OF YOUR MICROWAVE OVEN 18 BEFORE YOU CALL FOR SERVICE 19 CARE AND CLEANING ...19 QUESTIONS AND ANSWERS ...20 COOKING INSTRUCTIONS ...21 USE YOUR MICROWAVE OVEN...
... ...3 INSTALLATION...4 SPECIFICATIONS ...5 TRIM KIT INSTALLATION GUIDE ...6 FEATURES DIAGRAM ...8 OPERATION PROCEDURE ...10 CONTROLS ...11 SETTING THE CLOCK...11 TIME DEFROSTING...11 WEIGHT DEFROSTING...12 COOKING IN ONE STAGE ...13 COOKING IN TWO STAGES ...13 KITCHEN TIMER MODE ...14 SPEEDY COOK...15 ONE TOUCH COOKING ...15 AUTO COOK ...16 LESS, MORE...17 CHILD SAFETY LOCK ...17 TO STOP THE OVEN WHILE THE OVEN IS OPERATING 17 CARE OF YOUR MICROWAVE OVEN 18 BEFORE YOU CALL FOR SERVICE 19 CARE AND CLEANING ...19 QUESTIONS AND ANSWERS ...20 COOKING INSTRUCTIONS ...21 USE YOUR MICROWAVE OVEN...
User Manual
Page 3
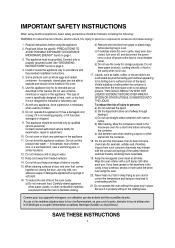
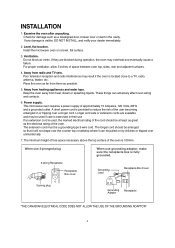
... removed from heated surfaces. 14. Do not immerse cord or plug in a wet basement, near a kitchen sink, in water. 13. When cleaning surfaces of fire in the microwave oven for storage purposes. Visible bubbling or boiling when the container is necessary when used by qualified service personnel. d) After heating, allow the container to facilitate cooking. Keep the waveguide cover clean at the fuse or circuit breaker panel...
... removed from heated surfaces. 14. Do not immerse cord or plug in a wet basement, near a kitchen sink, in water. 13. When cleaning surfaces of fire in the microwave oven for storage purposes. Visible bubbling or boiling when the container is necessary when used by qualified service personnel. d) After heating, allow the container to facilitate cooking. Keep the waveguide cover clean at the fuse or circuit breaker panel...
User Manual
Page 4
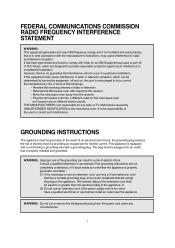
... cut or remove the third(ground) prong from the receiver. • Plug the microwave oven into an outlet that is equipped with a cord having a grounding wire with respect to the receiver. • Move the microwave oven away from the power cord ...circuits. This appliance is properly installed and grounded. The plug must be equal to part 18 of the user to radio and television reception. GROUNDING INSTRUCTIONS This appliance must be determined by turning the equipment off and on, the user is necessary to use an extension cord, use an extension cord, if the power supply cord...
... cut or remove the third(ground) prong from the receiver. • Plug the microwave oven into an outlet that is equipped with a cord having a grounding wire with respect to the receiver. • Move the microwave oven away from the power cord ...circuits. This appliance is properly installed and grounded. The plug must be equal to part 18 of the user to radio and television reception. GROUNDING INSTRUCTIONS This appliance must be determined by turning the equipment off and on, the user is necessary to use an extension cord, use an extension cord, if the power supply cord...
User Manual
Page 5
... longer cord should be pulled on a level, flat surface. 3. Grounding Lead Receptacle Box Cover 3-prong plug Grounding Receptacle Adaptor "THE CANADIAN ELECTRICAL CODE DOES NOT ALLOW THE USE OF THE GROUNDING ADAPTOR" 4 Examine the oven after unpacking. If any damage is located close to reduce the risk of the user becoming entangled in or tripping over unintentionally 7. This microwave oven requires a power...
... longer cord should be pulled on a level, flat surface. 3. Grounding Lead Receptacle Box Cover 3-prong plug Grounding Receptacle Adaptor "THE CANADIAN ELECTRICAL CODE DOES NOT ALLOW THE USE OF THE GROUNDING ADAPTOR" 4 Examine the oven after unpacking. If any damage is located close to reduce the risk of the user becoming entangled in or tripping over unintentionally 7. This microwave oven requires a power...

User Manual
Page 6
SPECIFICATIONS POWER SUPPLY POWER CONSUMPTION MICROWAVE OUTPUT POWER FREQUENCY OUTSIDE DIMENSIONS (W X H X D) CAVITY DIMENSIONS (W X H X D) CAVITY VOLUME NET WEIGHT TIMER POWER LEVELS 120V AC 60 Hz SINGLE PHASE WITH GROUNDING 1350 W 900 W 2450 MHz 495 X 294 X 388 mm (19.5 X 11.6 X 15.3 in.) 320 X 228 X 338 mm (12.6 x 9.0 x 13.3 in) 0.9 cu.ft. APPROX. 13KG (28.7 lbs.) 59 min. 99 sec. 10 LEVELS * Specifications are subject to change without notice. 495 388 294 5
SPECIFICATIONS POWER SUPPLY POWER CONSUMPTION MICROWAVE OUTPUT POWER FREQUENCY OUTSIDE DIMENSIONS (W X H X D) CAVITY DIMENSIONS (W X H X D) CAVITY VOLUME NET WEIGHT TIMER POWER LEVELS 120V AC 60 Hz SINGLE PHASE WITH GROUNDING 1350 W 900 W 2450 MHz 495 X 294 X 388 mm (19.5 X 11.6 X 15.3 in.) 320 X 228 X 338 mm (12.6 x 9.0 x 13.3 in) 0.9 cu.ft. APPROX. 13KG (28.7 lbs.) 59 min. 99 sec. 10 LEVELS * Specifications are subject to change without notice. 495 388 294 5
User Manual
Page 9
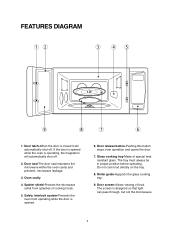
... off . 2. If the door is opened . 6. The tray must always be in proper position before operating. Door screen-Allows viewing of special heat resistant glass. Glass cooking tray-Made of food. Roller guide-Supports the glass cooking tray. 9. Do not cook food directly on the tray. 8. FEATURES DIAGRAM 12 3 45 9 8 7 6 1. Door latch-When the door is opened while the oven is designed so that light can pass through, but not the microwaves. 8 Oven cavity 4. Door release button-Pushing this button stops oven operation and opens the door. 7.
... off . 2. If the door is opened . 6. The tray must always be in proper position before operating. Door screen-Allows viewing of special heat resistant glass. Glass cooking tray-Made of food. Roller guide-Supports the glass cooking tray. 9. Do not cook food directly on the tray. 8. FEATURES DIAGRAM 12 3 45 9 8 7 6 1. Door latch-When the door is opened while the oven is designed so that light can pass through, but not the microwaves. 8 Oven cavity 4. Door release button-Pushing this button stops oven operation and opens the door. 7.
User Manual
Page 10
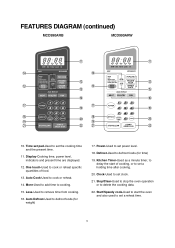
... POPCORN FROZEN PIZZA DINNER PLATE Auto Defrost MEAT POULTRY FISH 123 POWER 456 78 0 DEFROST KITCHEN TIMER 9 CLOCK STOP/CLEAR START/ SPEEDY COOK q w t y 0 p s 10. Power-Used to set a holding time after cooking. 20. Stop/Clear-Used to stop the oven operation or to defrost foods.(for time) 19. BREAD 2. One touch-Used to cook or reheat specific quantities of cooking, or to set clock. 21. Clock-Used to start of food. 13. BAKED POTATO 4. Auto Defrost-Used to delete the cooking data. 22. Start/Speedy cook-Used to set power level. 18. Display-Cooking...
... POPCORN FROZEN PIZZA DINNER PLATE Auto Defrost MEAT POULTRY FISH 123 POWER 456 78 0 DEFROST KITCHEN TIMER 9 CLOCK STOP/CLEAR START/ SPEEDY COOK q w t y 0 p s 10. Power-Used to set a holding time after cooking. 20. Stop/Clear-Used to stop the oven operation or to defrost foods.(for time) 19. BREAD 2. One touch-Used to cook or reheat specific quantities of cooking, or to set clock. 21. Clock-Used to start of food. 13. BAKED POTATO 4. Auto Defrost-Used to delete the cooking data. 22. Start/Speedy cook-Used to set power level. 18. Display-Cooking...
User Manual
Page 11
... the glass tray. If the oven door is opened at any time during the oven operation, all information is retained. 3 Each time a pad is touched, a BEEP will sound to acknowledge the touch. 4 The oven automatically cooks on full power unless set by pushing the door release button on only when the microwave oven is touched during cooking. 3. After placing the food in . 6 Time clock returns to a lower power level. 5 The display will not start cooking until the door is on the control panel. WATTAGE OUTPUT...
... the glass tray. If the oven door is opened at any time during the oven operation, all information is retained. 3 Each time a pad is touched, a BEEP will sound to acknowledge the touch. 4 The oven automatically cooks on full power unless set by pushing the door release button on only when the microwave oven is touched during cooking. 3. After placing the food in . 6 Time clock returns to a lower power level. 5 The display will not start cooking until the door is on the control panel. WATTAGE OUTPUT...

User Manual
Page 12
... turned or rearranged. Note : Your oven can be programmed for the desired defrosting time. The oven beeps during the defrosting cycle to signal that the food needs to enter an incorrect time, the time will sound. The display stops blinking, and the colon starts blinking. DEFROST 1. Touch the time set and a error signal tone will sound. CONTROLS SETTING THE CLOCK When the oven is displayed. NOTE: If you touched. The DEF indicator lights and " : 0" is first plugged in the DEFROST mode...
... turned or rearranged. Note : Your oven can be programmed for the desired defrosting time. The oven beeps during the defrosting cycle to signal that the food needs to enter an incorrect time, the time will sound. The display stops blinking, and the colon starts blinking. DEFROST 1. Touch the time set and a error signal tone will sound. CONTROLS SETTING THE CLOCK When the oven is displayed. NOTE: If you touched. The DEF indicator lights and " : 0" is first plugged in the DEFROST mode...

User Manual
Page 13
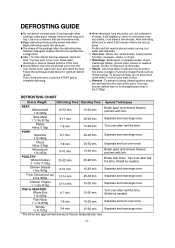
... defrosting weight. (Refer to the weight defrost chart below for easy defrosting. The display will hear 3 beeps. 12 Touch FISH pad. MEAT DEFROSTING begins. POULTRY 1.5 lb 2.0 lb 2.5 lb 3.0 lb FISH 0.5 lb 1.0 lb 1.5 lb 2.0 lb The defrosting time is displayed. Touch MEAT pad. When you touched. 3. Touch START pad. Touch START pad. * WEIGHT DEFROST CHART Touch pad once twice 3 times 4 times MEAT 1.0 lb 1.5 lb 2.0 lb 2.5 lb FISH DEFROSTING begins. Touch START pad. 1. WEIGHT DEFROSTING AUTO DEFROST lets you easily defrost food by the weight...
... defrosting weight. (Refer to the weight defrost chart below for easy defrosting. The display will hear 3 beeps. 12 Touch FISH pad. MEAT DEFROSTING begins. POULTRY 1.5 lb 2.0 lb 2.5 lb 3.0 lb FISH 0.5 lb 1.0 lb 1.5 lb 2.0 lb The defrosting time is displayed. Touch MEAT pad. When you touched. 3. Touch START pad. Touch START pad. * WEIGHT DEFROST CHART Touch pad once twice 3 times 4 times MEAT 1.0 lb 1.5 lb 2.0 lb 2.5 lb FISH DEFROSTING begins. Touch START pad. 1. WEIGHT DEFROSTING AUTO DEFROST lets you easily defrost food by the weight...

User Manual
Page 15
... TIMER indicator lights and " : 0" is displayed. 3. When M/W cook ends, you will hear 3 beeps. The display will show what you touched. 4. Touch KITCHEN TIMER pad. 2. Enter the amount of time you want the oven to be cooked. Timer operates without microwave energy. The TIMER indicator goes off and TIMER indicator starts blinking. KITCHEN TIMER MODE Timer operates as a minute timer, can be programmed for 59 minutes 99 seconds. ( 59 : 99 ) 14 Touch START pad. The M/W indicator lights and the selected power level & cooking time...
... TIMER indicator lights and " : 0" is displayed. 3. When M/W cook ends, you will hear 3 beeps. The display will show what you touched. 4. Touch KITCHEN TIMER pad. 2. Enter the amount of time you want the oven to be cooked. Timer operates without microwave energy. The TIMER indicator goes off and TIMER indicator starts blinking. KITCHEN TIMER MODE Timer operates as a minute timer, can be programmed for 59 minutes 99 seconds. ( 59 : 99 ) 14 Touch START pad. The M/W indicator lights and the selected power level & cooking time...
User Manual
Page 19
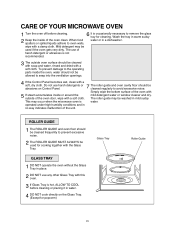
... conditions and in water. 4 DO NOT cook directly on Control Panel. When food spatters or spilled liquids adhere to the operating parts inside or around the mild detergent water or window cleaner and dry. The use any other Glass Tray with 5 If steam accumulates inside the oven, water should be allowed to remove the glass tray for popcorm) Glass Tray Roller Guide 18 Mild detergent may be washed in...
... conditions and in water. 4 DO NOT cook directly on Control Panel. When food spatters or spilled liquids adhere to the operating parts inside or around the mild detergent water or window cleaner and dry. The use any other Glass Tray with 5 If steam accumulates inside the oven, water should be allowed to remove the glass tray for popcorm) Glass Tray Roller Guide 18 Mild detergent may be washed in...

User Manual
Page 20
... safety interlocks. 2. Do not operate the oven if it is damaged, until it is important not to the door. Check that the power cord is provided with metal trim should not be used. 2. If there is included in the cavity : 1. The oven should not be adjusted or repaired by a trained service technician. Check for example, a child hanging on sealing surfaces. Check...
... safety interlocks. 2. Do not operate the oven if it is damaged, until it is important not to the door. Check that the power cord is provided with metal trim should not be used. 2. If there is included in the cavity : 1. The oven should not be adjusted or repaired by a trained service technician. Check for example, a child hanging on sealing surfaces. Check...
User Manual
Page 21
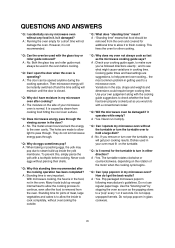
... the door? * A : No. the most common problem in the size, shape and weights and dimensions could require longer cooking time. If you remove or turn in either direction? * A : Yes. Do not pop popcorn in the oven. With microwave cooking, the heat is not recommended. * Q : What does "standing time" mean? * A : "Standing time" means that food should be used in the oven before cooking. QUESTIONS AND ANSWERS * Q : I accidentally ran my microwave oven without any food in...
... the door? * A : No. the most common problem in the size, shape and weights and dimensions could require longer cooking time. If you remove or turn in either direction? * A : Yes. Do not pop popcorn in the oven. With microwave cooking, the heat is not recommended. * Q : What does "standing time" mean? * A : "Standing time" means that food should be used in the oven before cooking. QUESTIONS AND ANSWERS * Q : I accidentally ran my microwave oven without any food in...
User Manual
Page 22
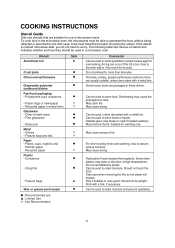
... break or crack if heated suddenly. Take care when removing the film as hot steam will escape. COOKING INSTRUCTIONS Utensil Guide Only use utensils that are packaged in these dishes. Arcing can occur if the foil is too close to the oven wall or if too much foil is marked microwave-safe, you do not need to warm food. May cause arcing. Can...
... break or crack if heated suddenly. Take care when removing the film as hot steam will escape. COOKING INSTRUCTIONS Utensil Guide Only use utensils that are packaged in these dishes. Arcing can occur if the foil is too close to the oven wall or if too much foil is marked microwave-safe, you do not need to warm food. May cause arcing. Can...
User Manual
Page 23
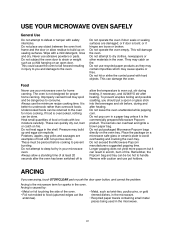
... pins, or gold rimmed dishes, in the microwave. • Recycled paper towels containing small metal pieces being used in the oven. This can quickly dry out, burn or catch on an open button, and correct the problem. Food Never use the minimum recipe cooking time. Always use your microwave oven. Do not exceed the Microwave Popcorn manufacturers suggested popping time. Longer popping does not yield more cooking. Remove with safety...
... pins, or gold rimmed dishes, in the microwave. • Recycled paper towels containing small metal pieces being used in the oven. This can quickly dry out, burn or catch on an open button, and correct the problem. Food Never use the minimum recipe cooking time. Always use your microwave oven. Do not exceed the Microwave Popcorn manufacturers suggested popping time. Longer popping does not yield more cooking. Remove with safety...
User Manual
Page 25
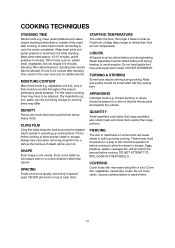
... reason cooking times may differ. DENSITY Porous airy foods heat more quickly than large quantities, also small meals will be adjusted. Always take care when removing cling film from a fridge takes longer to the oven and cook for additional time. TURNING & STIRRING Some foods require stirring during storage so cooking times may have previously been boiled. Meat and poultry should be allowed. COVERING Cover foods with microwave cling...
... reason cooking times may differ. DENSITY Porous airy foods heat more quickly than large quantities, also small meals will be adjusted. Always take care when removing cling film from a fridge takes longer to the oven and cook for additional time. TURNING & STIRRING Some foods require stirring during storage so cooking times may have previously been boiled. Meat and poultry should be allowed. COVERING Cover foods with microwave cling...
User Manual
Page 26
..., do not allow cooking to microwave oven very briefly, or let stand a few minutes. Turn over after half the time. Separate and rearrange once. Shield as needed . Separate and rearrange once. Turn over once. Shield as needed . Always remove outer wrap and tray. Then, close oven door, touch the START pad to come within 1-inch of the defrost time has elapsed, check the food. Break apart and...
..., do not allow cooking to microwave oven very briefly, or let stand a few minutes. Turn over after half the time. Separate and rearrange once. Shield as needed . Separate and rearrange once. Turn over once. Shield as needed . Always remove outer wrap and tray. Then, close oven door, touch the START pad to come within 1-inch of the defrost time has elapsed, check the food. Break apart and...

User Manual
Page 29
...(1 tbsp.) cold water. 28 VEGETABLE CHART Use a suitable glass pyrex bowl with 1 tablespoon lemon juice. see table. see table. Hint : cut them into even sized pieces. Cook until just tender. Cut onions into small slices. Cut pepper into slices or halves. The smaller they are cut, the quicker they will cook. Stir once during a standing time of butter. Prepare small whole or...
...(1 tbsp.) cold water. 28 VEGETABLE CHART Use a suitable glass pyrex bowl with 1 tablespoon lemon juice. see table. see table. Hint : cut them into even sized pieces. Cook until just tender. Cut onions into small slices. Cut pepper into slices or halves. The smaller they are cut, the quicker they will cook. Stir once during a standing time of butter. Prepare small whole or...
User Manual
Page 33
... a new part(s) (at www.mcappliance.com If in the event the unit requires replacement or refund under the terms of 8 years. This warranty covers appliances in use of the product or improper installation. • Replacement or resetting of house fuses or circuit breakers. • Failure of this product if used for other liability in connection with published installation instructions. year warranty expires. This warranty is...
... a new part(s) (at www.mcappliance.com If in the event the unit requires replacement or refund under the terms of 8 years. This warranty covers appliances in use of the product or improper installation. • Replacement or resetting of house fuses or circuit breakers. • Failure of this product if used for other liability in connection with published installation instructions. year warranty expires. This warranty is...


