
User Manual
Page 1
Wine and Beverage Center User's Manual Model HMWC50ST / HMBC58ST PLEASE READ THIS MANUAL CAREFULLY BEFORE USING YOUR WINE AND BEVERAGE CENTER AND KEEP IT FOR FUTURE REFERENCE.
Wine and Beverage Center User's Manual Model HMWC50ST / HMBC58ST PLEASE READ THIS MANUAL CAREFULLY BEFORE USING YOUR WINE AND BEVERAGE CENTER AND KEEP IT FOR FUTURE REFERENCE.

User Manual
Page 3
...THE PARTS 3 SPECIFICATIONS 4 IMPORTANT SAFETY INSTRUCTIONS 5 INSTALLATION INSTRUCTIONS BEFORE USING YOUR APPLIANCE 6 FREE STANDING INSTALLATION 6 BUILT-IN INSTALLATION 7 ELECTRICAL CONNECTION 7 APPLIANCE FEATURE HMWC50ST: WINE COOLER 8 HMBC58ST: BEVERAGE COOLER 8 OPERATING YOUR APPLIANCE HMWC50ST: WINE COOLER 9 HMBC58ST: BEVERAGE COOLER 9 CHANGING THE INNER LIGHT 10 AUTOMATIC DEFROST 10 CHANGING THE REVERSIBLE DOOR 10 CARE AND MAINTENANCE CLEANING YOUR APPLIANCE 11 VACATION TIME 11 MOVING YOUR APPLIANCE 11 ENERGY SAVING TIPS 11 TROUBLESHOOTING GUIDE 12 APPLIANCE WARRANTY 13...
...THE PARTS 3 SPECIFICATIONS 4 IMPORTANT SAFETY INSTRUCTIONS 5 INSTALLATION INSTRUCTIONS BEFORE USING YOUR APPLIANCE 6 FREE STANDING INSTALLATION 6 BUILT-IN INSTALLATION 7 ELECTRICAL CONNECTION 7 APPLIANCE FEATURE HMWC50ST: WINE COOLER 8 HMBC58ST: BEVERAGE COOLER 8 OPERATING YOUR APPLIANCE HMWC50ST: WINE COOLER 9 HMBC58ST: BEVERAGE COOLER 9 CHANGING THE INNER LIGHT 10 AUTOMATIC DEFROST 10 CHANGING THE REVERSIBLE DOOR 10 CARE AND MAINTENANCE CLEANING YOUR APPLIANCE 11 VACATION TIME 11 MOVING YOUR APPLIANCE 11 ENERGY SAVING TIPS 11 TROUBLESHOOTING GUIDE 12 APPLIANCE WARRANTY 13...

User Manual
Page 4
NAMES OF THE PARTS MODEL NO.: HMWC50ST 1 3 2 4 5 ① Electronic thermostat ② Wine rack ③ Door gasket ④ Glass door ⑤ Cabinet MODEL NO.: HMBC58ST 1 3 2 4 5 ① Electronic thermostat ② Beverage shelf ③ Door gasket ④ Glass door ⑤ Cabinet 3
NAMES OF THE PARTS MODEL NO.: HMWC50ST 1 3 2 4 5 ① Electronic thermostat ② Wine rack ③ Door gasket ④ Glass door ⑤ Cabinet MODEL NO.: HMBC58ST 1 3 2 4 5 ① Electronic thermostat ② Beverage shelf ③ Door gasket ④ Glass door ⑤ Cabinet 3

User Manual
Page 5
Unit Dimensions ( inches ) Net Weight ( lbs) Magic Chef 5.1 cu.ft. Model # HMWC50ST Product Description Model No. Stainless Steel Built-In Beverage Cooler HMBC58ST Width Height Depth 23.4" 33.9" 24.3" 95.2 lbs 4 Unit Dimensions ( inches ) Net Weight ( lbs) Magic Chef 50 Bottle Stainless Steel Built-In Wine Cooler HMWC50ST Width Height Depth 23.4" 33.9" 24.3" 99.1 lbs SPECIFICATIONS - Model # HMBC58ST Product Description Model No. SPECIFICATIONS -
Unit Dimensions ( inches ) Net Weight ( lbs) Magic Chef 5.1 cu.ft. Model # HMWC50ST Product Description Model No. Stainless Steel Built-In Beverage Cooler HMBC58ST Width Height Depth 23.4" 33.9" 24.3" 95.2 lbs 4 Unit Dimensions ( inches ) Net Weight ( lbs) Magic Chef 50 Bottle Stainless Steel Built-In Wine Cooler HMWC50ST Width Height Depth 23.4" 33.9" 24.3" 99.1 lbs SPECIFICATIONS - Model # HMBC58ST Product Description Model No. SPECIFICATIONS -

User Manual
Page 6
... when handle, move and use of refrigerator. 4) WARNING----Do not use electrical appliances inside the food storage compartments of the appliances, unless they have a qualified electrician install an outlet near the appliance. If the power cord is too short, have been given supervision or instruction concerning use an extension cord with , operate, or crawl inside the refrigerator. Use of an extension can...
... when handle, move and use of refrigerator. 4) WARNING----Do not use electrical appliances inside the food storage compartments of the appliances, unless they have a qualified electrician install an outlet near the appliance. If the power cord is too short, have been given supervision or instruction concerning use an extension cord with , operate, or crawl inside the refrigerator. Use of an extension can...

User Manual
Page 7
... water using a soft cloth. (Cleaning instruction on and allow children to the power source, let it stand upright for 3 ~ 4 hours under the guidelines of federal law must be installed built-in an RV or used with , or crawl inside the appliance. Refrigerants: All refrigeration products contain refrigerants, which under before placing wine bottles or beverages in place so that children may increase electrical consumption. Direct...
... water using a soft cloth. (Cleaning instruction on and allow children to the power source, let it stand upright for 3 ~ 4 hours under the guidelines of federal law must be installed built-in an RV or used with , or crawl inside the appliance. Refrigerants: All refrigeration products contain refrigerants, which under before placing wine bottles or beverages in place so that children may increase electrical consumption. Direct...

User Manual
Page 8
... authorized service center. Use of an extension cord can result in the risk of electrical shock. Do not, under any problems with an inverter. Do not use of the grounded plug can negatively affect the performance of this appliance is desired, please follow Reversible door instructions on hinge side. Built-In Installation The cutout dimension illustrated in figure (A) allows for your safety. The power cord...
... authorized service center. Use of an extension cord can result in the risk of electrical shock. Do not, under any problems with an inverter. Do not use of the grounded plug can negatively affect the performance of this appliance is desired, please follow Reversible door instructions on hinge side. Built-In Installation The cutout dimension illustrated in figure (A) allows for your safety. The power cord...

User Manual
Page 9
... HMWC50ST: Wine Cooler Engaged Wine Shelves There are five wine shelves of full depth in upper part of cabinet to back. The bottom rack, which consist of two stories, each hold 8 bottles with bottle necks facing the front. Warning: Do not press/jostle the circulation fan in the cabinet when you place in or remove the beverage cans or bottles...
... HMWC50ST: Wine Cooler Engaged Wine Shelves There are five wine shelves of full depth in upper part of cabinet to back. The bottom rack, which consist of two stories, each hold 8 bottles with bottle necks facing the front. Warning: Do not press/jostle the circulation fan in the cabinet when you place in or remove the beverage cans or bottles...
User Manual
Page 10
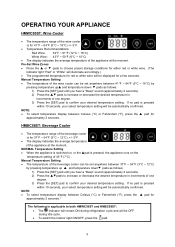
... idle cycle. To switch the Interior light ON/OFF, press the pad. 9 Manual Temperature Setting The temperature of the wine cooler can be automatically confirmed. Manual Temperature Setting The temperature of the beverage cooler can be automatically confirmed. If no pad is pressed within 10 seconds, your desired temperature setting. OPERATING YOUR APPLIANCE HMWC50ST: Wine Cooler The temperature range of the wine cooler is for 41°F ~ 64°...
... idle cycle. To switch the Interior light ON/OFF, press the pad. 9 Manual Temperature Setting The temperature of the wine cooler can be automatically confirmed. Manual Temperature Setting The temperature of the beverage cooler can be automatically confirmed. If no pad is pressed within 10 seconds, your desired temperature setting. OPERATING YOUR APPLIANCE HMWC50ST: Wine Cooler The temperature range of the wine cooler is for 41°F ~ 64°...
User Manual
Page 11
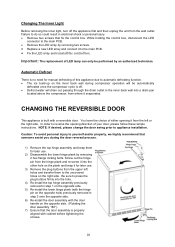
... pan located above the compressor, from where it from the left holes and transfer them for later use . 2) Disassemble the lower hinge plank by removing 2 hex flange locking bolts. Important: The replacement of your door, please follow these simple instructions. Caution: To avoid personal injury to yourself and/or property, we highly recommend that someone assist you during compressor operation will...
... pan located above the compressor, from where it from the left holes and transfer them for later use . 2) Disassemble the lower hinge plank by removing 2 hex flange locking bolts. Important: The replacement of your door, please follow these simple instructions. Caution: To avoid personal injury to yourself and/or property, we highly recommend that someone assist you during compressor operation will...
User Manual
Page 12
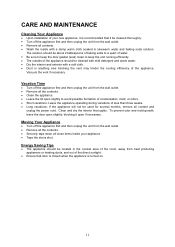
... located in lukewarm water and baking soda solution. Clean and dry the interior thoroughly. Moving Your Appliance Turn off the appliance first and then unplug the unit from the wall outlet. Remove all the contents. Securely tape down all content and unplug the power cord. Energy Saving Tips The appliance should be used...
... located in lukewarm water and baking soda solution. Clean and dry the interior thoroughly. Moving Your Appliance Turn off the appliance first and then unplug the unit from the wall outlet. Remove all the contents. Securely tape down all content and unplug the power cord. Energy Saving Tips The appliance should be used...

User Manual
Page 13
... the wall. PROBLEM Appliance does not operate. Door is dirty. 12 The gasket is slightly open too long or is set too cold. Warm air enters the appliance every time the door is too cold. Turn the control to a warmer setting and allow several hours for the appliance to stabilize. for service. Open the door less often. TROUBLESHOOTING GUIDE You can solve many common appliance problems easily, saving...
... the wall. PROBLEM Appliance does not operate. Door is dirty. 12 The gasket is slightly open too long or is set too cold. Warm air enters the appliance every time the door is too cold. Turn the control to a warmer setting and allow several hours for the appliance to stabilize. for service. Open the door less often. TROUBLESHOOTING GUIDE You can solve many common appliance problems easily, saving...

User Manual
Page 15
www.mcappliance.com Printed in China All rights reserved. d/b/a MC Appliance Corporation. Magic Chef® is a registered trademark of CNA International, Inc. CNA International, Inc.
www.mcappliance.com Printed in China All rights reserved. d/b/a MC Appliance Corporation. Magic Chef® is a registered trademark of CNA International, Inc. CNA International, Inc.


