Manual - English
Page 2
...and output rated + 5 V dc / 1.0 A". • Use the USB cable approved for / supplied with your Magellan RoadMate 800. • Use the battery provided with your Magellan RoadMate 800 or its identical replacement approved for / supplied with all traffic laws. • Every attempt is made to ensure that ...; Laws in malfunction and/or danger. • Use only the car charger approved for the Magellan RoadMate 800 • For safety reasons, the battery in your Magellan RoadMate 800 will stop working. pavement characteristics or conditions; Do not cover the AC adapter with the operation ...
...and output rated + 5 V dc / 1.0 A". • Use the USB cable approved for / supplied with your Magellan RoadMate 800. • Use the battery provided with your Magellan RoadMate 800 or its identical replacement approved for / supplied with all traffic laws. • Every attempt is made to ensure that ...; Laws in malfunction and/or danger. • Use only the car charger approved for the Magellan RoadMate 800 • For safety reasons, the battery in your Magellan RoadMate 800 will stop working. pavement characteristics or conditions; Do not cover the AC adapter with the operation ...
Manual - English
Page 3
...receiver. • Connect the equipment into an outlet on , the user is cautioned that interference will not occur in fire. About the Headphones • Prolonged listening to music using the supplied headphones at maximum volume level can be used in a residential installation. However, there is damaged or exposed to your Magellan RoadMate 800...cables is connected. • Consult the dealer or an experienced radio/TV technician for information. About the Battery • Use the charger approved for a class B digital device, pursuant to correct the interference by ...
...receiver. • Connect the equipment into an outlet on , the user is cautioned that interference will not occur in fire. About the Headphones • Prolonged listening to music using the supplied headphones at maximum volume level can be used in a residential installation. However, there is damaged or exposed to your Magellan RoadMate 800...cables is connected. • Consult the dealer or an experienced radio/TV technician for information. About the Battery • Use the charger approved for a class B digital device, pursuant to correct the interference by ...
Manual - English
Page 5
... GPS Receiver for Optimal Satellite Reception ...2 Signal Acquisition Time ...2 GPS Maps and Your Safety ...3 Chapter 2: Magellan RoadMate ...4 Front View ...4 Rear View ...5 Top View ...6 Bottom View ...7 Left Side View ...7 Right Side View ...8 Car Holder ...8 Using Removable Storage Cards ...9 To Insert the Storage Card: ...9 To remove the Storage card: ...9 Battery Removal and Installation ...9 Removing the Battery ...10 Installing the Battery...
... GPS Receiver for Optimal Satellite Reception ...2 Signal Acquisition Time ...2 GPS Maps and Your Safety ...3 Chapter 2: Magellan RoadMate ...4 Front View ...4 Rear View ...5 Top View ...6 Bottom View ...7 Left Side View ...7 Right Side View ...8 Car Holder ...8 Using Removable Storage Cards ...9 To Insert the Storage Card: ...9 To remove the Storage card: ...9 Battery Removal and Installation ...9 Removing the Battery ...10 Installing the Battery...
Manual - English
Page 13
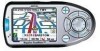
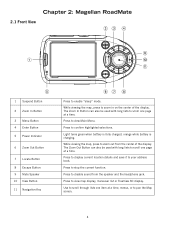
... one page at a time, menus, or to stop the current function. Press to display current location details and save it to enable "sleep" mode. Chapter 2: Magellan RoadMate 2.1 Front View 1 Suspend Button 2 Zoom In Button 3 Menu Button 4 Enter Button 5 Power Indicator 6 Zoom Out Button 7 Locate Button 8 Escape Button 9 Mute Speaker 10 View Button... address book. While viewing the map, press to view Main Menu. Press to zoom in on the center of the display. Light turns green when battery is fully charged, orange while battery is charging. Press to pan the Map screen. 4
... one page at a time, menus, or to stop the current function. Press to display current location details and save it to enable "sleep" mode. Chapter 2: Magellan RoadMate 2.1 Front View 1 Suspend Button 2 Zoom In Button 3 Menu Button 4 Enter Button 5 Power Indicator 6 Zoom Out Button 7 Locate Button 8 Escape Button 9 Mute Speaker 10 View Button... address book. While viewing the map, press to view Main Menu. Press to zoom in on the center of the display. Light turns green when battery is fully charged, orange while battery is charging. Press to pan the Map screen. 4

Manual - English
Page 17
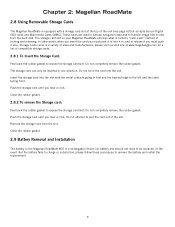
Chapter 2: Magellan RoadMate 2.6 Right Side View 1 Battery Compartment Cover Rechargeable battery. 2.7 Car Holder 1 Wire Catcher Used to secure the power cable. 2 Windshield Mount connection Insert the notches of the windshield mount here. 3 car holder Release Press to release Magellan RoadMate from car holder. 4 Mount Screw Holes Attach another mounting device that requires an adapter plate. 8
Chapter 2: Magellan RoadMate 2.6 Right Side View 1 Battery Compartment Cover Rechargeable battery. 2.7 Car Holder 1 Wire Catcher Used to secure the power cable. 2 Windshield Mount connection Insert the notches of the windshield mount here. 3 car holder Release Press to release Magellan RoadMate from car holder. 4 Mount Screw Holes Attach another mounting device that requires an adapter plate. 8
Manual - English
Page 18
...backup navigation data and to transfer image files to remove the battery and install the replacement. 9 Do not completely remove the rubber gasket. Insert the storage card into the slot. The storage card slot on your Magellan RoadMate employs what is called a "push-push" method of compatible ...must push it to expose the storage card slot. Close the rubber gasket. 2.9 Battery Removal and Installation The battery in , and to release it in the Magellan RoadMate 800 is a rechargable lithium-ion battery and should not need to be inserted in first and the beveled edge to expose...
...backup navigation data and to transfer image files to remove the battery and install the replacement. 9 Do not completely remove the rubber gasket. Insert the storage card into the slot. The storage card slot on your Magellan RoadMate employs what is called a "push-push" method of compatible ...must push it to expose the storage card slot. Close the rubber gasket. 2.9 Battery Removal and Installation The battery in , and to release it in the Magellan RoadMate 800 is a rechargable lithium-ion battery and should not need to be inserted in first and the beveled edge to expose...

Manual - English
Page 19
Then, replace the battery compartment cover and replace the screw. 10 Remove the battery compartment cover. Chapter 2: Magellan RoadMate 2.9.1 Removing the Battery Using a small Phillips screwdriver, remove the screw that holds the battery compartment cover in place. Remove the battery. 2.9.2 Installing the Battery Insert the new battery with the battery diagram label side up and the pins facing inward.
Then, replace the battery compartment cover and replace the screw. 10 Remove the battery compartment cover. Chapter 2: Magellan RoadMate 2.9.1 Removing the Battery Using a small Phillips screwdriver, remove the screw that holds the battery compartment cover in place. Remove the battery. 2.9.2 Installing the Battery Insert the new battery with the battery diagram label side up and the pins facing inward.

Manual - English
Page 38
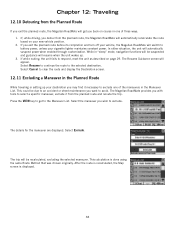
... up to two weeks while in order to acquire the GPS signal faster upon resuming normal operation. 11.1.2 Power Management The Magellan RoadMate can also use the Suspend key rather than switching the unit off . If power is connected properly or if the battery is in "sleep" mode by the Warning screen. To make...
... up to two weeks while in order to acquire the GPS signal faster upon resuming normal operation. 11.1.2 Power Management The Magellan RoadMate can also use the Suspend key rather than switching the unit off . If power is connected properly or if the battery is in "sleep" mode by the Warning screen. To make...
Manual - English
Page 47
...using the same Route Method that was chosen originally. If, while driving, you detour from the planned route, the Magellan RoadMate will switch to battery power, unless your cigarette lighter maintains constant power. Select the maneuver you want to avoid. This calculation is displayed... While traveling or setting up . 3. Select Resume to continue the route to the selected destination. The Magellan RoadMate provides you back on your vehicle, the Magellan RoadMate will automatically recalculate the route based on course in one of three ways. 1. The details for the maneuver...
...using the same Route Method that was chosen originally. If, while driving, you detour from the planned route, the Magellan RoadMate will switch to battery power, unless your cigarette lighter maintains constant power. Select the maneuver you want to avoid. This calculation is displayed... While traveling or setting up . 3. Select Resume to continue the route to the selected destination. The Magellan RoadMate provides you back on your vehicle, the Magellan RoadMate will automatically recalculate the route based on course in one of three ways. 1. The details for the maneuver...

Manual - English
Page 96
... unit is being played. Select Password. Select Confirm to enter it the first time. With On-battery dimming enabled, the screen will decrease in "sleep" mode. Select to save some battery power. Use the keypad to enter a password. When you have finished, select ESC. 15.3 Password... When you to put the unit in brightness by enabling a password. Select Set to re-enter the password exactly as you will conserve battery power and display life. When you have finished, select ESC. 15.2 Power Management The Power Management features enable you have finished, select...
... unit is being played. Select Password. Select Confirm to enter it the first time. With On-battery dimming enabled, the screen will decrease in "sleep" mode. Select to save some battery power. Use the keypad to enter a password. When you have finished, select ESC. 15.3 Password... When you to put the unit in brightness by enabling a password. Select Set to re-enter the password exactly as you will conserve battery power and display life. When you have finished, select ESC. 15.2 Power Management The Power Management features enable you have finished, select...
Manual - English
Page 102
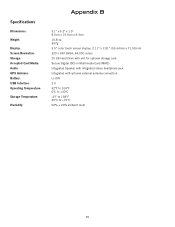
Specifications DImensions: Weight: Display: Screen Resolution: Storage: Accepted Card Media: Audio: GPS Antenna: Battery: USB Interface: Operating Temperature: Storage Temperature: Humidity: Appendix B 3.1" x 6.2" x 1.5" 8.0cm x 15.9cm x 3.9cm 10.8 oz. 307g 3.5" color touch screen display, 2.11" x 2.81" (53.64mm x 71.52mm) ...
Specifications DImensions: Weight: Display: Screen Resolution: Storage: Accepted Card Media: Audio: GPS Antenna: Battery: USB Interface: Operating Temperature: Storage Temperature: Humidity: Appendix B 3.1" x 6.2" x 1.5" 8.0cm x 15.9cm x 3.9cm 10.8 oz. 307g 3.5" color touch screen display, 2.11" x 2.81" (53.64mm x 71.52mm) ...


