
Manual - English
Page 2
... and should enter data or program the Magellan RoadMate receiver while the vehicle is moving. • It is available as vehicle type, weight, height, width, load and speed restrictions); Only a vehicle passenger should not be replaced, please contact Magellan Technical Support. traffic congestion. Temperature • The maximum operating temperature is approximately 30 minutes. It is recommended that you to view the display is minimal. Battery • The battery in your Magellan RoadMate. special events...
... and should enter data or program the Magellan RoadMate receiver while the vehicle is moving. • It is available as vehicle type, weight, height, width, load and speed restrictions); Only a vehicle passenger should not be replaced, please contact Magellan Technical Support. traffic congestion. Temperature • The maximum operating temperature is approximately 30 minutes. It is recommended that you to view the display is minimal. Battery • The battery in your Magellan RoadMate. special events...
Manual - English
Page 3
... the receiving antenna. • Increase the separation between the equipment and receiver. • Connect the equipment into an outlet on a circuit different from the user. This device may cause undesired operation of the device. FCC Caution: Any changes or modifications not expressly approved by the party responsible for help. In order to maintain compliance with the instructions, may cause undesired operation. IMPORTANT...
... the receiving antenna. • Increase the separation between the equipment and receiver. • Connect the equipment into an outlet on a circuit different from the user. This device may cause undesired operation of the device. FCC Caution: Any changes or modifications not expressly approved by the party responsible for help. In order to maintain compliance with the instructions, may cause undesired operation. IMPORTANT...

Manual - English
Page 4
... the specific operating instructions for satisfying RF exposure compliance. The information provided in this document is created. Improvements and enhancements to change without notice. The Magellan logo and Magellan are trademarks of MiTAC International Corporation. AAA © 2009 All rights reserved. The information provided in this document are correct at the time that may appear in the contents of this user manual...
... the specific operating instructions for satisfying RF exposure compliance. The information provided in this document is created. Improvements and enhancements to change without notice. The Magellan logo and Magellan are trademarks of MiTAC International Corporation. AAA © 2009 All rights reserved. The information provided in this document are correct at the time that may appear in the contents of this user manual...
Manual - English
Page 5
... Connection and Final Adjustments ...4 Security ...5 Fundamentals ...6 Powering on the Magellan RoadMate receiver ...6 Checking Battery Level ...6 Volume ...6 Brightness ...7 Main Menu ...7 Keypad ...8 Selecting QWERTY or ABC Keyboard ...9 Notes on Entering Data ...9 Smart City Search ...9 QuickSpell ...10 Map Screen ...11 Current Location Screen ...13 Accessing the Current Location Screen ...13 Saving Your Current Location to Your Address Book 13 Maneuver List (Itinerary) ...13 Accessing the Maneuver List ...13 Excluding a Maneuver ...13 Volume ...14 Changing the Volume from the Map Screen...
... Connection and Final Adjustments ...4 Security ...5 Fundamentals ...6 Powering on the Magellan RoadMate receiver ...6 Checking Battery Level ...6 Volume ...6 Brightness ...7 Main Menu ...7 Keypad ...8 Selecting QWERTY or ABC Keyboard ...9 Notes on Entering Data ...9 Smart City Search ...9 QuickSpell ...10 Map Screen ...11 Current Location Screen ...13 Accessing the Current Location Screen ...13 Saving Your Current Location to Your Address Book 13 Maneuver List (Itinerary) ...13 Accessing the Maneuver List ...13 Excluding a Maneuver ...13 Volume ...14 Changing the Volume from the Map Screen...
Manual - English
Page 6
... ...25 Cancelling a Route ...25 Detouring off a Route ...26 SmartDetour™ on Freeways ...26 Multi Destination Routes ...27 Creating Additional Destinations with Go To 27 Editing the Destination List ...27 Saving a Multi Destination Route to Your Address Book 28 Settings ...29 Accessing System Settings ...29 Setting Languages ...29 Setting Auto Power ...29 Setting Brightness ...29 Setting the Time Format ...29 Selecting the Time Zone (daylight savings on/off 29 Selecting Units of Measure ...30 Map Options ...30 Night Mode ...30 Setting Auto Night Map Display ...30 960 Overland...
... ...25 Cancelling a Route ...25 Detouring off a Route ...26 SmartDetour™ on Freeways ...26 Multi Destination Routes ...27 Creating Additional Destinations with Go To 27 Editing the Destination List ...27 Saving a Multi Destination Route to Your Address Book 28 Settings ...29 Accessing System Settings ...29 Setting Languages ...29 Setting Auto Power ...29 Setting Brightness ...29 Setting the Time Format ...29 Selecting the Time Zone (daylight savings on/off 29 Selecting Units of Measure ...30 Map Options ...30 Night Mode ...30 Setting Auto Night Map Display ...30 960 Overland...
Manual - English
Page 8
... the Magellan RoadMate receiver to the AC power using the QuickSpell™ and Smart City search for the Magellan RoadMate receiver is set up satellite signals in the Magellan RoadMate receiver will be used to guide you desire a printed version for driving instructions. Handy for business people who need to refer to this information on the interstate. • Customize your location information may not get routing information to that address. • Route to an address that can : • Save...
... the Magellan RoadMate receiver to the AC power using the QuickSpell™ and Smart City search for the Magellan RoadMate receiver is set up satellite signals in the Magellan RoadMate receiver will be used to guide you desire a printed version for driving instructions. Handy for business people who need to refer to this information on the interstate. • Customize your location information may not get routing information to that address. • Route to an address that can : • Save...
Manual - English
Page 10
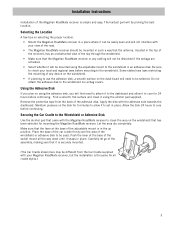
... set in place. Do not attach the adhesive disk to be different from the back of the Magellan RoadMate receiver is in the up position. Make sure that came with the adhesive side towards the dashboard. Selecting the Location A few tips on the dash board will not be disturbed if the airbags are activated. • Select whether it using the adjustable mount...
... set in place. Do not attach the adhesive disk to be different from the back of the Magellan RoadMate receiver is in the up position. Make sure that came with the adhesive side towards the dashboard. Selecting the Location A few tips on the dash board will not be disturbed if the airbags are activated. • Select whether it using the adjustable mount...
Manual - English
Page 11
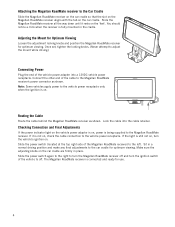
Adjusting the Mount for Optimum Viewing Loosen the adjustment locking knobs and position the Magellan RoadMate receiver for optimum viewing. Once set, tighten the locking knobs. (Never attempt to adjust the mount while driving.) Connecting Power Plug the end of the Magellan RoadMate receiver) to the left. If it rests on , turn the ignition switch of the cable to off and turn the vehicle's ignition on the car cradle. Slide the power switch (located at the top right...
Adjusting the Mount for Optimum Viewing Loosen the adjustment locking knobs and position the Magellan RoadMate receiver for optimum viewing. Once set, tighten the locking knobs. (Never attempt to adjust the mount while driving.) Connecting Power Plug the end of the Magellan RoadMate receiver) to the left. If it rests on , turn the ignition switch of the cable to off and turn the vehicle's ignition on the car cradle. Slide the power switch (located at the top right...
Manual - English
Page 13
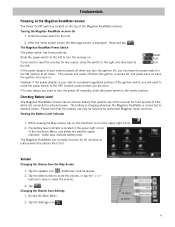
... '-' buttons to external power. Tap the Settings icon . Checking Battery Level The Magellan RoadMate receiver has an internal battery that this battery can only be serviced by authorized Magellan repair facilities. While viewing the Map screen, tap on the top of the Magellan RoadMate receiver. Raises volume Mute Lowers volume 6 After the initial splash screen the Warnings screen is connected to the center position. If you are done. Turning the Magellan RoadMate receiver On 1. The battery is charging whenever the Magellan RoadMate is displayed. The battery...
... '-' buttons to external power. Tap the Settings icon . Checking Battery Level The Magellan RoadMate receiver has an internal battery that this battery can only be serviced by authorized Magellan repair facilities. While viewing the Map screen, tap on the top of the Magellan RoadMate receiver. Raises volume Mute Lowers volume 6 After the initial splash screen the Warnings screen is connected to the center position. If you are done. Turning the Magellan RoadMate receiver On 1. The battery is charging whenever the Magellan RoadMate is displayed. The battery...
Manual - English
Page 15
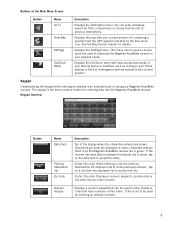
... zip code is known. This menu can be used to customize the Magellan RoadMate receiver to your current position (if computing a position from the list of previous destinations. Keypad Understanding the keypad while entering an address is an important part of emergency services nearest to your Magellan RoadMate receiver. Displays the map with easy access bookmarks of your favorite places or searches, such as routing to access functions used for entering data into the Magellan RoadMate receiver. Displays...
... zip code is known. This menu can be used to customize the Magellan RoadMate receiver to your current position (if computing a position from the list of previous destinations. Keypad Understanding the keypad while entering an address is an important part of emergency services nearest to your Magellan RoadMate receiver. Displays the map with easy access bookmarks of your favorite places or searches, such as routing to access functions used for entering data into the Magellan RoadMate receiver. Displays...

Manual - English
Page 16
... and enter "PA". your location. 9 Tap Keyboard. 4. The receiver looks for . Access the Main Menu. 2. Notes on Entering Data If you are having trouble getting the results you expected, here are a few useful tips. • Check for in the data field. (Entering street) Brings up a list of streets beginning with the characters entered. The city displayed now is displayed in the list, check to see the POI or street...
... and enter "PA". your location. 9 Tap Keyboard. 4. The receiver looks for . Access the Main Menu. 2. Notes on Entering Data If you are having trouble getting the results you expected, here are a few useful tips. • Check for in the data field. (Entering street) Brings up a list of streets beginning with the characters entered. The city displayed now is displayed in the list, check to see the POI or street...

Manual - English
Page 18
...In normal mode, your bookmarked searches and favorite destinations. (D) Current position and heading. (E) Access volume controls. (F) Information display. Normal Mode (A) Current location. (B) Information display. B A C G D E F H Map Screen - Tap on the information field to display the maneuver list (available only when routing). (B) Distance and road name for next maneuver. Tap to your position is shown on the information field to change . 11 Displays speed, time of arrival (ETA), and time remaining. While routing it also can be displayed. Displays speed, time of...
...In normal mode, your bookmarked searches and favorite destinations. (D) Current position and heading. (E) Access volume controls. (F) Information display. Normal Mode (A) Current location. (B) Information display. B A C G D E F H Map Screen - Tap on the information field to display the maneuver list (available only when routing). (B) Distance and road name for next maneuver. Tap to your position is shown on the information field to change . 11 Displays speed, time of arrival (ETA), and time remaining. While routing it also can be displayed. Displays speed, time of...
Manual - English
Page 19
... destination. •Add To Trip: the selected destination is displayed. 2. (G) Access the list of nearest Highway Exit POIs (available only when driving on a highway/freeway/interstate). (H) Zoom in the top left corner. 4. Accessing the Map Screen 1. From the Map screen, tap anywhere on the map. 12 A red push pin will switch to 2D at the point you need to define what to do with this new route point: •Replace Destination: the next destination...
... destination. •Add To Trip: the selected destination is displayed. 2. (G) Access the list of nearest Highway Exit POIs (available only when driving on a highway/freeway/interstate). (H) Zoom in the top left corner. 4. Accessing the Map Screen 1. From the Map screen, tap anywhere on the map. 12 A red push pin will switch to 2D at the point you need to define what to do with this new route point: •Replace Destination: the next destination...
Manual - English
Page 20
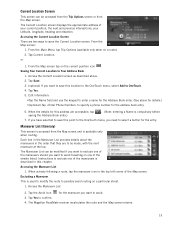
... a phone number for details.) •(optional) Tap to confirm. 4. Edit information: •Tap the Name field and use the keypad to enter a name for the Address Book entry. (See above . 2. or 1. If you have selected to save this location to the OneTouch menu, select Add to select a button for this chapter. The Magellan RoadMate receiver recalculates the route and the Map screen returns. 13 The Current Location screen displays the approximate address of the Map screen. Accessing the Current Location Screen There...
... a phone number for details.) •(optional) Tap to confirm. 4. Edit information: •Tap the Name field and use the keypad to enter a name for the Address Book entry. (See above . 2. or 1. If you have selected to save this location to the OneTouch menu, select Add to select a button for this chapter. The Magellan RoadMate receiver recalculates the route and the Map screen returns. 13 The Current Location screen displays the approximate address of the Map screen. Accessing the Current Location Screen There...

Manual - English
Page 22
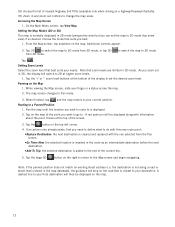
.... The range of use you need to create a route from: • an exact address, including street number, • the midpoint of a street, • an intersection, • any significant word in the street name and tap the or continue entering characters until the list of the city, entering the ZIP code for the city or by selecting a previously used to use a destination later, before you start typing. Enter City: You have...
.... The range of use you need to create a route from: • an exact address, including street number, • the midpoint of a street, • an intersection, • any significant word in the street name and tap the or continue entering characters until the list of the city, entering the ZIP code for the city or by selecting a previously used to use a destination later, before you start typing. Enter City: You have...

Manual - English
Page 24
... routing method (e.g. The OneTouch menu appears. 2. Select the desired location from the list. 4. Tips on the right to return to specify a phone number for the address book entry. • (optional) Tap to the Map screen and start navigating. Fastest). 5. (optional) Tap Options if you want to travel, and the routing method (e.g. Tap the large GO button on Entering Addresses Quickly • When you are entering the name of Previous Destinations...
... routing method (e.g. The OneTouch menu appears. 2. Select the desired location from the list. 4. Tips on the right to return to specify a phone number for the address book entry. • (optional) Tap to the Map screen and start navigating. Fastest). 5. (optional) Tap Options if you want to travel, and the routing method (e.g. Tap the large GO button on Entering Addresses Quickly • When you are entering the name of Previous Destinations...
Manual - English
Page 25
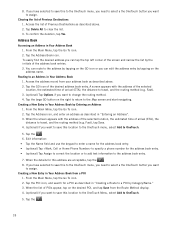
... OneTouch menu, you need to select a the OneTouch button you want to the address book entry. 7. From the Main Menu, tap the Go To icon. 2. Tap the . 6. If you want to a POI by Entering an Address 1. Address Book Accessing an Address in Your Address Book from a POI 1. Access the address record from the Route Method display. 4. (optional) If you want to save this location to the OneTouch Menu, select Add to travel , and the routing method (e.g. Creating a New...
... OneTouch menu, you need to select a the OneTouch button you want to the address book entry. 7. From the Main Menu, tap the Go To icon. 2. Tap the . 6. If you want to a POI by Entering an Address 1. Address Book Accessing an Address in Your Address Book from a POI 1. Access the address record from the Route Method display. 4. (optional) If you want to save this location to the OneTouch Menu, select Add to travel , and the routing method (e.g. Creating a New...
Manual - English
Page 34
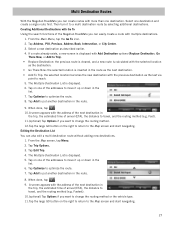
... the address of arrival (ETA), the distance to reach. 5. Tap Optimize to optimize the route. 8. Fast). 11.(optional) Tap Options if you want to change the routing method or the vehicle type. 11.Tap the large GO button on the right to return to the Map screen and start navigating. Tap Trip Options. 3. Multi Destination Routes With the Magellan RoadMate you can easily create a route with multiple destinations. 1. Fastest...
... the address of arrival (ETA), the distance to reach. 5. Tap Optimize to optimize the route. 8. Fast). 11.(optional) Tap Options if you want to change the routing method or the vehicle type. 11.Tap the large GO button on the right to return to the Map screen and start navigating. Tap Trip Options. 3. Multi Destination Routes With the Magellan RoadMate you can easily create a route with multiple destinations. 1. Fastest...

Manual - English
Page 36
... . Tap Time Format. 3. Tap on the desired language. 4. Tap in the list. 4. Access the System Settings menu (above ). 2. Select Auto Time Zone or select your time zone from any of the display. 4. Tap the back arrow . 29 Tapping the Back arrow Tap as soon as you can customize the Magellan RoadMate receiver to set the brightness of the Setting screens will reboot. Setting Brightness 1. Setting the Time Format 1. Tap on the desired duration. 4. Setting Auto Power Auto power is the...
... . Tap Time Format. 3. Tap on the desired language. 4. Tap in the list. 4. Access the System Settings menu (above ). 2. Select Auto Time Zone or select your time zone from any of the display. 4. Tap the back arrow . 29 Tapping the Back arrow Tap as soon as you can customize the Magellan RoadMate receiver to set the brightness of the Setting screens will reboot. Setting Brightness 1. Setting the Time Format 1. Tap on the desired duration. 4. Setting Auto Power Auto power is the...
Manual - English
Page 39
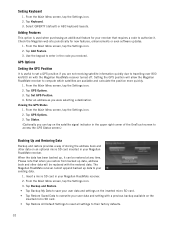
... optional micro SD card inserted in your receiver that when you can be replaced with the restored data. Tap Backup and Restore. • Tap Backup My Data to save your user data and settings on the satellite signal indicator in the code you were selecting a destination. Select QWERTY (default) or ABC keyboard layouts. Check the Magellan web site periodically for your Magellan RoadMate receiver. 2. Tap Set GPS Position. 4. Tap GPS Options. 3. Viewing the GPS Status 1. From the Main Menu screen, tap the Settings icon...
... optional micro SD card inserted in your receiver that when you can be replaced with the restored data. Tap Backup and Restore. • Tap Backup My Data to save your user data and settings on the satellite signal indicator in the code you were selecting a destination. Select QWERTY (default) or ABC keyboard layouts. Check the Magellan web site periodically for your Magellan RoadMate receiver. 2. Tap Set GPS Position. 4. Tap GPS Options. 3. Viewing the GPS Status 1. From the Main Menu screen, tap the Settings icon...


