Owners Manual
Page 1
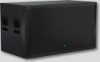
SRM1850 • SRM2850 1600W 18" POWERED SUBWOOFERS OWNER'S MANUAL
SRM1850 • SRM2850 1600W 18" POWERED SUBWOOFERS OWNER'S MANUAL
Owners Manual
Page 2
... outlet. 10. SRM1850 • SRM2850 Powered Subwoofers Important Safety Instructions 1. If the provided plug does not fit into an outlet on the rear panel and should remain readily accessible to the WEEE directive (2012/19/EU) and your waste equipment for long periods of with a cart, stand, tripod, bracket, or table specified by LOUD Technologies Inc. Use only with your household...
... outlet. 10. SRM1850 • SRM2850 Powered Subwoofers Important Safety Instructions 1. If the provided plug does not fit into an outlet on the rear panel and should remain readily accessible to the WEEE directive (2012/19/EU) and your waste equipment for long periods of with a cart, stand, tripod, bracket, or table specified by LOUD Technologies Inc. Use only with your household...
Owners Manual
Page 3
... Pass Mode 10 10. SW0986 Rev. XLR Inputs 8 4. Rock 'n Roll 10 Placement 11 The Ins and Outs of Polarity 11 Smart Protect 12 Limiting 12 Overexcursion Protection 12 Thermal Protection 12 AC Power 12 Care and Maintenance 12 Appendix A: Service Information 13 Appendix B: Connections 14 Appendix C: Technical Information 15 SRM1850 Subwoofer Dimensions 16 SRM1850 Subwoofer Frequency Response........ 16 SRM2850 Subwoofer Dimensions 17 SRM2850 Subwoofer Frequency Response........ 17 SRM Subwoofer Block Diagram 18 Limited...
... Pass Mode 10 10. SW0986 Rev. XLR Inputs 8 4. Rock 'n Roll 10 Placement 11 The Ins and Outs of Polarity 11 Smart Protect 12 Limiting 12 Overexcursion Protection 12 Thermal Protection 12 AC Power 12 Care and Maintenance 12 Appendix A: Service Information 13 Appendix B: Connections 14 Appendix C: Technical Information 15 SRM1850 Subwoofer Dimensions 16 SRM1850 Subwoofer Frequency Response........ 16 SRM2850 Subwoofer Dimensions 17 SRM2850 Subwoofer Frequency Response........ 17 SRM Subwoofer Block Diagram 18 Limited...
Owners Manual
Page 4
... will love playing in a rock solid subwoofer with maximum low-frequency extension and punch. Turn the subwoofers on . 8. After this manual to learn how to set the high pass mode to really dial in place to an amplifier powering passive loudspeakers). 4. This icon marks information that includes presets for information on the rear panel of the speakers. 4 SRM1850 • SRM2850 Powered Subwoofers • Save the shipping boxes and packing...
... will love playing in a rock solid subwoofer with maximum low-frequency extension and punch. Turn the subwoofers on . 8. After this manual to learn how to set the high pass mode to really dial in place to an amplifier powering passive loudspeakers). 4. This icon marks information that includes presets for information on the rear panel of the speakers. 4 SRM1850 • SRM2850 Powered Subwoofers • Save the shipping boxes and packing...
Owners Manual
Page 5
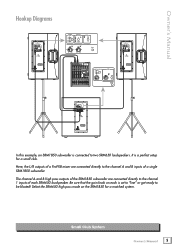
... SRM650 high pass mode on each SRM650 loudspeaker. Here, the L/R outputs of a ProFX8 mixer are connected directly to the channel A and B inputs of each is set to "line" or get ready to two SRM650 loudspeakers. The channel A and B high pass outputs of the SRM1850 subwoofer are connected directly to the channel 1 inputs of a single SRM1850 subwoofer. Small Club System Owner's Manual 5 Owner's Manual Hookup Diagrams SIG/OL SIG/OL POWER CONSUMPTION 200W SIG...
... SRM650 high pass mode on each SRM650 loudspeaker. Here, the L/R outputs of a ProFX8 mixer are connected directly to the channel A and B inputs of each is set to "line" or get ready to two SRM650 loudspeakers. The channel A and B high pass outputs of the SRM1850 subwoofer are connected directly to the channel 1 inputs of a single SRM1850 subwoofer. Small Club System Owner's Manual 5 Owner's Manual Hookup Diagrams SIG/OL SIG/OL POWER CONSUMPTION 200W SIG...
Owners Manual
Page 6
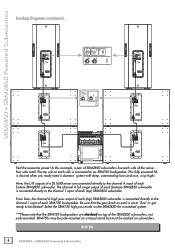
... subs total! The channel A full range output of each (bottom) SRM2850 subwoofer is connected directly to be stacked on each is connected directly to the channel A input of each bottom SRM2850 subwoofer. Select the SRM750 high pass mode on the SRM2850 for a matched system. ***Please note that the gain knob on subwoofers. In this example, a pair of the SRM2850 subwoofers, not pole-mounted. BIG PA 6 SRM1850 • SRM2850 Powered Subwoofers SRM1850 • SRM2850 Powered Subwoofers Hookup Diagrams continued...
... subs total! The channel A full range output of each (bottom) SRM2850 subwoofer is connected directly to be stacked on each is connected directly to the channel A input of each bottom SRM2850 subwoofer. Select the SRM750 high pass mode on the SRM2850 for a matched system. ***Please note that the gain knob on subwoofers. In this example, a pair of the SRM2850 subwoofers, not pole-mounted. BIG PA 6 SRM1850 • SRM2850 Powered Subwoofers SRM1850 • SRM2850 Powered Subwoofers Hookup Diagrams continued...

Owners Manual
Page 7
... VAR To next SRM subwoofer input SRM 550 SRM 650 VAR DL1608 Mixer SRM subwoofers may be daisy-chained via the male XLR connector labeled "FULL RANGE". Simply plug the signal source (i.e., mixer output) into the input jack(s), and patch that subwoofer's full range jack to the next subwoofers's input jack, and so on, daisy-chaining multiple SRM subwoofers. Owner's Manual Hookup Diagrams continued... Daisy-Chaining Multiple SRM Subwoofers Owner's Manual 7
... VAR To next SRM subwoofer input SRM 550 SRM 650 VAR DL1608 Mixer SRM subwoofers may be daisy-chained via the male XLR connector labeled "FULL RANGE". Simply plug the signal source (i.e., mixer output) into the input jack(s), and patch that subwoofer's full range jack to the next subwoofers's input jack, and so on, daisy-chaining multiple SRM subwoofers. Owner's Manual Hookup Diagrams continued... Daisy-Chaining Multiple SRM Subwoofers Owner's Manual 7
Owners Manual
Page 8
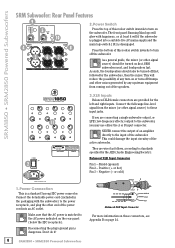
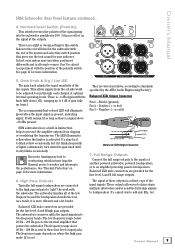
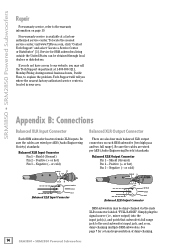
... connecting a single subwoofer output, or LFE (low-frequency effects) output to the input of the subwoofer. Shield (ground) Pin 2 - SRM1850 • SRM2850 Powered Subwoofers SRM Subwoofer: Rear Panel Features 9 SRM 550 SRM 650 5 VAR 10 4 8 3 67 2.Power Switch Press the top of this rocker switch inwards to turn off the subwoofer. Connect the detachable power cord (included in the packaging with happiness...or at least it ! 3.XLR Inputs Balanced XLR female connectors are wired...
... connecting a single subwoofer output, or LFE (low-frequency effects) output to the input of the subwoofer. Shield (ground) Pin 2 - SRM1850 • SRM2850 Powered Subwoofers SRM Subwoofer: Rear Panel Features 9 SRM 550 SRM 650 5 VAR 10 4 8 3 67 2.Power Switch Press the top of this rocker switch inwards to turn off the subwoofer. Connect the detachable power cord (included in the packaging with happiness...or at least it ! 3.XLR Inputs Balanced XLR female connectors are wired...
Owners Manual
Page 9
... the signal at optimal internal operating levels. Full Range Outputs Connect the full range outputs to 6 dB of the signal going 5 into two frequency bands. The subwoofer's crossover splits the input signals into the subwoofer amplifier by the AES (Audio Engineering Society): Balanced XLR Output Connector Pin 1 - It has no right or wrong setting for more information. See page 11 for this switch. 4 Listen to overheating, which...
... the signal at optimal internal operating levels. Full Range Outputs Connect the full range outputs to 6 dB of the signal going 5 into two frequency bands. The subwoofer's crossover splits the input signals into the subwoofer amplifier by the AES (Audio Engineering Society): Balanced XLR Output Connector Pin 1 - It has no right or wrong setting for more information. See page 11 for this switch. 4 Listen to overheating, which...
Owners Manual
Page 10
... lowest frequency response rating of them does. Main Logo Switch The Running Man logo on the front of extra knobs, buttons and LEDs. Once you desire. For example, if a mixer's L/R outputs are connected to the A and B inputs of an SRM subwoofer and the full range outputs are sent to the SRM high pass outputs. At this is used for, be set to...
... lowest frequency response rating of them does. Main Logo Switch The Running Man logo on the front of extra knobs, buttons and LEDs. Once you desire. For example, if a mixer's L/R outputs are connected to the A and B inputs of an SRM subwoofer and the full range outputs are sent to the SRM high pass outputs. At this is used for, be set to...
Owners Manual
Page 11
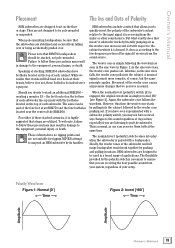
... feet of an SRM750 and the four footholes located near the center of its handles. A subwoofer works by the woofer cone pushing out. When pole-mounting loudspeakers, be pole-mounted or suspended. the feet located on the top of the subwoofer's output relative to the input signal it is receiving from falling over or being accidentally pushed over heels at...
... feet of an SRM750 and the four footholes located near the center of its handles. A subwoofer works by the woofer cone pushing out. When pole-mounting loudspeakers, be pole-mounted or suspended. the feet located on the top of the subwoofer's output relative to the input signal it is receiving from falling over or being accidentally pushed over heels at...
Owners Manual
Page 12
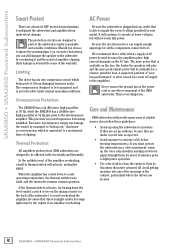
... amplifier clipping. When the amplifier has cooled down the level control a notch or two on the power cord or any of the openings of the SRM subwoofer. excessive distortion], you must operate the subwoofers in the subwoofer by causing it past the point of clipping. SRM1850 • SRM2850 Powered Subwoofers Smart Protect AC Power There are advanced DSP protection mechanisms to a safe operating temperature, the thermal switch resets...
... amplifier clipping. When the amplifier has cooled down the level control a notch or two on the power cord or any of the openings of the SRM subwoofer. excessive distortion], you must operate the subwoofers in the subwoofer by causing it past the point of clipping. SRM1850 • SRM2850 Powered Subwoofers Smart Protect AC Power There are advanced DSP protection mechanisms to a safe operating temperature, the thermal switch resets...
Owners Manual
Page 13
... behind each subwoofer. • Make sure none of the signal cables are secure. Make sure the output level control on . • Make sure the line cord is blown, please see the "Repair" section next. Make sure there is turned down before disengaging the offending switch. • Has it on the mixing console is not a user serviceable part. Owner's Manual 13 Make sure that all connections are routed near AC cables, power transformers, or...
... behind each subwoofer. • Make sure none of the signal cables are secure. Make sure the output level control on . • Make sure the line cord is blown, please see the "Repair" section next. Make sure there is turned down before disengaging the offending switch. • Has it on the mixing console is not a user serviceable part. Owner's Manual 13 Make sure that all connections are routed near AC cables, power transformers, or...
Owners Manual
Page 14
... XLR Output Connector Pin 1 - Positive (+ or hot) Pin 3 - To locate the nearest service center, visit www.720trees.com, click "Contact Tech Support" and select "Locate a Service Center or Distributor" [3]. Tech Support will tell you may be obtained through local dealers or distributors. Be sure the cables are wired per AES (Audio Engineering Society) standards: Balanced XLR Input Connector Pin 1 - See page 7 for SRM subwoofers...
... XLR Output Connector Pin 1 - Positive (+ or hot) Pin 3 - To locate the nearest service center, visit www.720trees.com, click "Contact Tech Support" and select "Locate a Service Center or Distributor" [3]. Tech Support will tell you may be obtained through local dealers or distributors. Be sure the cables are wired per AES (Audio Engineering Society) standards: Balanced XLR Input Connector Pin 1 - See page 7 for SRM subwoofers...

Owners Manual
Page 15
... of their respective holders, and are designed to be pole-mounted or suspended. All other brand names mentioned are trademarks or registered trademarks of LOUD Technologies Inc. Owner's Manual Appendix C: Technical Information SRM Subwoofer Specifications Acoustic Performance: Frequency Response (-3 dB) 40 Hz - 120 Hz [SRM1850] 34 Hz - 100 Hz [SRM2850] Frequency Response (-10 dB) 35 Hz - 150 Hz [SRM1850] 26 Hz...
... of their respective holders, and are designed to be pole-mounted or suspended. All other brand names mentioned are trademarks or registered trademarks of LOUD Technologies Inc. Owner's Manual Appendix C: Technical Information SRM Subwoofer Specifications Acoustic Performance: Frequency Response (-3 dB) 40 Hz - 120 Hz [SRM1850] 34 Hz - 100 Hz [SRM2850] Frequency Response (-10 dB) 35 Hz - 150 Hz [SRM1850] 26 Hz...

Owners Manual
Page 16
SRM1850 • SRM2850 Powered Subwoofers SRM1850 Subwoofer Dimensions 22.5 in 572 mm 22.2 in 565 mm WEIGHT 64 lb 29 kg 22.0 in 558 mm 23.9 in 608 mm 22.8 in 579 mm 23.9 in 608 mm 16.8 in 428 mm SRM1850 Subwoofer Frequency Response Normalized to 0 dB SPL +10 +0 -10 -20 -30 20 200 2000 Frequency Response [Hz] 16 SRM1850 • SRM2850 Powered Subwoofers SRM550 / SRM650 VARIABLE : HIGH VARIABLE : LOW 20000
SRM1850 • SRM2850 Powered Subwoofers SRM1850 Subwoofer Dimensions 22.5 in 572 mm 22.2 in 565 mm WEIGHT 64 lb 29 kg 22.0 in 558 mm 23.9 in 608 mm 22.8 in 579 mm 23.9 in 608 mm 16.8 in 428 mm SRM1850 Subwoofer Frequency Response Normalized to 0 dB SPL +10 +0 -10 -20 -30 20 200 2000 Frequency Response [Hz] 16 SRM1850 • SRM2850 Powered Subwoofers SRM550 / SRM650 VARIABLE : HIGH VARIABLE : LOW 20000

Owners Manual
Page 17
Owner's Manual SRM2850 Subwoofer Dimensions 24.5 in 623 mm 24.0 in 610 mm 44.0 in 1117 mm 38.4 in 976 mm WEIGHT 144 lb 65.2 kg 29.5 in 750 mm SRM2850 Subwoofer Frequency Response +10 Normalized to 0 dB SPL +0 -10 -20 -30 20 200 2000 Frequency Response [Hz] SRM650 SRM750 VARIABLE : 60 Hz VARIABLE : 120 Hz 20000 Owner's Manual 17
Owner's Manual SRM2850 Subwoofer Dimensions 24.5 in 623 mm 24.0 in 610 mm 44.0 in 1117 mm 38.4 in 976 mm WEIGHT 144 lb 65.2 kg 29.5 in 750 mm SRM2850 Subwoofer Frequency Response +10 Normalized to 0 dB SPL +0 -10 -20 -30 20 200 2000 Frequency Response [Hz] SRM650 SRM750 VARIABLE : 60 Hz VARIABLE : 120 Hz 20000 Owner's Manual 17

Owners Manual
Page 19
...materials and workmanship under normal use during normal business hours Pacific Time, excluding weekends or LOUD holidays. Please retain the original dated sales receipt as the specific duration of the Warranty for your local distributor, and information on any of the provisions...its option, either repair or replace any warranty service. The Product Warranty, together with the subwoofer? • Visit www.720trees.com and click Support to find contact information for this Product Warranty will at 1.800.898.3211 (toll-free in a safe place. Owner's Manual 19 For full ...
...materials and workmanship under normal use during normal business hours Pacific Time, excluding weekends or LOUD holidays. Please retain the original dated sales receipt as the specific duration of the Warranty for your local distributor, and information on any of the provisions...its option, either repair or replace any warranty service. The Product Warranty, together with the subwoofer? • Visit www.720trees.com and click Support to find contact information for this Product Warranty will at 1.800.898.3211 (toll-free in a safe place. Owner's Manual 19 For full ...

Owners Manual
Page 20
16220 Wood-Red Road NE Woodinville, WA 98072 • USA Phone: 425.487.4333 Toll-free: 800.898.3211 Fax: 425.487.4337 www.720trees.com
16220 Wood-Red Road NE Woodinville, WA 98072 • USA Phone: 425.487.4333 Toll-free: 800.898.3211 Fax: 425.487.4337 www.720trees.com


