
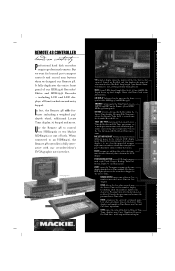
Desktop Brochure
Page 3
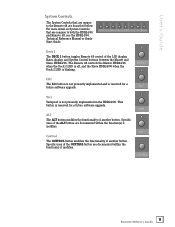
... and BBT on the Remote 48 and MDR/ HDR24/96 front panels. SYSTEM CONTROL BUTTONS access LCD display menus such as math operators in time code calculator operations, and call up the next/previous Cue in the Cue List in the LCD display. U se the Remote 48 to indicate which direction you edit specific fields within that menu. When connected to the ones on...
... and BBT on the Remote 48 and MDR/ HDR24/96 front panels. SYSTEM CONTROL BUTTONS access LCD display menus such as math operators in time code calculator operations, and call up the next/previous Cue in the Cue List in the LCD display. U se the Remote 48 to indicate which direction you edit specific fields within that menu. When connected to the ones on...

Desktop Brochure
Page 4
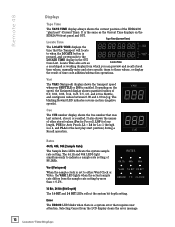
... the Locate button is most often used together to the time set for recording, and affects only armed tracks. Jog play audio both forwards and backwards at the beginning of time by Auto Input. LOCATE TIME displays the time that point. ALL INPUT is pressed, and acts as a scratchpad or working display from all recording controls. REHEARSE allows you to the Auto Punch in certain Autolocator operations, such...
... the Locate button is most often used together to the time set for recording, and affects only armed tracks. Jog play audio both forwards and backwards at the beginning of time by Auto Input. LOCATE TIME displays the time that point. ALL INPUT is pressed, and acts as a scratchpad or working display from all recording controls. REHEARSE allows you to the Auto Punch in certain Autolocator operations, such...
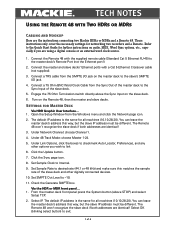
Hook Up Diagram for Multiple MDR/HDRs
Page 1
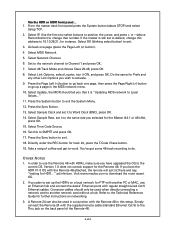
... are using a digital console or an external word clock source. 1. Under Network Channel: choose Channel 1. 4. Connect the master and slave decks' Ethernet ports with Two HDRs or MDRs Cabling and Hookup Here are identical! Settings for networking two recorders and a Remote. Click the Sync page icon. 8. Click the Update button. 7. Check the Generate SMPTE box. The default IP address is the same for further instructions on the Remote 48...
... are using a digital console or an external word clock source. 1. Under Network Channel: choose Channel 1. 4. Connect the master and slave decks' Ethernet ports with Two HDRs or MDRs Cabling and Hookup Here are identical! Settings for networking two recorders and a Remote. Click the Sync page icon. 8. Click the Update button. 7. Check the Generate SMPTE box. The default IP address is the same for further instructions on the Remote 48...

Hook Up Diagram for Multiple MDR/HDRs
Page 2
Click the Update button. 7. Set Time Code Source to 10.10.28.21, for instance. 3. Settings for the Master Deck (44.1 or 48 kHz) 10. If the master is still set to default, change this ON and press OK 17. Under Link Options, click the boxes to checkmark Auto Locator, Preferences and any other options you 're currently in the HDR's menu). 16. Go back one page...
Click the Update button. 7. Set Time Code Source to 10.10.28.21, for instance. 3. Settings for the Master Deck (44.1 or 48 kHz) 10. If the master is still set to default, change this ON and press OK 17. Under Link Options, click the boxes to checkmark Auto Locator, Preferences and any other options you 're currently in the HDR's menu). 16. Go back one page...
Hook Up Diagram for Multiple MDR/HDRs
Page 4
If the master is still set to 10.10.28.21, for instance. Select IP. Select OK (blinking select button) to position the cursor, and press + or - (above STOP) and select Setup TCP. 2. Go back one page (press the Page Left ( From the master deck front panel press the System button (above Record button) to change this address to default, change that number. Use the first two select buttons to exit. 3. Via the HDR or MDR front panel... 1.
If the master is still set to 10.10.28.21, for instance. Select IP. Select OK (blinking select button) to position the cursor, and press + or - (above STOP) and select Setup TCP. 2. Go back one page (press the Page Left ( From the master deck front panel press the System button (above Record button) to change this address to default, change that number. Use the first two select buttons to exit. 3. Via the HDR or MDR front panel... 1.
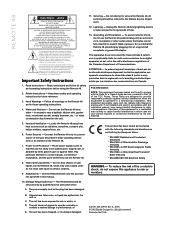
Owner's Manual
Page 2
... U.S.A. Follow all safety and operating instructions before using the Remote 48. 2. This apparatus does not exceed the Class A/Class B (whichever is applicable) limits for radio noise emissions from heat sources such as marked on the unit. 11. Locate the Remote 48 away from digital apparatus as set forth by plugging into an ungrounded receptacle or ground lift adapter. Power Cord Protection - Objects have fallen onto...
... U.S.A. Follow all safety and operating instructions before using the Remote 48. 2. This apparatus does not exceed the Class A/Class B (whichever is applicable) limits for radio noise emissions from heat sources such as marked on the unit. 11. Locate the Remote 48 away from digital apparatus as set forth by plugging into an ungrounded receptacle or ground lift adapter. Power Cord Protection - Objects have fallen onto...
Owner's Manual
Page 3
User's Guide Contents Introduction 4 Installation 5 Mount on Stand (Optional 5 Mount on Mic Stand (Optional 5 Plug It In 6 What About The Remote 24 6 Footswitch 6 Operation 7 Transport 7 Stop 7 Play 7 Fast Forward/Rewind 7 Record 7 Transport Locate 7 Numbered Locates 8 Shuttle and Jog 8 Shuttle and Jog Wheel 8 Transport Modes 9 Pre Roll 9 Loop 9 Punch 9 Rehearse 9 Auto Play 9 Auto Take 9 Record/Monitor Controls 10 Record Ready 10 All Input 10 Auto Input 10 Record Safe 10 Lock...
User's Guide Contents Introduction 4 Installation 5 Mount on Stand (Optional 5 Mount on Mic Stand (Optional 5 Plug It In 6 What About The Remote 24 6 Footswitch 6 Operation 7 Transport 7 Stop 7 Play 7 Fast Forward/Rewind 7 Record 7 Transport Locate 7 Numbered Locates 8 Shuttle and Jog 8 Shuttle and Jog Wheel 8 Transport Modes 9 Pre Roll 9 Loop 9 Punch 9 Rehearse 9 Auto Play 9 Auto Take 9 Record/Monitor Controls 10 Record Ready 10 All Input 10 Auto Input 10 Record Safe 10 Lock...

Owner's Manual
Page 4
... keys for 48 tracks • System control for both the Mackie HDR24/96 and MDR24/96. Remote 48 Introduction The Remote 48 is used to control one or more HDR24/96 recorders. It is a professional remote controller for two HDR24/96 recorders • Time code Calculator Record Ready Buttons LCD Display & Control Status, Cue & Time Displays Monitoring & Record Safe EDIT ALT CONTROL System Control Autolocator & Numeric Keypad Transport Transport Control Jog/Shuttle...
... keys for 48 tracks • System control for both the Mackie HDR24/96 and MDR24/96. Remote 48 Introduction The Remote 48 is used to control one or more HDR24/96 recorders. It is a professional remote controller for two HDR24/96 recorders • Time code Calculator Record Ready Buttons LCD Display & Control Status, Cue & Time Displays Monitoring & Record Safe EDIT ALT CONTROL System Control Autolocator & Numeric Keypad Transport Transport Control Jog/Shuttle...
Owner's Manual
Page 6
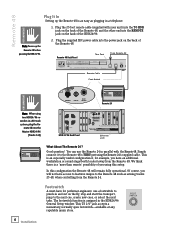
... the Master HDR24/96 (Tracks 1-24) 120VAC 50/60 Hz 475W INPUT INPUT INPUT OUTPUT OUTPUT OUTPUT WARNING DO NOT PLUG INTO ETHERNET REMOTE MOUSE FOOT SWITCH TAPE 1- 8 TAPE 9-16 TAPE 17-24 HDR 24/96 24TRACK 24 BIT DIGITAL AUDIO HARD DISK RECORDER/EDITOR KEYBOARD OPT • 8 OPT • 8 OPT • 8 WARNING: SHUT OFF POWER TO UNIT BEFORE INSTALLING OR REMOVING CARDS! Remote 48 Plug It In Setting up the Remote 48 before powering...
... the Master HDR24/96 (Tracks 1-24) 120VAC 50/60 Hz 475W INPUT INPUT INPUT OUTPUT OUTPUT OUTPUT WARNING DO NOT PLUG INTO ETHERNET REMOTE MOUSE FOOT SWITCH TAPE 1- 8 TAPE 9-16 TAPE 17-24 HDR 24/96 24TRACK 24 BIT DIGITAL AUDIO HARD DISK RECORDER/EDITOR KEYBOARD OPT • 8 OPT • 8 OPT • 8 WARNING: SHUT OFF POWER TO UNIT BEFORE INSTALLING OR REMOVING CARDS! Remote 48 Plug It In Setting up the Remote 48 before powering...

Owner's Manual
Page 7
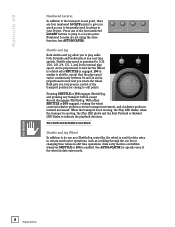
... FWD STOP P L AY RECORD Play PLAY puts the HDR24/96 into fast wind mode from any transport button except Record, Jog, or Shuttle to 20X speed in the HDR24/96 and Remote 24 user's manuals. REWIND FAST FWD Record Press PLAY and RECORD simultaneously to an immediate halt. The Remote 48 LOCATE button corresponds to the time displayed in the GUI transport. Transport...
... FWD STOP P L AY RECORD Play PLAY puts the HDR24/96 into fast wind mode from any transport button except Record, Jog, or Shuttle to 20X speed in the HDR24/96 and Remote 24 user's manuals. REWIND FAST FWD Record Press PLAY and RECORD simultaneously to an immediate halt. The Remote 48 LOCATE button corresponds to the time displayed in the GUI transport. Transport...
Owner's Manual
Page 8
Remote 48 Numbered Locates In addition to the transport locate point, there are set using the store function (see AUTOLOCATOR). 1 2 LOCATE 3 4 LOCATE Shuttle and Jog Both shuttle and jog allow you to play audio both forwards and backwards at non real-time speeds. Shuttle play speed is quantized to 1/32, 1/16, 1/8, 1/4, 1/2, 1, and 2x the normal play speed varies continuously between 0x and...
Remote 48 Numbered Locates In addition to the transport locate point, there are set using the store function (see AUTOLOCATOR). 1 2 LOCATE 3 4 LOCATE Shuttle and Jog Both shuttle and jog allow you to play audio both forwards and backwards at non real-time speeds. Shuttle play speed is quantized to 1/32, 1/16, 1/8, 1/4, 1/2, 1, and 2x the normal play speed varies continuously between 0x and...
Owner's Manual
Page 10
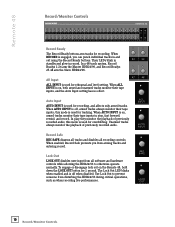
... user input from all recording controls. When AUTO INPUT is used for 1 second. this mode is off when disabled. Their LEDs blink in standby and glow in and out using the Record Ready buttons. When AUTO INPUT is on the Remote 48, hold down the LOCK OUT button for rehearsal and level setting. When ALL INPUT is on, armed tracks monitor their tape inputs; Unarmed tracks always monitor the playback of previously recorded audio...
... user input from all recording controls. When AUTO INPUT is used for 1 second. this mode is off when disabled. Their LEDs blink in standby and glow in and out using the Record Ready buttons. When AUTO INPUT is on the Remote 48, hold down the LOCK OUT button for rehearsal and level setting. When ALL INPUT is on, armed tracks monitor their tape inputs; Unarmed tracks always monitor the playback of previously recorded audio...
Owner's Manual
Page 11
.... Specific uses of the ALT button are documented within the function(s) it modifies. CODE CHASE VARI ALT CONTROL Deck 2 The DECK 2 button toggles Remote 48 control of another button. EDIT Vari Varispeed is reserved for a future software upgrade. VARI ALT The ALT button modifies the functionality of the LCD display, Rates display, and System Control buttons between the Master and Slave HDR24/96. User's Guide System Controls The System Controls that are common to the Remote 48...
.... Specific uses of the ALT button are documented within the function(s) it modifies. CODE CHASE VARI ALT CONTROL Deck 2 The DECK 2 button toggles Remote 48 control of another button. EDIT Vari Varispeed is reserved for a future software upgrade. VARI ALT The ALT button modifies the functionality of the LCD display, Rates display, and System Control buttons between the Master and Slave HDR24/96. User's Guide System Controls The System Controls that are common to the Remote 48...
Owner's Manual
Page 12
... bit depth setting. Remote 48 Displays Tape Time The TAPE TIME display always shows the current position of the HDR24/96 "play start position) during a Recall operation. The blinking Rewind LED indicates reverse motion (negative speeds). Selecting Cancel from the sample rate setting by more than ± 0.2%. Cue The CUE number display shows the Cue number that requires user attention. Locate Time also acts as the Current Time displays on the...
... bit depth setting. Remote 48 Displays Tape Time The TAPE TIME display always shows the current position of the HDR24/96 "play start position) during a Recall operation. The blinking Rewind LED indicates reverse motion (negative speeds). Selecting Cancel from the sample rate setting by more than ± 0.2%. Cue The CUE number display shows the Cue number that requires user attention. Locate Time also acts as the Current Time displays on the...
Owner's Manual
Page 13
... entry with respect to the selected sample clock source, and blinks when the sample clock source is completed. 13 Remote 48 User's Guide Clock The CLOCK LED glows when the system is locked to received time code. Some Autolocator functions have many steps associated with zeros after the operation is not present or out of the display cancels the operation, and restores the previous Locate...
... entry with respect to the selected sample clock source, and blinks when the sample clock source is completed. 13 Remote 48 User's Guide Clock The CLOCK LED glows when the system is locked to received time code. Some Autolocator functions have many steps associated with zeros after the operation is not present or out of the display cancels the operation, and restores the previous Locate...

Owner's Manual
Page 14
... and BBT display modes. CAPTURE 14 Autolocator ENTER] Enter the desired time directly from the Remote 48 (see EDIT TIME, STORE, RECALL, and TIME CODE CALCULATOR). Pressing EDIT TIME once selects the Frames/Ticks field (depending on display mode), a second time the Seconds/Beats field, and so on, until the field value is set anywhere in specific Recall and Store operations (see STORE and RECALL). Tape Time can be...
... and BBT display modes. CAPTURE 14 Autolocator ENTER] Enter the desired time directly from the Remote 48 (see EDIT TIME, STORE, RECALL, and TIME CODE CALCULATOR). Pressing EDIT TIME once selects the Frames/Ticks field (depending on display mode), a second time the Seconds/Beats field, and so on, until the field value is set anywhere in specific Recall and Store operations (see STORE and RECALL). Tape Time can be...

Owner's Manual
Page 15
... Locates 3 and 4) by one character. New Cues are sequentially numbered using the lowest number available in Time Code Calculator operations (see TIME ENTRY, EDIT TIME, STORE, RECALL, and TIME CODE CALCULATOR). A flashing dot in the right of numbers when entering a time in the LOCATE TIME display, and completes Time Entry, new Cue and Cue Store operations. The Remote 48 supports the following button sequences: [Store], [Store Store], or [CTRL+Store]. The...
... Locates 3 and 4) by one character. New Cues are sequentially numbered using the lowest number available in Time Code Calculator operations (see TIME ENTRY, EDIT TIME, STORE, RECALL, and TIME CODE CALCULATOR). A flashing dot in the right of numbers when entering a time in the LOCATE TIME display, and completes Time Entry, new Cue and Cue Store operations. The Remote 48 supports the following button sequences: [Store], [Store Store], or [CTRL+Store]. The...

Owner's Manual
Page 16
... restored after Recall is completed. The Recall LED blinks when Recall is active, and goes off after the operation is executed or canceled. RECALL When RECALL is pressed, a dot flashes in any time while previewing, the displayed value can also store a specific time to a cue from the Cue List. Remote 48 • [STORE ###... STORE LOOP] Stores the Loop End...
... restored after Recall is completed. The Recall LED blinks when Recall is active, and goes off after the operation is executed or canceled. RECALL When RECALL is pressed, a dot flashes in any time while previewing, the displayed value can also store a specific time to a cue from the Cue List. Remote 48 • [STORE ###... STORE LOOP] Stores the Loop End...

Owner's Manual
Page 17
... current Locate Time value; The Remote 48 supports the following Time Code Calculator operations: • [+NEXT ENTER] Adds the directly entered time to the current Locate Time value. • [-PREV ENTER] Subtracts the directly entered time from the first. Note: When the TC Frame rate is equivalent to the "=" button. ENTER] Recalls a specific Cue to Locate Time. • [RECALL ENTER] Recalls the currently displayed Cue to...
... current Locate Time value; The Remote 48 supports the following Time Code Calculator operations: • [+NEXT ENTER] Adds the directly entered time to the current Locate Time value. • [-PREV ENTER] Subtracts the directly entered time from the first. Note: When the TC Frame rate is equivalent to the "=" button. ENTER] Recalls a specific Cue to Locate Time. • [RECALL ENTER] Recalls the currently displayed Cue to...
Owner's Manual
Page 18
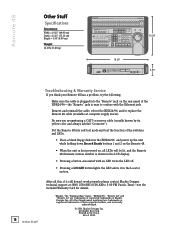
... labeled "Crossover"). Printed in the LCD display. • Pressing a button associated with the Ethernet jack. Remote 48 Other Stuff Specifications Dimensions: Width = 19.25" (48.90 cm) Depth = 12.25" (31.12 cm) Height = 3.50" (8.89 cm) Weight: 12.1 lbs (5.49 kg) EDIT ALT CONTROL 19.25" 12.25" 3.50" Troubleshooting & Warranty Service If you are hereby acknowledged. © 2001 Mackie Designs...
... labeled "Crossover"). Printed in the LCD display. • Pressing a button associated with the Ethernet jack. Remote 48 Other Stuff Specifications Dimensions: Width = 19.25" (48.90 cm) Depth = 12.25" (31.12 cm) Height = 3.50" (8.89 cm) Weight: 12.1 lbs (5.49 kg) EDIT ALT CONTROL 19.25" 12.25" 3.50" Troubleshooting & Warranty Service If you are hereby acknowledged. © 2001 Mackie Designs...


