

Owners Manual
Page 1
CR3™ • CR4™ Creative Reference™ Multimedia Monitors OWNER'S MANUAL
CR3™ • CR4™ Creative Reference™ Multimedia Monitors OWNER'S MANUAL

Owners Manual
Page 2
... instructions. 2. If the provided plug does not fit into an outlet on , the user is encouraged to try to radio or television reception, which the receiver is used as this apparatus near any way, such as radiators, heat registers, stoves, or other . Servicing is required when the apparatus has been damaged in any heat sources such as power-supply cord or plug...
... instructions. 2. If the provided plug does not fit into an outlet on , the user is encouraged to try to radio or television reception, which the receiver is used as this apparatus near any way, such as radiators, heat registers, stoves, or other . Servicing is required when the apparatus has been damaged in any heat sources such as power-supply cord or plug...
Owners Manual
Page 3
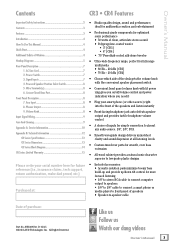
... performance • 50 watts of purchase: Part No. Phones Output 8 9. SW1069 Rev. Like us Follow us Watch our dang videos Owner's Manual 3 Powered Speaker Position Select Switch 8 5. Custom-Tuned Rear Port 8 Front Panel Description 8 7. Volume Knob 8 Input Signal Wiring 9 Care And Cleaning 9 Appendix A: Service Information 10 Appendix B: Technical Information 12 CR Series Specifications 12 CR Series Dimensions 13 CR Series Block Diagram 14 CR Series Limited Warranty 15 • Ultra-wide frequency range, perfect for full...
... performance • 50 watts of purchase: Part No. Phones Output 8 9. SW1069 Rev. Like us Follow us Watch our dang videos Owner's Manual 3 Powered Speaker Position Select Switch 8 5. Custom-Tuned Rear Port 8 Front Panel Description 8 7. Volume Knob 8 Input Signal Wiring 9 Care And Cleaning 9 Appendix A: Service Information 10 Appendix B: Technical Information 12 CR Series Specifications 12 CR Series Dimensions 13 CR Series Block Diagram 14 CR Series Limited Warranty 15 • Ultra-wide frequency range, perfect for full...
Owners Manual
Page 4
... set up , turn the front panel volume control to the input jacks on the rear panel of Power - Additional Tidbits of the box. Please see the Safety Instructions on page 2 for information on and the greatest of all the cables and acoustic isolation pads you ever need to the passive monitor's ± spring clips. 5. Choose which side of the Creative Reference Monitor (1⁄4" or RCA). 4. Turn on the power switch...
... set up , turn the front panel volume control to the input jacks on the rear panel of Power - Additional Tidbits of the box. Please see the Safety Instructions on page 2 for information on and the greatest of all the cables and acoustic isolation pads you ever need to the passive monitor's ± spring clips. 5. Choose which side of the Creative Reference Monitor (1⁄4" or RCA). 4. Turn on the power switch...
Owners Manual
Page 5
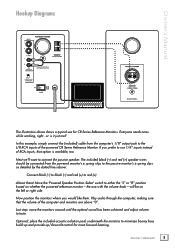
... tilt control for CR Series Reference Monitors. Owner's Manual Hookup Diagrams The illustration above shows a typical use 1/4" inputs instead of RCA inputs, that the volume of the powered CR Series Reference Monitor. Now position the monitors where you prefer to the L/R RCA inputs of the computer and monitors are above "0". Owner's Manual 5 Last step: move the monitors around until the optimal sound has been achieved and adjust volume to taste. Everyone needs tunes while working...
... tilt control for CR Series Reference Monitors. Owner's Manual Hookup Diagrams The illustration above shows a typical use 1/4" inputs instead of RCA inputs, that the volume of the powered CR Series Reference Monitor. Now position the monitors where you prefer to the L/R RCA inputs of the computer and monitors are above "0". Owner's Manual 5 Last step: move the monitors around until the optimal sound has been achieved and adjust volume to taste. Everyone needs tunes while working...
Owners Manual
Page 6
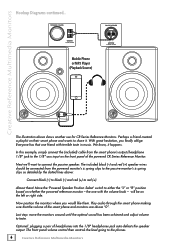
... use for CR Series Reference Monitors. Creative Reference Multimedia Monitors Hookup Diagrams continued... Next we'll want to taste. Last step: move the monitors around until the optimal sound has been achieved and adjust volume to connect the passive speaker. Everyone has that the volume of headphones into the 1/8" headphones jack auto-defeats the speaker output. The included black (-) and red (+) speaker wires should be on the front panel of the powered...
... use for CR Series Reference Monitors. Creative Reference Multimedia Monitors Hookup Diagrams continued... Next we'll want to taste. Last step: move the monitors around until the optimal sound has been achieved and adjust volume to connect the passive speaker. Everyone has that the volume of headphones into the 1/8" headphones jack auto-defeats the speaker output. The included black (-) and red (+) speaker wires should be on the front panel of the powered...
Owners Manual
Page 7
... supply, or unplug the power cord from the AC supply. There are connected together electrically, do not connect more than 20 feet (6 meters). AC Line Cord Plug the attached power cord into an AC outlet, the power switch is turned on and the front panel volume control is turned clockwise until the monitor "clicks" on the rear panel. 2. Make sure the volume knob [9] is the preferred method, especially if using a cable longer than one pair of input connectors...
... supply, or unplug the power cord from the AC supply. There are connected together electrically, do not connect more than 20 feet (6 meters). AC Line Cord Plug the attached power cord into an AC outlet, the power switch is turned on and the front panel volume control is turned clockwise until the monitor "clicks" on the rear panel. 2. Make sure the volume knob [9] is the preferred method, especially if using a cable longer than one pair of input connectors...
Owners Manual
Page 8
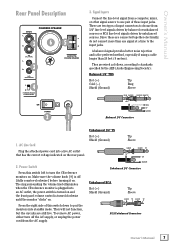
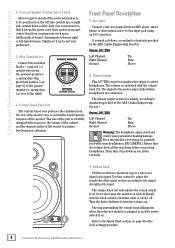
... input jack using an 1/8" connector. The ring surrounding the volume knob illuminates when the reference monitor is plugged in and the power switch is killed when headphones are connected. Custom-Tuned Rear Port The custom-tuned rear port uses the radiation from the powered monitor's ± spring clips [big 5 green ball number 5 on page 4 for the level-setting procedure. 8 Creative Reference Multimedia Monitors Front Panel Description 7. Turn the knob clockwise to the power amp...
... input jack using an 1/8" connector. The ring surrounding the volume knob illuminates when the reference monitor is plugged in and the power switch is killed when headphones are connected. Custom-Tuned Rear Port The custom-tuned rear port uses the radiation from the powered monitor's ± spring clips [big 5 green ball number 5 on page 4 for the level-setting procedure. 8 Creative Reference Multimedia Monitors Front Panel Description 7. Turn the knob clockwise to the power amp...

Owners Manual
Page 9
... the RCA inputs. • Balanced TRS cables work well with the CR Series Reference Monitors are included, they might need to be able to front panel of the CR Series reference monitor! NOTE: In certain home theater applications, it is turned off. If so, we recommend using high-quality, shielded cables to connect the signal source to line-level signal attenuator between the receiver's speaker output and the CR Series reference monitor's input.
... the RCA inputs. • Balanced TRS cables work well with the CR Series Reference Monitors are included, they might need to be able to front panel of the CR Series reference monitor! NOTE: In certain home theater applications, it is turned off. If so, we recommend using high-quality, shielded cables to connect the signal source to line-level signal attenuator between the receiver's speaker output and the CR Series reference monitor's input.
Owners Manual
Page 10
... surrounding the volume knob [9] on the front panel illuminated? Make sure the signal level from the source. • Make sure the signal cable is live . These sources usually produce hum. • Is there a light dimmer or other documentation. Make sure it plugged in . No Sound • If connecting an unbalanced output to the CR Series reference monitor's balanced input, make sure the AC outlet is presumed dead, switch...
... surrounding the volume knob [9] on the front panel illuminated? Make sure the signal level from the source. • Make sure the signal cable is live . These sources usually produce hum. • Is there a light dimmer or other documentation. Make sure it plugged in . No Sound • If connecting an unbalanced output to the CR Series reference monitor's balanced input, make sure the AC outlet is presumed dead, switch...

Owners Manual
Page 11
... nearest service center, visit www.720trees.com, click "Contact Tech Support" and select "Locate a Service Center or Distributor" [3]. Non-warranty service is located in your area. If you where the nearest factory-authorized service center is available at : [email protected]. • Telephone 1-800-898-3211 to explain the problem. Owner's Manual 11 Owner's Manual Repair For warranty service, please refer to the warranty information on...
... nearest service center, visit www.720trees.com, click "Contact Tech Support" and select "Locate a Service Center or Distributor" [3]. Non-warranty service is located in your area. If you where the nearest factory-authorized service center is available at : [email protected]. • Telephone 1-800-898-3211 to explain the problem. Owner's Manual 11 Owner's Manual Repair For warranty service, please refer to the warranty information on...
Owners Manual
Page 12
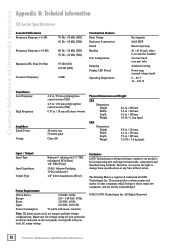
Creative Reference Multimedia Monitors Appendix B: Technical Information CR Series Specifications Acoustic Performance Frequency Response (-3 dB) 70 Hz - 20 kHz [CR3] 60 Hz - 20 kHz [CR4] Frequency Response (-10 dB) 80 Hz - 20 kHz [CR3] 70 Hz - 20 kHz [CR4] Maximum SPL Peak Per Pair 97 dB [CR3] 100 dB [CR4] Crossover Frequency 3 kHz Construction Features Basic Design Rectangular Enclosure Construction Solid MDF Finish Black vinyl wrap Handles At
Creative Reference Multimedia Monitors Appendix B: Technical Information CR Series Specifications Acoustic Performance Frequency Response (-3 dB) 70 Hz - 20 kHz [CR3] 60 Hz - 20 kHz [CR4] Frequency Response (-10 dB) 80 Hz - 20 kHz [CR3] 70 Hz - 20 kHz [CR4] Maximum SPL Peak Per Pair 97 dB [CR3] 100 dB [CR4] Crossover Frequency 3 kHz Construction Features Basic Design Rectangular Enclosure Construction Solid MDF Finish Black vinyl wrap Handles At

Owners Manual
Page 13
Owner's Manual CR3 Dimensions 5.5 in / 140 mm 6.2 in / 158 mm 8.2 in 208 mm WEIGHT (per pair) 9.4 lb 4.1 kg CR4 Dimensions 6.1 in / 156 mm 7.3 in / 185 mm 8.8 in 224 mm WEIGHT (per pair) 12.0 lb 5.4 kg Owner's Manual 13
Owner's Manual CR3 Dimensions 5.5 in / 140 mm 6.2 in / 158 mm 8.2 in 208 mm WEIGHT (per pair) 9.4 lb 4.1 kg CR4 Dimensions 6.1 in / 156 mm 7.3 in / 185 mm 8.8 in 224 mm WEIGHT (per pair) 12.0 lb 5.4 kg Owner's Manual 13
Owners Manual
Page 14
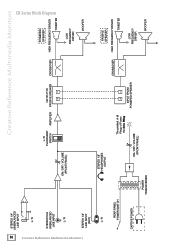
...1/8" LINE INPUT [AUX] WOOFER STEREO 1/8" L / R HEADPHONES OUTPUT REAR PANEL POWER SWITCH CAPTIVE POWER POWER TRANSFORMER The greatest of all Rings of Power: the One Ring ON / OFF / VOLUME (FRONT PANEL) +- INPUT FROM POWERED SPEAKER CROSSOVER PASSIVE SPEAKER HIGH FREQUENCY DRIVER TWEETER LOW FREQUENCY DRIVER WOOFER 14 STEREO 1/4" (UN)BALANCED LINE INPUT Creative Reference Multimedia Monitors CR Series Block Diagram Creative Reference Multimedia Monitors L / R STEREO RCA UNBALANCED LINE INPUT L / R ON / OFF / VOLUME (FRONT PANEL) L / R PLACEMENT SWITCH AMPLIFIER OUTPUT TO...
...1/8" LINE INPUT [AUX] WOOFER STEREO 1/8" L / R HEADPHONES OUTPUT REAR PANEL POWER SWITCH CAPTIVE POWER POWER TRANSFORMER The greatest of all Rings of Power: the One Ring ON / OFF / VOLUME (FRONT PANEL) +- INPUT FROM POWERED SPEAKER CROSSOVER PASSIVE SPEAKER HIGH FREQUENCY DRIVER TWEETER LOW FREQUENCY DRIVER WOOFER 14 STEREO 1/4" (UN)BALANCED LINE INPUT Creative Reference Multimedia Monitors CR Series Block Diagram Creative Reference Multimedia Monitors L / R STEREO RCA UNBALANCED LINE INPUT L / R ON / OFF / VOLUME (FRONT PANEL) L / R PLACEMENT SWITCH AMPLIFIER OUTPUT TO...

Owners Manual
Page 15
... LOUD technical support at www.720trees.com constitutes the entire agreement, and supersedes any warranty coverage provided by the party to the subject matter hereof. Owner's Manual Limited Warranty Please keep your "). or Canada, please visit www.720trees.com to obtain any of the provisions of any warranty service. You will need it to find contact information...
... LOUD technical support at www.720trees.com constitutes the entire agreement, and supersedes any warranty coverage provided by the party to the subject matter hereof. Owner's Manual Limited Warranty Please keep your "). or Canada, please visit www.720trees.com to obtain any of the provisions of any warranty service. You will need it to find contact information...

Owners Manual
Page 16
16220 Wood-Red Road NE Woodinville, WA 98072 • USA Phone: 425.487.4333 Toll-free: 800.898.3211 Fax: 425.487.4337 www.720trees.com
16220 Wood-Red Road NE Woodinville, WA 98072 • USA Phone: 425.487.4333 Toll-free: 800.898.3211 Fax: 425.487.4337 www.720trees.com


