
Owner's Manual
Page 9
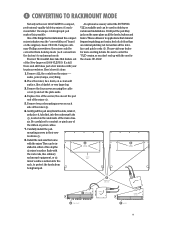
... Gently pull the pod away from the factory) to rackmount mode. Be sure to constrict or pinch any of the ribbon or power cables. 7. Remove the four screws securing the cable cover and set the plate aside. 4. Replace two of the mixer . 5. Remove two pod-mounting screws on ... to mention all the knobs, buttons and faders. This is the new 1604-VLZ PRO a compact, professional-quality tabletop mixer, it 's done: 1. Install the rack ears that feature out of the New Improved 1604-VLZ PRO. remove screws remove plate replace screws remove screws flush mount rackmount tab slots ...
... Gently pull the pod away from the factory) to rackmount mode. Be sure to constrict or pinch any of the ribbon or power cables. 7. Remove the four screws securing the cable cover and set the plate aside. 4. Replace two of the mixer . 5. Remove two pod-mounting screws on ... to mention all the knobs, buttons and faders. This is the new 1604-VLZ PRO a compact, professional-quality tabletop mixer, it 's done: 1. Install the rack ears that feature out of the New Improved 1604-VLZ PRO. remove screws remove plate replace screws remove screws flush mount rackmount tab slots ...
