
User Guide
Page 2
Our products are properties of their respective owners. ■ MSI® is registered trademark of Micro-Star Int'l Co.,Ltd. ■ NVIDIA® is registered trademark of NVIDIA Corporation. ■ ATI® is registered trademark ...; iPad, iPhone, and iPod are trademarks of Apple Inc. ■ Qualcomm Atheros and Killer are trademarks of Qualcomm Atheros Inc. Trademarks All trademarks in this manual are under continual improvement and we reserve the right to the correctness of MICRO-STAR INTERNATIONAL. Revision History Revision V1.0 Revision History First release Date...
Our products are properties of their respective owners. ■ MSI® is registered trademark of Micro-Star Int'l Co.,Ltd. ■ NVIDIA® is registered trademark of NVIDIA Corporation. ■ ATI® is registered trademark ...; iPad, iPhone, and iPod are trademarks of Apple Inc. ■ Qualcomm Atheros and Killer are trademarks of Qualcomm Atheros Inc. Trademarks All trademarks in this manual are under continual improvement and we reserve the right to the correctness of MICRO-STAR INTERNATIONAL. Revision History Revision V1.0 Revision History First release Date...

User Guide
Page 3
... required, you 'll efficiently locate your place of purchase or local distributor. Visit the MSI website for DIY users. With a simple tap of the smartphone, you may easily download user manuals within minutes. Preface Technical Support If a problem arises with your system and no solution... can be obtained from the user's manual, please contact your ideal products from a wide variety of power unit capacity for technical guide, BIOS updates, driver updates, and other information: http://www.msi.com/service/download/ Contact our technical staff at: http://support...
... required, you 'll efficiently locate your place of purchase or local distributor. Visit the MSI website for DIY users. With a simple tap of the smartphone, you may easily download user manuals within minutes. Preface Technical Support If a problem arises with your system and no solution... can be obtained from the user's manual, please contact your ideal products from a wide variety of power unit capacity for technical guide, BIOS updates, driver updates, and other information: http://www.msi.com/service/download/ Contact our technical staff at: http://support...

User Guide
Page 4
...following situations arises, get it . Preface Safety Instructions ■ Always read the safety instructions carefully. ■ Keep this User's Manual for air convection hence protects the equipment from humidity. ■ Lay this equipment on a reliable flat surface before connecting the equipment to User...'s Manual. ◯ The equipment has been dropped and damaged. ◯ The equipment has obvious sign of breakage. ■ DO NOT...
...following situations arises, get it . Preface Safety Instructions ■ Always read the safety instructions carefully. ■ Keep this User's Manual for air convection hence protects the equipment from humidity. ■ Lay this equipment on a reliable flat surface before connecting the equipment to User...'s Manual. ◯ The equipment has been dropped and damaged. ◯ The equipment has obvious sign of breakage. ■ DO NOT...

User Guide
Page 24
...+VGA DisplayPort+DVI VGA+DVI HDMI+DisplayPort+VGA HDMI+DisplayPort+DVI DisplayPort+VGA+DVI HDMI+VGA+DVI Extend mode (Extend the desktop to the monitor's manual for connecting external audio outputting devices. ■ Green- Getting Started 1-10 Mic: Used as a connector for a microphone. ■ Black- This connector is a digital display interface...
...+VGA DisplayPort+DVI VGA+DVI HDMI+DisplayPort+VGA HDMI+DisplayPort+DVI DisplayPort+VGA+DVI HDMI+VGA+DVI Extend mode (Extend the desktop to the monitor's manual for connecting external audio outputting devices. ■ Green- Getting Started 1-10 Mic: Used as a connector for a microphone. ■ Black- This connector is a digital display interface...

User Guide
Page 30
... of the screw holes on the motherboard are no loose metal components on a flat surface free from unnecessary debris. • To prevent damage to the manual that may cause a short circuit of the computer case. If there is prohibited. • Please make sure there are shown below. They should line up...
... of the screw holes on the motherboard are no loose metal components on a flat surface free from unnecessary debris. • To prevent damage to the manual that may cause a short circuit of the computer case. If there is prohibited. • Please make sure there are shown below. They should line up...

User Guide
Page 33
... video to learn how to the computer case. Remove any protective expansion slot covers from the power supply. 5. For best compatibility, MSI graphics cards are recommended. http://youtu.be installed by way of the motherboard's expansion slots. Line up the video card on PCIe ... of the graphics card to install a graphics card on top of the expansion slot(s) with butterfly lock. Please consult your video card's manual for further instructions regarding driver installation or other special settings. 1-19 Getting Started Adding on the motherboard. Determine what type of expansion slot...
... video to learn how to the computer case. Remove any protective expansion slot covers from the power supply. 5. For best compatibility, MSI graphics cards are recommended. http://youtu.be installed by way of the motherboard's expansion slots. Line up the video card on PCIe ... of the graphics card to install a graphics card on top of the expansion slot(s) with butterfly lock. Please consult your video card's manual for further instructions regarding driver installation or other special settings. 1-19 Getting Started Adding on the motherboard. Determine what type of expansion slot...
User Guide
Page 35
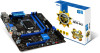
...8226; SuperTiling • Scissor Mode • Alternate Frame Rendering • Super Anti-aliasing. For more details, please consult the graphics card manual. 1-21 Getting Started Depending on the desktop and choose the "Catalyst Control Center". 5. For more information, please refer to operate. The ...CrossFire™ setting must be enabled to allow CrossFire™ mode to the manual that came with your operating system, the screen may look different. Boot up the computer and install the drivers and software included...
...8226; SuperTiling • Scissor Mode • Alternate Frame Rendering • Super Anti-aliasing. For more details, please consult the graphics card manual. 1-21 Getting Started Depending on the desktop and choose the "Catalyst Control Center". 5. For more information, please refer to operate. The ...CrossFire™ setting must be enabled to allow CrossFire™ mode to the manual that came with your operating system, the screen may look different. Boot up the computer and install the drivers and software included...

User Guide
Page 36
... large SATA devices, such as HDDs, SSDs, and optical drives, be /RZsMpqxythc Chapter 1 SATA2 SATA1 SATA4 SATA6 SATA3 SATA5 For Z87M-G43/ H87M-G43 - Data loss may result during transmission otherwise. • SATA cables have identical plugs on either sides of the cable. ...supply. http://youtu.be screwed down into the case. SATA1, SATA2, SATA3, SATA4 (6Gb/s, by Intel® B85) - Please refer to the device's manual for further information. • Many computer cases also require that came with your computer case or your SATA device for space saving purposes. Such devices...
... large SATA devices, such as HDDs, SSDs, and optical drives, be /RZsMpqxythc Chapter 1 SATA2 SATA1 SATA4 SATA6 SATA3 SATA5 For Z87M-G43/ H87M-G43 - Data loss may result during transmission otherwise. • SATA cables have identical plugs on either sides of the cable. ...supply. http://youtu.be screwed down into the case. SATA1, SATA2, SATA3, SATA4 (6Gb/s, by Intel® B85) - Please refer to the device's manual for further information. • Many computer cases also require that came with your computer case or your SATA device for space saving purposes. Such devices...

User Guide
Page 41
Please refer to a TPM (Trusted Platform Module). Chapter 1 JTPM1: TPM Module Connector This connector connects to the TPM security platform manual for more details and usages. 2.34V.36S..3tS8aVe.n15Prd0iVaob1.NlwyP2I1o.eRopG4rwoPQ.rwGeionreurornudnd 1.L3P.L5CP.LCC7P.loLRC9cP.eLka1CsPd1e1ad.CtL3drPea.dLsdCrPsedasCr&edsFdsd&sraraedt&amsasdpteaa&intpa0dinap1tian2pin3 JCOM1: Serial ...
Please refer to a TPM (Trusted Platform Module). Chapter 1 JTPM1: TPM Module Connector This connector connects to the TPM security platform manual for more details and usages. 2.34V.36S..3tS8aVe.n15Prd0iVaob1.NlwyP2I1o.eRopG4rwoPQ.rwGeionreurornudnd 1.L3P.L5CP.LCC7P.loLRC9cP.eLka1CsPd1e1ad.CtL3drPea.dLsdCrPsedasCr&edsFdsd&sraraedt&amsasdpteaa&intpa0dinap1tian2pin3 JCOM1: Serial ...

User Guide
Page 68
... only for UEFI applications. ▶ Super IO Configuration Sets system Super I/O chip parameters including LPT and COM ports. Chapter 3 BIOS Setup 3-10 If set it manually. ▶ Parallel (LPT) Port Configuration Sets detailed configuration of Intel Rapid Start Display. [BIOS Save/Restore] The BIOS POST splash screen will be saved/ restored...
... only for UEFI applications. ▶ Super IO Configuration Sets system Super I/O chip parameters including LPT and COM ports. Chapter 3 BIOS Setup 3-10 If set it manually. ▶ Parallel (LPT) Port Configuration Sets detailed configuration of Intel Rapid Start Display. [BIOS Save/Restore] The BIOS POST splash screen will be saved/ restored...

User Guide
Page 69
.... Press to update when you do not need to wait for optimizing system network performance in power off ) before AC power loss. If set it manually. ▶ Device Mode [Printer Mode] Selects an operating mode for parallel port. [Printer Mode] Printer port mode [SPP] Standard Parallel Port mode [EPP-1.9/ 1.7 + SPP] Enhanced...
.... Press to update when you do not need to wait for optimizing system network performance in power off ) before AC power loss. If set it manually. ▶ Device Mode [Printer Mode] Selects an operating mode for parallel port. [Printer Mode] Printer port mode [SPP] Standard Parallel Port mode [EPP-1.9/ 1.7 + SPP] Enhanced...
User Guide
Page 71
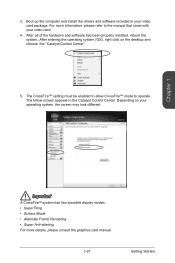
... after entering the operating system. This submenu will automatically load the secure keys from BIOS. [Custom] Allows user to configure the secure boot settings and manually load the secure keys. ▶ Image Execution Policy Sets the policy when the system image execution policy on Security Violation. This item appears when "Secure...
... after entering the operating system. This submenu will automatically load the secure keys from BIOS. [Custom] Allows user to configure the secure boot settings and manually load the secure keys. ▶ Image Execution Policy Sets the policy when the system image execution policy on Security Violation. This item appears when "Secure...

User Guide
Page 75
... This item appears when the installed processor supports this value. Read only. This item can void your warranty or severely damage your PC manually is only recommended for advanced users. • Overclocking is not guaranteed. You may overclock the CPU Base Clock by adjusting this setting ...automatically. [Options: Auto, 1.00, 1.25, 1.67] ▶ CPU Base Clock Apply Mode [Auto] Sets the applying mode for Z87M-G43) Shows the current CPU Base Clock Strap. If set to use OC Genie for easy overclocking. ▶ Current CPU/ DRAM/ Ring Frequency These...
... This item appears when the installed processor supports this value. Read only. This item can void your warranty or severely damage your PC manually is only recommended for advanced users. • Overclocking is not guaranteed. You may overclock the CPU Base Clock by adjusting this setting ...automatically. [Options: Auto, 1.00, 1.25, 1.67] ▶ CPU Base Clock Apply Mode [Auto] Sets the applying mode for Z87M-G43) Shows the current CPU Base Clock Strap. If set to use OC Genie for easy overclocking. ▶ Current CPU/ DRAM/ Ring Frequency These...
User Guide
Page 77
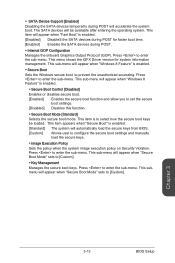
.... Enables or disables the various training ways of installed memory modules. [Link] Allows user to configure the DRAM timing manually for all memory channel. [UnLink] Allows user to configure the DRAM timing manually for each memory channel. If it occurs, please clear the CMOS data and restore the default settings. (Refer to...
.... Enables or disables the various training ways of installed memory modules. [Link] Allows user to configure the DRAM timing manually for all memory channel. [UnLink] Allows user to configure the DRAM timing manually for each memory channel. If it occurs, please clear the CMOS data and restore the default settings. (Refer to...

User Guide
Page 78
... Voltage/ Current CPU IO Digital Voltage Show the current voltages. If set to "Auto", BIOS will set these voltages automatically or you can set it manually. ▶ CPU Core Voltage Offset Mode/ CPU Ring Voltage Offset Mode/ CPU GT Voltage Offset Mode/ CPU SA Voltage Offset Mode/ CPU IO Analog...be configured automatically by BIOS. [Adaptive Mode] Sets adaptive voltages automatically for optimizing the system performance. [Override Mode] Allows you to set these voltages manually. ▶ CPU Core Voltage/ CPU Ring Voltage/ CPU GT Voltage [Auto] Sets these voltages. Chapter 3 BIOS Setup 3-20
... Voltage/ Current CPU IO Digital Voltage Show the current voltages. If set to "Auto", BIOS will set these voltages automatically or you can set it manually. ▶ CPU Core Voltage Offset Mode/ CPU Ring Voltage Offset Mode/ CPU GT Voltage Offset Mode/ CPU SA Voltage Offset Mode/ CPU IO Analog...be configured automatically by BIOS. [Adaptive Mode] Sets adaptive voltages automatically for optimizing the system performance. [Override Mode] Allows you to set these voltages manually. ▶ CPU Core Voltage/ CPU Ring Voltage/ CPU GT Voltage [Auto] Sets these voltages. Chapter 3 BIOS Setup 3-20

User Guide
Page 79
... EMI problem, leave the setting at [Disabled] for optimal system stability and performance. But if you are overclocking because even a slight jitter can set it manually. ▶ Current DRAM Voltage Shows current memory voltage. For the most suitable Spread Spectrum value, please consult your local EMI regulation. • Remember to "Auto...
... EMI problem, leave the setting at [Disabled] for optimal system stability and performance. But if you are overclocking because even a slight jitter can set it manually. ▶ Current DRAM Voltage Shows current memory voltage. For the most suitable Spread Spectrum value, please consult your local EMI regulation. • Remember to "Auto...

User Guide
Page 104
.... WARNING: IT IS RECOMMENDED THAT YOU [ERFORM A SYNCHRONIZATION BEFORE REMOVING ACCELERATION. [ ↑↓] - The following screen appears. Appendix B RST Synchronization (optional) If you want to manually sync the disks for avoiding data loss. In some situations, you may want to synchronize data to confirm. Press 'r' to sync...
.... WARNING: IT IS RECOMMENDED THAT YOU [ERFORM A SYNCHRONIZATION BEFORE REMOVING ACCELERATION. [ ↑↓] - The following screen appears. Appendix B RST Synchronization (optional) If you want to manually sync the disks for avoiding data loss. In some situations, you may want to synchronize data to confirm. Press 'r' to sync...


