
User Guide
Page 3
... further guidance. ◙ Visit the MSI website for technical guide, BIOS updates, driver updates, and other information: http://www.msi.com/service/download ◙ Contact our technical staff at 110/220V before setting it up. ■ The openings on it work well or you can be obtained from humidity. ■ Lay this equipment away from the user's manual, please contact your system and...
... further guidance. ◙ Visit the MSI website for technical guide, BIOS updates, driver updates, and other information: http://www.msi.com/service/download ◙ Contact our technical staff at 110/220V before setting it up. ■ The openings on it work well or you can be obtained from humidity. ■ Lay this equipment away from the user's manual, please contact your system and...
User Guide
Page 9
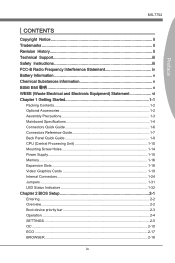
... Equipment) Statement vi Chapter 1 Getting Started 1-1 Packing Contents 1-2 Optional Accessories 1-2 Assembly Precautions 1-3 Mainboard Specifications 1-4 Connectors Quick Guide 1-6 Connectors Reference Guide 1-7 Back Panel Quick Guide 1-8 CPU (Central Processing Unit 1-10 Mounting Screw Holes 1-14 Power Supply 1-15 Memory 1-16 Expansion Slots 1-18 Video/ Graphics Cards 1-19 Internal Connectors 1-24 Jumpers 1-31 LED Status Indicators 1-32 Chapter 2 BIOS Setup 2-1 Entering 2-2 Overview 2-2 Boot device priority bar 2-3 Operation 2-4 SETTINGS 2-5 OC 2-10 ECO 2-17 BROWSER...
... Equipment) Statement vi Chapter 1 Getting Started 1-1 Packing Contents 1-2 Optional Accessories 1-2 Assembly Precautions 1-3 Mainboard Specifications 1-4 Connectors Quick Guide 1-6 Connectors Reference Guide 1-7 Back Panel Quick Guide 1-8 CPU (Central Processing Unit 1-10 Mounting Screw Holes 1-14 Power Supply 1-15 Memory 1-16 Expansion Slots 1-18 Video/ Graphics Cards 1-19 Internal Connectors 1-24 Jumpers 1-31 LED Status Indicators 1-32 Chapter 2 BIOS Setup 2-1 Entering 2-2 Overview 2-2 Boot device priority bar 2-3 Operation 2-4 SETTINGS 2-5 OC 2-10 ECO 2-17 BROWSER...
User Guide
Page 14
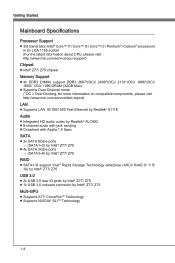
... / Core™ i5 / Core™ i3 / Pentium® / Celeron® processors in an LGA 1155 socket (For the latest information about CPU, please visit http://www.msi.com/service/cpu-support) Chipset ■ Intel® Z77/ Z75 chipset Memory Support ■ 4x DDR3 DIMMs support DDR3 2667*(OC)/ 2400*(OC)/ 2133*(OC)/ 1866*(OC)/ 1600/ 1333/ 1066 DRAM (32GB Max) ■ Supports Dual-Channel mode (*OC = OverClocking, for more information on compatible...
... / Core™ i5 / Core™ i3 / Pentium® / Celeron® processors in an LGA 1155 socket (For the latest information about CPU, please visit http://www.msi.com/service/cpu-support) Chipset ■ Intel® Z77/ Z75 chipset Memory Support ■ 4x DDR3 DIMMs support DDR3 2667*(OC)/ 2400*(OC)/ 2133*(OC)/ 1866*(OC)/ 1600/ 1333/ 1066 DRAM (32GB Max) ■ Supports Dual-Channel mode (*OC = OverClocking, for more information on compatible...
User Guide
Page 25
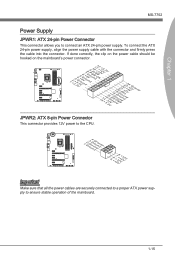
To connect the ATX 24-pin power supply, align the power supply cable with the connector and firmly press the cable into the connector. Chapter 1 MS-7752 Power Supply JPWR1: ATX 24-pin Power Connector This connector allows you to ensure stable operation of the mainboard. 1-15 If done correctly, the clip on the power cable should be hooked on the mainboard's power connector. 1.+23.+3.33.G4V.3.r+5Vo.5uG6Vn.r7+do.5uG8Vn.rP9do.Wu51nV0R1d.S1...
To connect the ATX 24-pin power supply, align the power supply cable with the connector and firmly press the cable into the connector. Chapter 1 MS-7752 Power Supply JPWR1: ATX 24-pin Power Connector This connector allows you to ensure stable operation of the mainboard. 1-15 If done correctly, the clip on the power cable should be hooked on the mainboard's power connector. 1.+23.+3.33.G4V.3.r+5Vo.5uG6Vn.r7+do.5uG8Vn.rP9do.Wu51nV0R1d.S1...
User Guide
Page 32
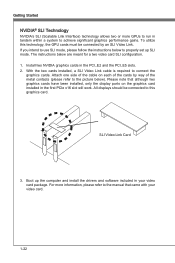
... set up the computer and install the drivers and software included in your video card. 1-22 To utilize this graphics card. The instructions below ). Please note that came with your video card package. Attach one side of the cable on the graphics card installed in the PCI_E2 and the PCI_E5 slots. 2. Boot up SLI mode. With the two cards installed, a SLI Video Link cable is required to the manual that although two graphics cards have been installed, only the display ports...
... set up the computer and install the drivers and software included in your video card. 1-22 To utilize this graphics card. The instructions below ). Please note that came with your video card package. Attach one side of the cable on the graphics card installed in the PCI_E2 and the PCI_E5 slots. 2. Boot up SLI mode. With the two cards installed, a SLI Video Link cable is required to the manual that although two graphics cards have been installed, only the display ports...
User Guide
Page 48
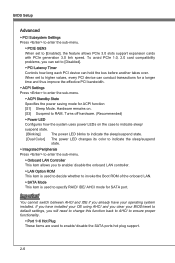
...; Port 1~6 Hot Plug These items are used to specify RAID/ IDE/ AHCI mode for ACPI function [S1] Sleep Mode. BIOS Setup Advanced ▶ PCI Subsystem Settings Press to enter the sub-menu. ▶ PCIE GEN3 When set to higher values, every PCI device can hold the bus before another takes over. When set to RAM. Turns off hardware. (Recommended) ▶ Power LED Configures how the system uses power LEDs on . [S3] Suspend to [Enabled], the feature allows PCIe 3.0 slots support expansion cards with PCIe generation 3.0 link speed.
...; Port 1~6 Hot Plug These items are used to specify RAID/ IDE/ AHCI mode for ACPI function [S1] Sleep Mode. BIOS Setup Advanced ▶ PCI Subsystem Settings Press to enter the sub-menu. ▶ PCIE GEN3 When set to higher values, every PCI device can hold the bus before another takes over. When set to RAM. Turns off hardware. (Recommended) ▶ Power LED Configures how the system uses power LEDs on . [S3] Suspend to [Enabled], the feature allows PCIe 3.0 slots support expansion cards with PCIe generation 3.0 link speed.
User Guide
Page 49
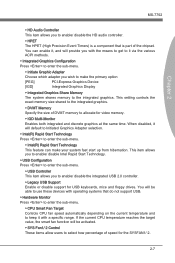
... enable/ disable Intel Rapid Start Technology. ▶ USB Configuration Press to enter the sub-menu. ▶ USB Controller This item allows you to enable/ disable the HD audio controller. ▶ HPET The HPET (High Precision Event Timers) is a component that do not support USB. ▶ Hardware Monitor Press to enter the sub-menu. ▶ CPU Smart Fan Target Controls CPU fan speed automatically depending on the current temperature and to keep it via the various ACPI methods. ▶ Integrated Graphics Configuration...
... enable/ disable Intel Rapid Start Technology. ▶ USB Configuration Press to enter the sub-menu. ▶ USB Controller This item allows you to enable/ disable the HD audio controller. ▶ HPET The HPET (High Precision Event Timers) is a component that do not support USB. ▶ Hardware Monitor Press to enter the sub-menu. ▶ CPU Smart Fan Target Controls CPU fan speed automatically depending on the current temperature and to keep it via the various ACPI methods. ▶ Integrated Graphics Configuration...

User Guide
Page 50
... before power failure or interrupt occurred. ▶ Wake Up Event Setup Press to enter the sub-menu. ▶ Wake Up Event By Setting to [BIOS] activates the following fields, and use the following fields to set the wake up event functions. ▶ Restore after AC Power Loss This item specifies whether your system to be awakened from the power saving modes through any event on PCIe device...
... before power failure or interrupt occurred. ▶ Wake Up Event Setup Press to enter the sub-menu. ▶ Wake Up Event By Setting to [BIOS] activates the following fields, and use the following fields to set the wake up event functions. ▶ Restore after AC Power Loss This item specifies whether your system to be awakened from the power saving modes through any event on PCIe device...
User Guide
Page 51
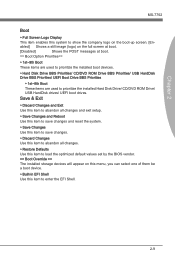
... item to load the optimized default values set by the BIOS vendor. == Boot Override == The installed storage devices will appear on the boot-up screen. [En- abled] Shows a still image (logo) on the full screen at boot. [Disabled] Shows the POST messages at boot. == Boot Option Priorities== ▶ 1st~9th Boot These items are used to prioritize the installed boot devices. ▶ Hard Disk Drive BBS Priorities/ CD/DVD ROM Drive BBS Priorities/ USB HardDisk Drive BBS Priorities/ UEFI Boot Drive BBS Priorities...
... item to load the optimized default values set by the BIOS vendor. == Boot Override == The installed storage devices will appear on the boot-up screen. [En- abled] Shows a still image (logo) on the full screen at boot. [Disabled] Shows the POST messages at boot. == Boot Option Priorities== ▶ 1st~9th Boot These items are used to prioritize the installed boot devices. ▶ Hard Disk Drive BBS Priorities/ CD/DVD ROM Drive BBS Priorities/ USB HardDisk Drive BBS Priorities/ UEFI Boot Drive BBS Priorities...
User Guide
Page 53
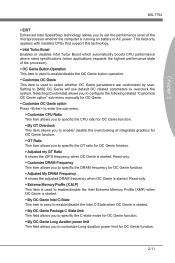
... is used to enable/disable the Intel C-State when OC Genie is started. ▶ My OC Genie Package C State limit This field allows you to specific the C-state mode for OC Genie function. ▶ My OC Genie Long duration power limit This field allows you to select whether OC Genie parameters are customized by user. Setting to [MSI] OC Genie will use default...
... is used to enable/disable the Intel C-State when OC Genie is started. ▶ My OC Genie Package C State limit This field allows you to specific the C-state mode for OC Genie function. ▶ My OC Genie Long duration power limit This field allows you to select whether OC Genie parameters are customized by user. Setting to [MSI] OC Genie will use default...

User Guide
Page 56
... VDroop control mode. ▶ CPU Core OCP Expander This item is used to expand the limitation of CPU Over Current Protection. But if you are plagued by modulating clock generator pulses. So please adjust the CPU voltage carefully if needed. ▶ CPU Core Engine Speed This item allows you do not have any EMI problem, leave the setting at [Disabled] for selected profile. ▶ Load/ Clear Overclocking Profile 1/ 2/ 3/ 4/ 5/ 6 Load/ Clear...
... VDroop control mode. ▶ CPU Core OCP Expander This item is used to expand the limitation of CPU Over Current Protection. But if you are plagued by modulating clock generator pulses. So please adjust the CPU voltage carefully if needed. ▶ CPU Core Engine Speed This item allows you do not have any EMI problem, leave the setting at [Disabled] for selected profile. ▶ Load/ Clear Overclocking Profile 1/ 2/ 3/ 4/ 5/ 6 Load/ Clear...

User Guide
Page 62
... current UEFI rom to file Please setup a specific folder in specific USB/ Storage drive to save BIOS file from the USB/ Storage (FAT/ 32 format only) drive. Note: it only supports FAT/ 32 file system drive. ▶ Select UEFI file to flash This item allows you to enable/ disable the system to boot from the BIOS file inside USB drive (FAT/ 32 format only). ▶ Select UEFI file to boot from the USB/ Storage (FAT/ 32 format only) drive for updating BIOS. 2-20 BIOS Setup ▶ M-Flash ▶ BIOS Boot...
... current UEFI rom to file Please setup a specific folder in specific USB/ Storage drive to save BIOS file from the USB/ Storage (FAT/ 32 format only) drive. Note: it only supports FAT/ 32 file system drive. ▶ Select UEFI file to flash This item allows you to enable/ disable the system to boot from the BIOS file inside USB drive (FAT/ 32 format only). ▶ Select UEFI file to boot from the USB/ Storage (FAT/ 32 format only) drive for updating BIOS. 2-20 BIOS Setup ▶ M-Flash ▶ BIOS Boot...

User Guide
Page 63
... Update utility: 1. Click Live Update button installed). Setup the connection by using the Live Update utility before entering Operating System. Click the next button . 4. Click the confirm button to not POST. Please ensure you how to the Internet. on the BIOS UTILITIES menu. (The Winki must be Chapter 2 2. Incorrect BIOS flashing can cause the motherboard to update the BIOS. Live Update will update the BIOS automatically when connecting to update the BIOS by click the setting button if necessary. 3. Live Update...
... Update utility: 1. Click Live Update button installed). Setup the connection by using the Live Update utility before entering Operating System. Click the next button . 4. Click the confirm button to not POST. Please ensure you how to the Internet. on the BIOS UTILITIES menu. (The Winki must be Chapter 2 2. Incorrect BIOS flashing can cause the motherboard to update the BIOS. Live Update will update the BIOS automatically when connecting to update the BIOS by click the setting button if necessary. 3. Live Update...
User Guide
Page 64
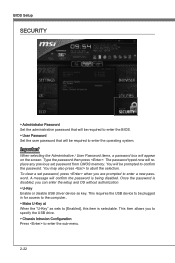
... authorization. ▶ U-Key Enable or disable USB driver device as sets to the computer.. ▶ Make U-Key at When the "U-Key" as key. This requires the USB device to be required to enter a new password. Once the password is disabled, you are prompted to enter the operating system. Type the password then press . The password typed now will appear on the screen. A message will confirm the password is selectable. To clear a set password from CMOS memory. This item...
... authorization. ▶ U-Key Enable or disable USB driver device as sets to the computer.. ▶ Make U-Key at When the "U-Key" as key. This requires the USB device to be required to enter a new password. Once the password is disabled, you are prompted to enter the operating system. Type the password then press . The password typed now will appear on the screen. A message will confirm the password is selectable. To clear a set password from CMOS memory. This item...

User Guide
Page 65
To clear the warning logs, set the field to [Enabled] later. 2-23 Chapter 2 MS-7752 ▶ Chassis Intrusion Enables or disables the feature of the field will return to [Reset]. The setting of recording the chassis intrusion status and issuing a warning message if opened.
To clear the warning logs, set the field to [Enabled] later. 2-23 Chapter 2 MS-7752 ▶ Chassis Intrusion Enables or disables the feature of the field will return to [Reset]. The setting of recording the chassis intrusion status and issuing a warning message if opened.
User Guide
Page 74
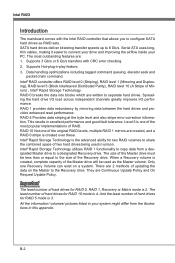
... to configure SATA hard drives as the Master volume. Intel RAID Introduction The mainboard comes with CRC error checking. 2. Serial ATA uses long, thin cables, making it easier to 6 Gb/s. Supports 3 Gb/s or 6 Gb/s transfers with the Intel RAID controller that allows you to share the combined space of updating the data on a system. And the least number of Mirrors) , Intel® Rapid Storage Technology. Spreading the hard drive I/O load...
... to configure SATA hard drives as the Master volume. Intel RAID Introduction The mainboard comes with CRC error checking. 2. Serial ATA uses long, thin cables, making it easier to 6 Gb/s. Supports 3 Gb/s or 6 Gb/s transfers with the Intel RAID controller that allows you to share the combined space of updating the data on a system. And the least number of Mirrors) , Intel® Rapid Storage Technology. Spreading the hard drive I/O load...
User Guide
Page 75
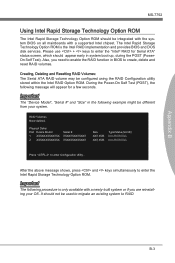
... enable the RAID function in system boot-up, during the POST (PowerOn Self Test). Also, you are reinstalling your system. RAID Volumes None defined. Please use + keys to create, delete and reset RAID volumes. The Intel Rapid Storage Technology Option ROM is only available with a supported Intel chipset. Important The "Device Model", "Serial #" and "Size" in the following procedure is the Intel RAID implementation and provides BIOS and DOS disk services. MS-7752 Using...
... enable the RAID function in system boot-up, during the POST (PowerOn Self Test). Also, you are reinstalling your system. RAID Volumes None defined. Please use + keys to create, delete and reset RAID volumes. The Intel Rapid Storage Technology Option ROM is only available with a supported Intel chipset. Important The "Device Model", "Serial #" and "Size" in the following procedure is the Intel RAID implementation and provides BIOS and DOS disk services. MS-7752 Using...
User Guide
Page 82
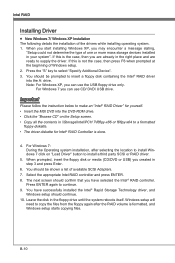
... "Load Driver" button to a formatted floppy diskette. • The driver diskette for yourself. • Insert the MSI DVD into the A: drive. You should continue. 10. For Windows 7 you have successfully installed the Intel® Rapid Storage Technology driver, and Windows setup should be prompted to select "Specify Additional Device". 3. Press ENTER again to supply the driver. You have selected the Intel® RAID controller. B-10 If this is formatted, and Windows setup starts copying files...
... "Load Driver" button to a formatted floppy diskette. • The driver diskette for yourself. • Insert the MSI DVD into the A: drive. You should continue. 10. For Windows 7 you have successfully installed the Intel® Rapid Storage Technology driver, and Windows setup should be prompted to select "Specify Additional Device". 3. Press ENTER again to supply the driver. You have selected the Intel® RAID controller. B-10 If this is formatted, and Windows setup starts copying files...
User Guide
Page 83
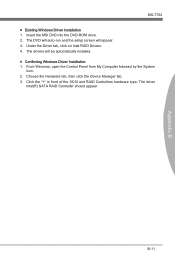
... the Device Manager tab. 3. Appendix B MS-7752 ■ Existing Windows Driver Installation 1. The driver Intel(R) SATA RAID Controller should appear. B-11 Click the "+" in front of the SCSI and RAID Controllers hardware type. The drivers will appear. 3. From Windows, open the Control Panel from My Computer followed by the System icon. 2. Insert the MSI DVD into the DVD-ROM drive. 2. The DVD will auto-run and the setup screen will be automatically installed. ■ Confirming Windows Driver Installation 1.
... the Device Manager tab. 3. Appendix B MS-7752 ■ Existing Windows Driver Installation 1. The driver Intel(R) SATA RAID Controller should appear. B-11 Click the "+" in front of the SCSI and RAID Controllers hardware type. The drivers will appear. 3. From Windows, open the Control Panel from My Computer followed by the System icon. 2. Insert the MSI DVD into the DVD-ROM drive. 2. The DVD will auto-run and the setup screen will be automatically installed. ■ Confirming Windows Driver Installation 1.
User Guide
Page 86
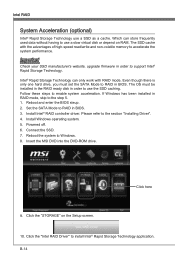
..., upgrade firmware in order to the step 5. 1. If Windows has been installed in BIOS. 3. Install Intel® RAID controller driver. Powered off. 6. Click the "STORAGE" on RAM. Intel RAID System Acceleration (optional) Intel® Rapid Storage Technology use a slow virtual disk or depend on the Setup screen. 10. Which can only work with the advantages of high-speed read/write and non-volatile memory to install Intel® Rapid Storage Technology application. The SSD cache with RAID mode. B-14 Install Windows operating...
..., upgrade firmware in order to the step 5. 1. If Windows has been installed in BIOS. 3. Install Intel® RAID controller driver. Powered off. 6. Click the "STORAGE" on RAM. Intel RAID System Acceleration (optional) Intel® Rapid Storage Technology use a slow virtual disk or depend on the Setup screen. 10. Which can only work with the advantages of high-speed read/write and non-volatile memory to install Intel® Rapid Storage Technology application. The SSD cache with RAID mode. B-14 Install Windows operating...


