
User Manual
Page 24
...Introductions 2-2 Congratulations on becoming an user of installing and uninstalling the battery; This brand-new exquisite notebook will give you purchased this notebook for unsurpassed dependability and customer satisfaction. We are also provided to tell our users that is recommended ... devices, communication devices, and so on, are proud to help users getting familiar with this notebook, the finely designed notebook. Beside, the steps of this notebook. Chapter 2, Introductions, includes the descriptions of all the accessories included when you to read this...
...Introductions 2-2 Congratulations on becoming an user of installing and uninstalling the battery; This brand-new exquisite notebook will give you purchased this notebook for unsurpassed dependability and customer satisfaction. We are also provided to tell our users that is recommended ... devices, communication devices, and so on, are proud to help users getting familiar with this notebook, the finely designed notebook. Beside, the steps of this notebook. Chapter 2, Introductions, includes the descriptions of all the accessories included when you to read this...

User Manual
Page 25
Unpacking First, unpack the shipping carton and check all items carefully. The package should contain the following items: Notebook Quick Start Manual High-capacity Li-ion battery AC/DC adapter and AC power cord Carry bag (optional) All-in the future. Introductions the system ...
Unpacking First, unpack the shipping carton and check all items carefully. The package should contain the following items: Notebook Quick Start Manual High-capacity Li-ion battery AC/DC adapter and AC power cord Carry bag (optional) All-in the future. Introductions the system ...
User Manual
Page 26
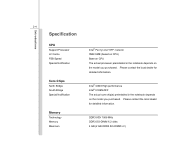
... on the model you purchased. Intel® GS45 High performance Intel® ICH9M-SFF The actual core chip(s) preinstalled in the notebook depends on the model you purchased. DDR3 800/ 1066 MHz DDR3 SO-DIMM X 2 slots 4 GB (2 GB DDR3 SO-DIMM x 2) Please contact the local dealer for ...
... on the model you purchased. Intel® GS45 High performance Intel® ICH9M-SFF The actual core chip(s) preinstalled in the notebook depends on the model you purchased. DDR3 800/ 1066 MHz DDR3 SO-DIMM X 2 slots 4 GB (2 GB DDR3 SO-DIMM x 2) Please contact the local dealer for ...
User Manual
Page 27
Support: LCD max 1366 x768, CRT max 1280x1024 15.6" 16:9 WXGA Brightness controlled by K/B hot-keys 1.3 Mega Pixel Introductions 2-5 Storage HDD form factor Optical Device Special Notification Video LCD Resolution CRT Output HDMI Output Dua lView functions Display LCD Type Brightness Webcam CMOS 2.5", 9.5 mm 250/ 320/ 500GB (optional) Super Multi 9.5mm ODD The actual HDD and ODD preinstalled in the notebook depends on the model you purchased. 1366 x 768 Supported Supported LCD or CRT will be auto detected when connected.
Support: LCD max 1366 x768, CRT max 1280x1024 15.6" 16:9 WXGA Brightness controlled by K/B hot-keys 1.3 Mega Pixel Introductions 2-5 Storage HDD form factor Optical Device Special Notification Video LCD Resolution CRT Output HDMI Output Dua lView functions Display LCD Type Brightness Webcam CMOS 2.5", 9.5 mm 250/ 320/ 500GB (optional) Super Multi 9.5mm ODD The actual HDD and ODD preinstalled in the notebook depends on the model you purchased. 1366 x 768 Supported Supported LCD or CRT will be auto detected when connected.

User Manual
Page 30
Internal Microphone 2. Optical Drive Eject Button Please be aware that the notebook shown in this notebook before using it. GPU Boost Function Buttons 5. Touch Pad 8 7. It will lead you to browse the main operating area of your notebook. 2 3 4 56 7 1 1. Top-open View The figure ...of top-open view and description shown below will help you to know more about the appearance of the notebook. Webcam / Webcam LED 3. Power Button / Power LED 4. Introductions Product Overview This section provides the description of basic aspects of ...
Internal Microphone 2. Optical Drive Eject Button Please be aware that the notebook shown in this notebook before using it. GPU Boost Function Buttons 5. Touch Pad 8 7. It will lead you to browse the main operating area of your notebook. 2 3 4 56 7 1 1. Top-open View The figure ...of top-open view and description shown below will help you to know more about the appearance of the notebook. Webcam / Webcam LED 3. Power Button / Power LED 4. Introductions Product Overview This section provides the description of basic aspects of ...

User Manual
Page 31
... Management section in chapter 3 of this manual for the detailed information of this GPU Boost Function. Refer to turn the notebook power ON and OFF. Power LED: Glowing blue when the notebook power is activated; Webcam/ Webcam LED Š This built-in microphone and its function is turned off. 3. LED goes out...
... Management section in chapter 3 of this manual for the detailed information of this GPU Boost Function. Refer to turn the notebook power ON and OFF. Power LED: Glowing blue when the notebook power is activated; Webcam/ Webcam LED Š This built-in microphone and its function is turned off. 3. LED goes out...
User Manual
Page 32
... or tools. With the help extending the battery running time. 5. Touchpad This is disabled. 6. Keyboard The built-in keyboard provides all the functions of the notebook. 7. Introductions 2-10 Power-Saving GPU mode Press this button to select the Power-Saving GPU mode, and the internal graphic card will be able to...
... or tools. With the help extending the battery running time. 5. Touchpad This is disabled. 6. Keyboard The built-in keyboard provides all the functions of the notebook. 7. Introductions 2-10 Power-Saving GPU mode Press this button to select the Power-Saving GPU mode, and the internal graphic card will be able to...

User Manual
Page 38
... Port 6. USB Port 7. The end of the cable has a small loop which allows users to secure the notebook in place. 3. Ventilator 4. DO NOT block the ventilator for the notebook. 2. Power Connector 2. HDMI Connector 5. Power Connector To connect the AC/DC adapter and supply power for air... circulation. Kensington Lock Hole This notebook provides a Kensington Lock hole, which allows the whole cable to cool the system. Audio Port Connectors 1. Introductions 2-16 Right Side ...
... Port 6. USB Port 7. The end of the cable has a small loop which allows users to secure the notebook in place. 3. Ventilator 4. DO NOT block the ventilator for the notebook. 2. Power Connector 2. HDMI Connector 5. Power Connector To connect the AC/DC adapter and supply power for air... circulation. Kensington Lock Hole This notebook provides a Kensington Lock hole, which allows the whole cable to cool the system. Audio Port Connectors 1. Introductions 2-16 Right Side ...

User Manual
Page 39
... cable. 5. Audio Port Connector Make high quality sound blaster with stereo system and Hi-Fi function supported. Users can now utilize shielded cable outside the notebook to take advantage of the benefits the SATA interface brings to connect USB-interface peripheral devices, such as the mouse, keyboard, modem, portable hard disk...
... cable. 5. Audio Port Connector Make high quality sound blaster with stereo system and Hi-Fi function supported. Users can now utilize shielded cable outside the notebook to take advantage of the benefits the SATA interface brings to connect USB-interface peripheral devices, such as the mouse, keyboard, modem, portable hard disk...

User Manual
Page 41
Battery Pack 1. Battery Pack This notebook will be powered by the battery pack when the AC adapter is disconnected. Introductions 2-19 Rear Side View 1 1.
Battery Pack 1. Battery Pack This notebook will be powered by the battery pack when the AC adapter is disconnected. Introductions 2-19 Rear Side View 1 1.

User Manual
Page 42
Once the button is slid to unlock position, the battery is disconnected. Ventilator 5. Battery Pack This notebook will be moved when the button is positioned on lock status. Battery Release Button 4. Stereo Speaker 5 1. Battery Pack 3. Introductions 2-20 Bottom Side View 3 2 1 4 1. Battery Lock/ Unlock Button 2. Battery Lock/ Unlock Button Battery cannot be powered by the battery pack when the AC adapter is removable. 2.
Once the button is slid to unlock position, the battery is disconnected. Ventilator 5. Battery Pack This notebook will be moved when the button is positioned on lock status. Battery Release Button 4. Stereo Speaker 5 1. Battery Pack 3. Introductions 2-20 Bottom Side View 3 2 1 4 1. Battery Lock/ Unlock Button 2. Battery Lock/ Unlock Button Battery cannot be powered by the battery pack when the AC adapter is removable. 2.

User Manual
Page 45
...the battery will start immediately. Note that the AC/DC adapter included in the package is approved for the first time. using this notebook for your notebook; Do not cover the AC/DC adapter since it . Getting Started 3-2 Power Management Connecting the AC power It is strongly recommended to... connect the AC/DC adapter to the notebook and use the AC power while using other adapter model may damage either the notebook or other devices attached to it may produce a certain heat while in use .
...the battery will start immediately. Note that the AC/DC adapter included in the package is approved for the first time. using this notebook for your notebook; Do not cover the AC/DC adapter since it . Getting Started 3-2 Power Management Connecting the AC power It is strongly recommended to... connect the AC/DC adapter to the notebook and use the AC power while using other adapter model may damage either the notebook or other devices attached to it may produce a certain heat while in use .

User Manual
Page 46
Unpack the package to the electrical outlet. Plug the DC end of the adapter to the notebook, and the male end of the AC/DC adapter. 3. Never pull the cord directly! 4 2 6 3 3 6 Unplug the connector from the electrical outlet first. 5. Disconnect the power ... of the power cord to find the AC/DC adapter and power cord. 2. Getting Started 3-3 Connecting the AC Power 1. Unplug the power cord from the notebook. 6.
Unpack the package to the electrical outlet. Plug the DC end of the adapter to the notebook, and the male end of the AC/DC adapter. 3. Never pull the cord directly! 4 2 6 3 3 6 Unplug the connector from the electrical outlet first. 5. Disconnect the power ... of the power cord to find the AC/DC adapter and power cord. 2. Getting Started 3-3 Connecting the AC Power 1. Unplug the power cord from the notebook. 6.

User Manual
Page 47
... the manufacturer only. Also, note that this battery pack is not in a safe place. Getting Started 3-4 Using the Battery Power This notebook is an internal power source of the notebook. To prevent explosion caused by improper battery replacement, use in use the same or equivalent type of battery recommended by an authorized...
... the manufacturer only. Also, note that this battery pack is not in a safe place. Getting Started 3-4 Using the Battery Power This notebook is an internal power source of the notebook. To prevent explosion caused by improper battery replacement, use in use the same or equivalent type of battery recommended by an authorized...

User Manual
Page 49
...pack out of the compartment and then pull the battery pack out. To remove the battery pack, following the steps below: 2 1. Make sure the notebook is turned off, and the AC power is always recommended to the battery releasing direction as shown on the bottom side. 4. Getting Started 3-6 Releasing... the Battery Pack It is disconnected. 2. Locate the battery release button on the bottom side. 4 3 5 5. Please contact your notebook. Push and hold the release button to have another battery pack in reserve for enough power supply.
...pack out of the compartment and then pull the battery pack out. To remove the battery pack, following the steps below: 2 1. Make sure the notebook is turned off, and the AC power is always recommended to the battery releasing direction as shown on the bottom side. 4. Getting Started 3-6 Releasing... the Battery Pack It is disconnected. 2. Locate the battery release button on the bottom side. 4 3 5 5. Please contact your notebook. Push and hold the release button to have another battery pack in reserve for enough power supply.

User Manual
Page 51
...It is unnecessary to -Disk. Š Plug in an external AC/DC adapter. Š You can be determined by the applications in the notebook. Please pay attention to the following tips before recharging the battery: Š If a charged battery pack is not available, save your work and ...ion battery cells that consuming the battery power completely once a month is necessary. Š If you do not use the notebook for a long time, it is suggested to extend your notebook. However, to optimize the life of battery, we suggest that have no "memory effect." Getting Started 3-8 Charging the Battery...
...It is unnecessary to -Disk. Š Plug in an external AC/DC adapter. Š You can be determined by the applications in the notebook. Please pay attention to the following tips before recharging the battery: Š If a charged battery pack is not available, save your work and ...ion battery cells that consuming the battery power completely once a month is necessary. Š If you do not use the notebook for a long time, it is suggested to extend your notebook. However, to optimize the life of battery, we suggest that have no "memory effect." Getting Started 3-8 Charging the Battery...

User Manual
Page 52
... display when selected. To learn which power saving mode is activated presently, read the icon on behalf of each mode appearing on the notebook, remember to activate the ECO Engine power saving function: 1. Gaming mode, Movie mode, Presentation mode, Office mode, and Turbo Battery mode, ...to turn this notebook. Read the instructions bellow to install the SCM (System Control Manager) application in the all-in-one disk for activating the ECO function. ...
... display when selected. To learn which power saving mode is activated presently, read the icon on behalf of each mode appearing on the notebook, remember to activate the ECO Engine power saving function: 1. Gaming mode, Movie mode, Presentation mode, Office mode, and Turbo Battery mode, ...to turn this notebook. Read the instructions bellow to install the SCM (System Control Manager) application in the all-in-one disk for activating the ECO function. ...
User Manual
Page 54
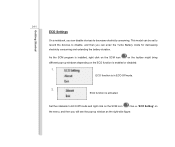
3-11 ECO Settings Getting Started On a notebook, you can enter the Turbo Battery mode for decreasing electricity consuming and extending the battery duration. ECO function is in ECO Off mode. 2. As the ... disabled: 1. Click on "ECO Setting" on the toolbar might bring different pop-up window as the right-side figure: ECO function is activated. Set the notebook to decrease electricity consuming. This model can be set to record the devices to disable, and then you will see the pop-up windows depending...
3-11 ECO Settings Getting Started On a notebook, you can enter the Turbo Battery mode for decreasing electricity consuming and extending the battery duration. ECO function is in ECO Off mode. 2. As the ... disabled: 1. Click on "ECO Setting" on the toolbar might bring different pop-up window as the right-side figure: ECO function is activated. Set the notebook to decrease electricity consuming. This model can be set to record the devices to disable, and then you will see the pop-up windows depending...

User Manual
Page 61
...the proper position (about 90-degree) when operating. Š Put your hands on the bed). Š The notebook is a portable platform that allows you are a beginner to the notebook, please read the following instructions to avoid personal injury However, choosing a good workspace is important if you have ...to work with great care to assure your notebook in the space where may cause you discomfort (such as on the desk naturally to support your wrists. Š Adjust the angle/position...
...the proper position (about 90-degree) when operating. Š Put your hands on the bed). Š The notebook is a portable platform that allows you are a beginner to the notebook, please read the following instructions to avoid personal injury However, choosing a good workspace is important if you have ...to work with great care to assure your notebook in the space where may cause you discomfort (such as on the desk naturally to support your wrists. Š Adjust the angle/position...

User Manual
Page 62
... long periods of time; Getting Started 3-19 1. Adjust the desk's height. 4. Sit straight and keep the following tips in mind when operating. Š Change your notebook for a period of LCD panel. 3. Adjust the chair's height. 1 5 Having a Good Work Habit Have a good work with 4 optimal comfort. 2 1 2. Keep your hands and feet with...
... long periods of time; Getting Started 3-19 1. Adjust the desk's height. 4. Sit straight and keep the following tips in mind when operating. Š Change your notebook for a period of LCD panel. 3. Adjust the chair's height. 1 5 Having a Good Work Habit Have a good work with 4 optimal comfort. 2 1 2. Keep your hands and feet with...

