
User Manual
Page 56
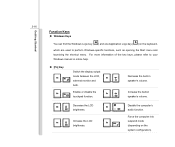
Getting Started 3-16 Function Keys „ Windows Keys You can find the Windows Logo key ( ) and one Application Logo key ( ) on the system configuration). Decrease the LCD + brightness. Disable the computer's + audio function. Enable or disable the + ... built-in speaker's volume. Increase the built-in speaker's volume. Force the computer into suspend mode + (depending on the keyboard, which are used to your Windows manual or online help. „ [Fn] Key Switch the display output mode between the LCD, + external monitor and + both. For more information of the...
Getting Started 3-16 Function Keys „ Windows Keys You can find the Windows Logo key ( ) and one Application Logo key ( ) on the system configuration). Decrease the LCD + brightness. Disable the computer's + audio function. Enable or disable the + ... built-in speaker's volume. Increase the built-in speaker's volume. Force the computer into suspend mode + (depending on the keyboard, which are used to your Windows manual or online help. „ [Fn] Key Switch the display output mode between the LCD, + external monitor and + both. For more information of the...
User Manual
Page 63
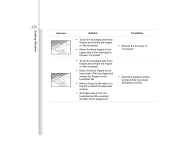
... with three fingers and remain the fingers on the touchpad. Š Move the three fingers to select the expected window. Š All fingers leave from the touchpad and the selected window will be popped up. Functions Š Browse the directory of the touchpad and remain the fingers on the touchpad ...still. Š Move a finger to the right or to the left to the lower side of "Computer" Š Switching between all the windows that have been ...
... with three fingers and remain the fingers on the touchpad. Š Move the three fingers to select the expected window. Š All fingers leave from the touchpad and the selected window will be popped up. Functions Š Browse the directory of the touchpad and remain the fingers on the touchpad ...still. Š Move a finger to the right or to the left to the lower side of "Computer" Š Switching between all the windows that have been ...
User Manual
Page 70
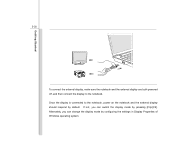
Getting Started 3-30 To connect the external display, make sure the notebook and the external display are both powered off, and then connect the display to the notebook, power on the notebook and the external display should respond by pressing [Fn]+[F2]. Once the display is connected to the notebook. If not, you can switch the display mode by default. Alternately, you can change the display mode by configuring the settings in Display Properties of Windows operating system.
Getting Started 3-30 To connect the external display, make sure the notebook and the external display are both powered off, and then connect the display to the notebook, power on the notebook and the external display should respond by pressing [Fn]+[F2]. Once the display is connected to the notebook. If not, you can switch the display mode by default. Alternately, you can change the display mode by configuring the settings in Display Properties of Windows operating system.
User Manual
Page 73
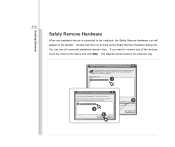
If you want to bring up the Safely Remove Hardware dialog box. When Windows notifies you want to remove any peripheral device is for reference only. USB Mass Storage Device 3 4 OK Cancel Properties 2 Stop Close Getting Started 3-33 Safely ... Hardware Select the device you that it is safe to the device and click Stop. The diagram shown below is connected to be removed safely. Windows will appear on the taskbar. Choose OK To continue.
If you want to bring up the Safely Remove Hardware dialog box. When Windows notifies you want to remove any peripheral device is for reference only. USB Mass Storage Device 3 4 OK Cancel Properties 2 Stop Close Getting Started 3-33 Safely ... Hardware Select the device you that it is safe to the device and click Stop. The diagram shown below is connected to be removed safely. Windows will appear on the taskbar. Choose OK To continue.
User Manual
Page 78
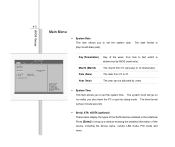
... (Date) The date from 01 (January) to set the system date. BIOS Setup 4-5 Main Menu Š System Date This item allows you to bring up a window showing the detailed information of the device, including the device name, vendor, LBA mode, PIO mode and more. Press [Enter] to set the system time...
... (Date) The date from 01 (January) to set the system date. BIOS Setup 4-5 Main Menu Š System Date This item allows you to bring up a window showing the detailed information of the device, including the device name, vendor, LBA mode, PIO mode and more. Press [Enter] to set the system time...

