User Manual
Page 4
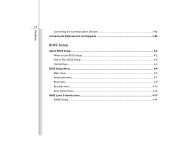
Preface 1-4 Connecting the Communication Devices 3-42 Components Replacement and Upgrade 3-45 BIOS Setup About BIOS Setup...4-2 When to Use BIOS Setup...4-2 How to Run BIOS Setup...4-2 Control Keys ...4-3 BIOS Setup Menu...4-4 Main menu...4-5 Advanced menu...4-7 Boot menu ...4-9 Security menu...4-10 Save & Exit menu...4-12 RAID Level 0 Introduction ...4-13 RAID0 Setup...4-14
Preface 1-4 Connecting the Communication Devices 3-42 Components Replacement and Upgrade 3-45 BIOS Setup About BIOS Setup...4-2 When to Use BIOS Setup...4-2 How to Run BIOS Setup...4-2 Control Keys ...4-3 BIOS Setup Menu...4-4 Main menu...4-5 Advanced menu...4-7 Boot menu ...4-9 Security menu...4-10 Save & Exit menu...4-12 RAID Level 0 Introduction ...4-13 RAID0 Setup...4-14
User Manual
Page 25
... Start Manual High-capacity Li-ion battery AC/DC adapter and AC power cord Carry bag (optional) All-in the future. Introductions 2-3 Chapter 4, BIOS Setup, provides information on BIOS Setup program and allows you need to configure the system for optimum use. If any item contained is damaged or missing, please contact...
... Start Manual High-capacity Li-ion battery AC/DC adapter and AC power cord Carry bag (optional) All-in the future. Introductions 2-3 Chapter 4, BIOS Setup, provides information on BIOS Setup program and allows you need to configure the system for optimum use. If any item contained is damaged or missing, please contact...
User Manual
Page 29
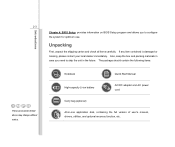
...~240V, 1.5A~2.0A 50~60Hz Output: 19V 4.74A Battery Type 6-cell RTC Battery Yes Special Notification The actual battery pack that comes with battery) Software & BIOS USB Flash Boot BIOS Yes, USB floppy boot up DOS only Fast Boot Support --- Please contact the local dealer for detailed information.
...~240V, 1.5A~2.0A 50~60Hz Output: 19V 4.74A Battery Type 6-cell RTC Battery Yes Special Notification The actual battery pack that comes with battery) Software & BIOS USB Flash Boot BIOS Yes, USB floppy boot up DOS only Fast Boot Support --- Please contact the local dealer for detailed information.
User Manual
Page 93
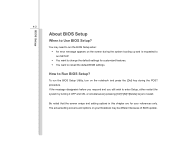
... you still wish to enter Setup, either restart the system by turning it OFF and ON, or simultaneously pressing [Ctrl]+[Alt]+[Delete] keys to Run BIOS Setup? The actual setting screens and options on the screen during the POST procedure. How to restart. You may be different because of... references only. Be noted that the screen snaps and setting options in this chapter are for customized features. Š You want to reload the default BIOS settings. BIOS Setup 4-2 About BIOS Setup When to run SETUP. Š You want to change the default settings for your Notebook may need to Use...
... you still wish to enter Setup, either restart the system by turning it OFF and ON, or simultaneously pressing [Ctrl]+[Alt]+[Delete] keys to Run BIOS Setup? The actual setting screens and options on the screen during the POST procedure. How to restart. You may be different because of... references only. Be noted that the screen snaps and setting options in this chapter are for customized features. Š You want to reload the default BIOS settings. BIOS Setup 4-2 About BIOS Setup When to run SETUP. Š You want to change the default settings for your Notebook may need to Use...
User Manual
Page 94
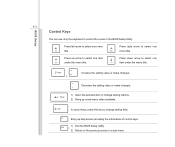
... You can use only the keyboard to the previous screen in the BIOS Setup Utility. Bring up help screen providing the information of control keys. 1) Exit the BIOS Setup Utility. 2) Return to control the cursor in a sub-menu. Press left arrow to select one menu title. Press down arrow to select one...
... You can use only the keyboard to the previous screen in the BIOS Setup Utility. Bring up help screen providing the information of control keys. 1) Exit the BIOS Setup Utility. 2) Return to control the cursor in a sub-menu. Press left arrow to select one menu title. Press down arrow to select one...
User Manual
Page 95
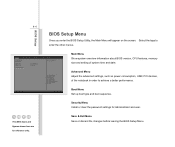
... Menu. Select the tags to achieve a better performance. Boot Menu Set up boot type and boot sequence. BIOS Setup BIOS Setup Menu Once you enter the BIOS Setup Utility, the Main Menu will appear on the screen. Advanced Menu Adjust the advanced settings, such as power consumption, USB/ PCI devices, of system ...time and date. Main Menu Show system overview information about BIOS version, CPU features, memory size and setting of the notebook in order to enter the other menus. 4-4 The...
... Menu. Select the tags to achieve a better performance. Boot Menu Set up boot type and boot sequence. BIOS Setup BIOS Setup Menu Once you enter the BIOS Setup Utility, the Main Menu will appear on the screen. Advanced Menu Adjust the advanced settings, such as power consumption, USB/ PCI devices, of system ...time and date. Main Menu Show system overview information about BIOS version, CPU features, memory size and setting of the notebook in order to enter the other menus. 4-4 The...

User Manual
Page 96
... SATA devices installed in the notebook. Day Month Date Year Day of the week, from 01 (January) to 31. The year can be adjusted by BIOS (read-only). The date format is [hour:minute:second]. Š SATA Information These items display the types of the device, including the device name ...and more. BIOS Setup 4-5 Main Menu Š System Date This item allows you to set the system date. The system clock will go on no matter you shut...
... SATA devices installed in the notebook. Day Month Date Year Day of the week, from 01 (January) to 31. The year can be adjusted by BIOS (read-only). The date format is [hour:minute:second]. Š SATA Information These items display the types of the device, including the device name ...and more. BIOS Setup 4-5 Main Menu Š System Date This item allows you to set the system date. The system clock will go on no matter you shut...
User Manual
Page 97
BIOS Setup 4-6 Š System Information This item provides the information about the firmware, processor, and system memory.
BIOS Setup 4-6 Š System Information This item provides the information about the firmware, processor, and system memory.
User Manual
Page 98
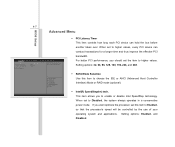
... before another takes over. When set to Enabled, so that the processor's speed will be controlled by the use of your operating system and applications. BIOS Setup 4-7 Advanced Menu Š PCI Latency Timer This item controls how long each PCI device can conduct transactions for a longer time and thus improve the...
... before another takes over. When set to Enabled, so that the processor's speed will be controlled by the use of your operating system and applications. BIOS Setup 4-7 Advanced Menu Š PCI Latency Timer This item controls how long each PCI device can conduct transactions for a longer time and thus improve the...
User Manual
Page 99
BIOS Setup 4-8 Š USB Configuration Select this item to use USB devices, such as mouse, keyboard, or portable disk, in DOS system; Setting options: Enabled, Disabled and Auto. Legacy USB Support Selecting Enabled allows users to enter the sub-menu: -- or allows users to boot the system by USB device.
BIOS Setup 4-8 Š USB Configuration Select this item to use USB devices, such as mouse, keyboard, or portable disk, in DOS system; Setting options: Enabled, Disabled and Auto. Legacy USB Support Selecting Enabled allows users to enter the sub-menu: -- or allows users to boot the system by USB device.
User Manual
Page 100
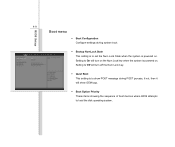
Setting to Off will turn on the Num Lock key when the system is powered on . Setting to On will show POST message during system boot. Š Bootup NumLock State This setting is to load the disk operating system. BIOS Setup 4-9 Boot menu Š Boot Configuration Configure settings during POST process, if not, then it will turn off the Num Lock key. Š Quiet Boot This setting is to show OEM logo. Š Boot Option Priority These items showing the sequence of boot devices where BIOS attempts to set the Num Lock State when the system is powered on .
Setting to Off will turn on the Num Lock key when the system is powered on . Setting to On will show POST message during system boot. Š Bootup NumLock State This setting is to load the disk operating system. BIOS Setup 4-9 Boot menu Š Boot Configuration Configure settings during POST process, if not, then it will turn off the Num Lock key. Š Quiet Boot This setting is to show OEM logo. Š Boot Option Priority These items showing the sequence of boot devices where BIOS attempts to set the Num Lock State when the system is powered on .

User Manual
Page 101
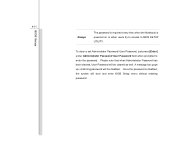
... required only when users try to access to abandon password setting. The Password Check item is used to specify the type of BIOS password protection that Administrator Password field allows users to enter and change the settings of twenty-digit password and press [Enter...]. BIOS Setup 4-10 Security menu Š Administrator Password When this item is implemented. Settings are described below : Type a maximum of the BIOS SETUP UTILITY, while User Password field only allows users to abandon new password setting...
... required only when users try to access to abandon password setting. The Password Check item is used to specify the type of BIOS password protection that Administrator Password field allows users to enter and change the settings of twenty-digit password and press [Enter...]. BIOS Setup 4-10 Security menu Š Administrator Password When this item is implemented. Settings are described below : Type a maximum of the BIOS SETUP UTILITY, while User Password field only allows users to abandon new password setting...
User Manual
Page 102
A message box pops up confirming password will be cleared as well. BIOS Setup 4-11 Always The password is required every time when the Notebook is disabled, the system will boot and enter BIOS Setup menu without entering password. Once the password is powered on or when users try to access to enter the password. To clear a set Administrator Password/ User Password, just press [Enter] under Administrator Password/ User Password field when prompted to BIOS SETUP UTILITY. Please note that when Administrator Password has been cleared, User Password will be disabled.
A message box pops up confirming password will be cleared as well. BIOS Setup 4-11 Always The password is required every time when the Notebook is disabled, the system will boot and enter BIOS Setup menu without entering password. Once the password is powered on or when users try to access to enter the password. To clear a set Administrator Password/ User Password, just press [Enter] under Administrator Password/ User Password field when prompted to BIOS SETUP UTILITY. Please note that when Administrator Password has been cleared, User Password will be disabled.
User Manual
Page 103
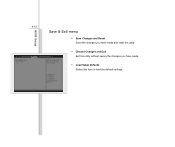
BIOS Setup 4-12 Save & Exit menu Š Save Changes and Reset Save the changes you have made and reset the utility Š Discard Changes and Exit Exit the utility without saving the changes you have made. Š Load Setup Defaults Select this item to load the default settings.
BIOS Setup 4-12 Save & Exit menu Š Save Changes and Reset Save the changes you have made and reset the utility Š Discard Changes and Exit Exit the utility without saving the changes you have made. Š Load Setup Defaults Select this item to load the default settings.
User Manual
Page 104
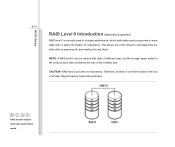
CAUTION: RAID level 0 provides no parity information for and reading the next block. BIOS Setup 4-13 RAID Level 0 Introduction (Optionally Supported) RAID level 0 is searching for redundancy. This allows one drive results in the loss of the drives to ...
CAUTION: RAID level 0 provides no parity information for and reading the next block. BIOS Setup 4-13 RAID Level 0 Introduction (Optionally Supported) RAID level 0 is searching for redundancy. This allows one drive results in the loss of the drives to ...
User Manual
Page 105
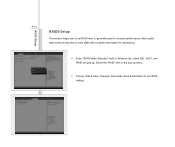
BIOS Setup 4-14 RAID0 Setup This section helps user to set RAID level 0, generally used to exit BIOS setting. Select the "RAID" item in Advance tab, items IDE, AHCI, and RAID will pop up menu. Š Choose "Exit & Save Changes" field under Save & Exit Menu to increase performance, which splits data evenly across two or more disks with no parity information for redundancy. Š Enter "SATA Mode Selection" field in the pop up .
BIOS Setup 4-14 RAID0 Setup This section helps user to set RAID level 0, generally used to exit BIOS setting. Select the "RAID" item in Advance tab, items IDE, AHCI, and RAID will pop up menu. Š Choose "Exit & Save Changes" field under Save & Exit Menu to increase performance, which splits data evenly across two or more disks with no parity information for redundancy. Š Enter "SATA Mode Selection" field in the pop up .
User Manual
Page 106
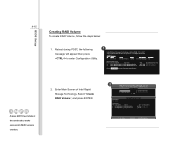
.... 1 Intel(R) Rapid Storage Technology - Select "Create RAID Volume", and press ENTER. Reboot during POST, the following message will appear then press to enter Configuration Utility... 2 2. BIOS Setup 4-15 Creating RAID Volume To create RAID Volume, follow the steps below: 1. It takes BOTH hard disks in the notebook to make successful RAID0...
.... 1 Intel(R) Rapid Storage Technology - Select "Create RAID Volume", and press ENTER. Reboot during POST, the following message will appear then press to enter Configuration Utility... 2 2. BIOS Setup 4-15 Creating RAID Volume To create RAID Volume, follow the steps below: 1. It takes BOTH hard disks in the notebook to make successful RAID0...
User Manual
Page 107
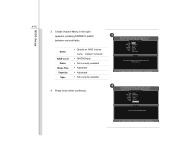
Press enter when confirmed. Name RAID Level Disks Stripe Size Capacity Sync Š Specify an RAID Volume name. Default: Volume0 Š RAID0(Stripe) Š Not currently available Š Adjustable Š Adjustable Š Not currently available 4 4. Create Volume Menu in the right appears, pressing ENTER to switch 3 between various fields. BIOS Setup 4-16 3.
Press enter when confirmed. Name RAID Level Disks Stripe Size Capacity Sync Š Specify an RAID Volume name. Default: Volume0 Š RAID0(Stripe) Š Not currently available Š Adjustable Š Adjustable Š Not currently available 4 4. Create Volume Menu in the right appears, pressing ENTER to switch 3 between various fields. BIOS Setup 4-16 3.

User Manual
Page 108
4-17 BIOS Setup 5. A Warning message prompted to confirm the RAID volume creation, 5 press "Y" to continue. 6. RAID information shows in the following screen indicating successful 6 work.
4-17 BIOS Setup 5. A Warning message prompted to confirm the RAID volume creation, 5 press "Y" to continue. 6. RAID information shows in the following screen indicating successful 6 work.
User Manual
Page 109
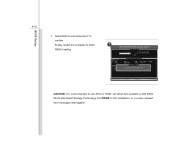
Select ESC to exit and press Y to OS installation, or a screen showed error messages shall appear. 4-18 BIOS Setup 7. CAUTION: For users intended to use AHCI or RAID, set either item enabled in both BIOS PLUS Intel Rapid Storage Technology tool PRIOR to confirm. Finally, restart the computer to finish 7 RAID 0 setting.
Select ESC to exit and press Y to OS installation, or a screen showed error messages shall appear. 4-18 BIOS Setup 7. CAUTION: For users intended to use AHCI or RAID, set either item enabled in both BIOS PLUS Intel Rapid Storage Technology tool PRIOR to confirm. Finally, restart the computer to finish 7 RAID 0 setting.


