

User Manual
Page 32
... learn the function status. 4. Introductions 2-12 + 3G (optional) + P1 Š Press and hold the Fn button, and then press the F4 button to turn the windows search function on .
... learn the function status. 4. Introductions 2-12 + 3G (optional) + P1 Š Press and hold the Fn button, and then press the F4 button to turn the windows search function on .

User Manual
Page 57
Enable or disable the touchpad + function. Force the computer into suspend + mode (depending on the keyboard, which are used to your Windows manual or online help. „ [Fn] Key + Switch the display output mode between the LCD, external monitor and both. For more ...information of the two keys, please refer to perform Windows-specific functions, such as opening the Start menu and launching the shortcut menu. Decrease the LCD brightness. + Increase the LCD brightness. + Disable the ...
Enable or disable the touchpad + function. Force the computer into suspend + mode (depending on the keyboard, which are used to your Windows manual or online help. „ [Fn] Key + Switch the display output mode between the LCD, external monitor and both. For more ...information of the two keys, please refer to perform Windows-specific functions, such as opening the Start menu and launching the shortcut menu. Decrease the LCD brightness. + Increase the LCD brightness. + Disable the ...
User Manual
Page 59
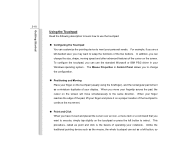
... basics of operating your finger and place it on a proper location of your finger on the touchpad or press the left button to meet your Windows operating system. Unlike the traditional pointing device such as the mouse, the whole touchpad can change the configuration. „ Positioning and Moving Place your display...
... basics of operating your finger and place it on a proper location of your finger on the touchpad or press the left button to meet your Windows operating system. Unlike the traditional pointing device such as the mouse, the whole touchpad can change the configuration. „ Positioning and Moving Place your display...
User Manual
Page 66
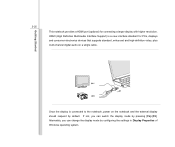
..., you can switch the display mode by pressing [Fn]+[F2]. Alternately, you can change the display mode by configuring the settings in Display Properties of Windows operating system. Getting Started 3-25 This notebook provides a HDMI port (optional) for PCs, displays and consumer electronics devices that supports standard, enhanced and high-definition...
..., you can switch the display mode by pressing [Fn]+[F2]. Alternately, you can change the display mode by configuring the settings in Display Properties of Windows operating system. Getting Started 3-25 This notebook provides a HDMI port (optional) for PCs, displays and consumer electronics devices that supports standard, enhanced and high-definition...
User Manual
Page 68
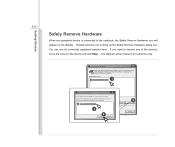
... Device 3 4 OK Cancel Properties 2 Stop Close The diagram shown below is safe to do so unplug the device from your computer. When Windows notifies you want to unplug or eject, and then click Stop. Double-click the icon to bring up the Safely Remove Hardware dialog box. Choose... OK To continue. Windows will appear on the taskbar. You can see all connected peripheral devices here. Getting Started 3-27 Safely Remove Hardware When any of the devices...
... Device 3 4 OK Cancel Properties 2 Stop Close The diagram shown below is safe to do so unplug the device from your computer. When Windows notifies you want to unplug or eject, and then click Stop. Double-click the icon to bring up the Safely Remove Hardware dialog box. Choose... OK To continue. Windows will appear on the taskbar. You can see all connected peripheral devices here. Getting Started 3-27 Safely Remove Hardware When any of the devices...
User Manual
Page 73
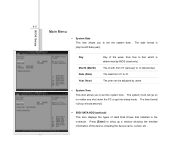
... year can be adjusted by BIOS (read-only). The month from 01 to set the system time. The date from 01 (January) to bring up a window showing the detailed information of Hard Disk Drives that installed in the notebook. Press [Enter] to 12 (December).
... year can be adjusted by BIOS (read-only). The month from 01 to set the system time. The date from 01 (January) to bring up a window showing the detailed information of Hard Disk Drives that installed in the notebook. Press [Enter] to 12 (December).
User Manual
Page 74
BIOS Setup 4-6 Š Serial ATA (optional) The item displays the types of the device, including the device name, vendor, LBA mode, PIO mode and more. Š System Information This item provides the information about the firmware, processor, and system memory. Press [Enter] to bring up a window showing the detailed information of the SATA devices installed in the notebook.
BIOS Setup 4-6 Š Serial ATA (optional) The item displays the types of the device, including the device name, vendor, LBA mode, PIO mode and more. Š System Information This item provides the information about the firmware, processor, and system memory. Press [Enter] to bring up a window showing the detailed information of the SATA devices installed in the notebook.


