
User Manual
Page 3
... the External Devices 3-19 Using the External Optical Storage Device 3-19 Connecting the Peripheral Devices 3-21 Connecting the Communication Devices 3-23 Safely Remove Hardware ...3-24 Windows XP Installation...3-25 Installation Requirement...3-25 Installing...
... the External Devices 3-19 Using the External Optical Storage Device 3-19 Connecting the Peripheral Devices 3-21 Connecting the Communication Devices 3-23 Safely Remove Hardware ...3-24 Windows XP Installation...3-25 Installation Requirement...3-25 Installing...
User Manual
Page 54
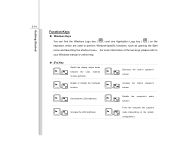
... + Increase the LCD brightness. + Disable the computer's audio + function. Force the computer into suspend mode (depending on the keyboard, which are used to your Windows manual or online help. „ [Fn] Key + + Switch the display output mode between the LCD, external monitor and both. Increase the built-in speaker...'s + volume. Enable or disable the touchpad function. For more information of the two keys, please refer to perform Windows-specific functions, such as opening the Start menu and launching the shortcut menu. Getting Started 3-14 Function Keys „...
... + Increase the LCD brightness. + Disable the computer's audio + function. Force the computer into suspend mode (depending on the keyboard, which are used to your Windows manual or online help. „ [Fn] Key + + Switch the display output mode between the LCD, external monitor and both. Increase the built-in speaker...'s + volume. Enable or disable the touchpad function. For more information of the two keys, please refer to perform Windows-specific functions, such as opening the Start menu and launching the shortcut menu. Getting Started 3-14 Function Keys „...

User Manual
Page 56
... button of the keyboard. 1 2 Using the Touchpad Read the following description to learn how to use the standard Microsoft or IBM PS/2 driver in your Windows operating system. 3-16 The touchpad figures shown here are a left-handed user, you may be different from the notebook that users purchased Getting Started Knowing...
... button of the keyboard. 1 2 Using the Touchpad Read the following description to learn how to use the standard Microsoft or IBM PS/2 driver in your Windows operating system. 3-16 The touchpad figures shown here are a left-handed user, you may be different from the notebook that users purchased Getting Started Knowing...
User Manual
Page 62
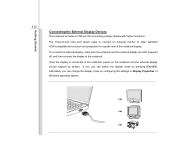
...-D-sub VGA port allows users to the notebook. Getting Started 3-22 Connecting the External Display Devices This notebook provides a VGA port for a great view of Windows operating system.
...-D-sub VGA port allows users to the notebook. Getting Started 3-22 Connecting the External Display Devices This notebook provides a VGA port for a great view of Windows operating system.

User Manual
Page 64
... Confirm devices to be removed safely. Double-click the icon to do so unplug the device from your computer. When Windows notifies you want to unplug or eject, and then click Stop. Windows will appear on the taskbar. You can see all connected peripheral devices here. Choose OK To continue. USB Mass...
... Confirm devices to be removed safely. Double-click the icon to do so unplug the device from your computer. When Windows notifies you want to unplug or eject, and then click Stop. Windows will appear on the taskbar. You can see all connected peripheral devices here. Choose OK To continue. USB Mass...

User Manual
Page 65
... is booting up. Š Select the boot device [USB:xxxxxxx (maybe labeled with USB interface. Please confirm that the older version of this notebook Installing Windows XP Š Attach the power cord to the AC adapter and the notebook. Š Connect the external USB CD-ROM or DVD-ROM to boot... from Microsoft® Note that your notebook. Installation Requirement Š CD-ROM or DVD-ROM with USB interface for installation Š Official Windows® XP service pack 3 (or newer) installation disk from the optical device drive. Š Delete any existing partition while the...
... is booting up. Š Select the boot device [USB:xxxxxxx (maybe labeled with USB interface. Please confirm that the older version of this notebook Installing Windows XP Š Attach the power cord to the AC adapter and the notebook. Š Connect the external USB CD-ROM or DVD-ROM to boot... from Microsoft® Note that your notebook. Installation Requirement Š CD-ROM or DVD-ROM with USB interface for installation Š Official Windows® XP service pack 3 (or newer) installation disk from the optical device drive. Š Delete any existing partition while the...

User Manual
Page 66
... CD-ROM or DVD-ROM. Š Follow the Driver Installation Wizard to continue and complete the installation process. Š Restart the system and enter the Windows® XP operating system. Getting Started 3-26 Note that it is strongly recommended to back up the data that stored in -one application disk of...
... CD-ROM or DVD-ROM. Š Follow the Driver Installation Wizard to continue and complete the installation process. Š Restart the system and enter the Windows® XP operating system. Getting Started 3-26 Note that it is strongly recommended to back up the data that stored in -one application disk of...
User Manual
Page 71
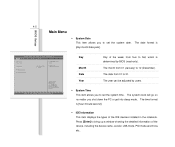
... Values F9: Optimized Default F4: Save Version 1.23.1109. The date from 01 (January) to 31. Main Atpio Setup Utility - Press [Enter] to bring up a window showing the detailed information of the week, from Sun to Sat, which is determined by users. Š System Time This item allows you to set...
... Values F9: Optimized Default F4: Save Version 1.23.1109. The date from 01 (January) to 31. Main Atpio Setup Utility - Press [Enter] to bring up a window showing the detailed information of the week, from Sun to Sat, which is determined by users. Š System Time This item allows you to set...


