

User Manual
Page 14
BIOS SETUP Using BIOS Setup Utility 60 When to Use BIOS Setup 60 How to Run BIOS Setup 60 Control Keys 61 BIOS SETUP MENU 62 MAIN MENU 63 System Overview 63 System Memory 63 System Time 64 System Date 64 Advanced Settings 65 Primary IDE Master/Slave 65 Legacy USB Support 65 Intel® SpeedStep™ Technology 66 Security Settings 67 Change Supervisor/User Password 67 Boot Settings 69 Quiet Boot 69 1st, 2nd and 3rd Boot Device Setting 69 Exit Setting 70 XIV
BIOS SETUP Using BIOS Setup Utility 60 When to Use BIOS Setup 60 How to Run BIOS Setup 60 Control Keys 61 BIOS SETUP MENU 62 MAIN MENU 63 System Overview 63 System Memory 63 System Time 64 System Date 64 Advanced Settings 65 Primary IDE Master/Slave 65 Legacy USB Support 65 Intel® SpeedStep™ Technology 66 Security Settings 67 Change Supervisor/User Password 67 Boot Settings 69 Quiet Boot 69 1st, 2nd and 3rd Boot Device Setting 69 Exit Setting 70 XIV
User Manual
Page 15
Additional Information Activating Your System 72 Using the Recovery CD 74 Resuming the Operating System 74 Using the Utility CD 76 When do I Need the Utility CD 76 How to Use the Utility CD 76 The Setup program includes 77 MSI Live UpdateTM3 78 Using MSI Live UpdateTM3 78 Updating BIOS 79 Updating Driver 80 Updating Utility 80 Norton Internet SecurityTM2005 81 Registering Norton Internet SecurityTM2005 81 Advanced Software 83 MSI System Control Manager 83 Search Key Define 84 Energy Station 86 Mail Properties 89 OSD (On-Screen Display 91 XV
Additional Information Activating Your System 72 Using the Recovery CD 74 Resuming the Operating System 74 Using the Utility CD 76 When do I Need the Utility CD 76 How to Use the Utility CD 76 The Setup program includes 77 MSI Live UpdateTM3 78 Using MSI Live UpdateTM3 78 Updating BIOS 79 Updating Driver 80 Updating Utility 80 Norton Internet SecurityTM2005 81 Registering Norton Internet SecurityTM2005 81 Advanced Software 83 MSI System Control Manager 83 Search Key Define 84 Energy Station 86 Mail Properties 89 OSD (On-Screen Display 91 XV

User Manual
Page 22
Yes (Win XP) x 1 WHQL --- Embedded in Intel ICH6-M Realtek ALC655 2 Speakers with housing (AMP: TI TPA0202) SoundBlaster compatible (Not support DOS) Adjust by volume button, K/B hot-key & SW Win XP Home and Professional edition Yes, USB floppy boot up DOS only Fast Boot Support --- PC2001 6 Display can scan CRT & LCD simultaneously if both are detected and activate. y Audio Sound Controller Sound Codec chip Internal Speaker SoundBlaster Sound Volume y Software & BIOS Support OS USB Flash Boot BIOS y Other Kensington Lock Hole Compliance detected; 3.
Yes (Win XP) x 1 WHQL --- Embedded in Intel ICH6-M Realtek ALC655 2 Speakers with housing (AMP: TI TPA0202) SoundBlaster compatible (Not support DOS) Adjust by volume button, K/B hot-key & SW Win XP Home and Professional edition Yes, USB floppy boot up DOS only Fast Boot Support --- PC2001 6 Display can scan CRT & LCD simultaneously if both are detected and activate. y Audio Sound Controller Sound Codec chip Internal Speaker SoundBlaster Sound Volume y Software & BIOS Support OS USB Flash Boot BIOS y Other Kensington Lock Hole Compliance detected; 3.

User Manual
Page 76
...and ON, or simultaneously pressing [Ctrl]+[Alt]+[Delete] keys to run the BIOS Setup Utility, turn on your references only. Things to Use BIOS Setup? BIOS SETUP UTILITY ˆ When to know... 60 You may be different because of BIOS update. To run SETUP. ” You want to reload the default... BIOS settings. ˆ How to run the BIOS Setup when: ” An error message appears ...
...and ON, or simultaneously pressing [Ctrl]+[Alt]+[Delete] keys to run the BIOS Setup Utility, turn on your references only. Things to Use BIOS Setup? BIOS SETUP UTILITY ˆ When to know... 60 You may be different because of BIOS update. To run SETUP. ” You want to reload the default... BIOS settings. ˆ How to run the BIOS Setup when: ” An error message appears ...

User Manual
Page 77
.... ˆ Control Keys You can use only the keyboard to change setting options. 2) Bring up help screen providing the information of control keys. 1) Exit the BIOS Setup Utility. 2) Return to select one menu title. Bring up a sub-menu when available. Press left arrow to select one menu title. Press up arrow...
.... ˆ Control Keys You can use only the keyboard to change setting options. 2) Bring up help screen providing the information of control keys. 1) Exit the BIOS Setup Utility. 2) Return to select one menu title. Bring up a sub-menu when available. Press left arrow to select one menu title. Press up arrow...
User Manual
Page 78
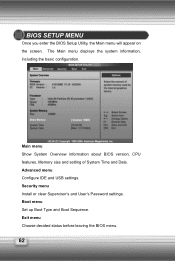
The Main menu displays the system information, including the basic configuration. Security menu Install or clear Supervisor's and User's Password settings. Boot menu Set up Boot Type and Boot Sequence. Exit menu Choose decided status before leaving the BIOS menu. 62 Advanced menu Configure IDE and USB settings. BIOS SETUP MENU Once you enter the BIOS Setup Utility, the Main menu will appear on the screen. Main menu Show System Overview information about BIOS version, CPU features, Memory size and setting of System Time and Date.
The Main menu displays the system information, including the basic configuration. Security menu Install or clear Supervisor's and User's Password settings. Boot menu Set up Boot Type and Boot Sequence. Exit menu Choose decided status before leaving the BIOS menu. 62 Advanced menu Configure IDE and USB settings. BIOS SETUP MENU Once you enter the BIOS Setup Utility, the Main menu will appear on the screen. Main menu Show System Overview information about BIOS version, CPU features, Memory size and setting of System Time and Date.

User Manual
Page 79
Select an available and acceptable value from the menu. There are Share Memory, System Time and System Date. ˆ MAIN MENU y System Overview System Overview will show you BIOS version and other information about its build date and update notes. y Share Memory Some devices need to share with PC's memory to select. 63 The variable settings in Main menu are modes of 1MB, 4MB, 8MB, 16MB, 32MB provided to accelerate their performance. Following is CPU's information about its Type and Speed.
Select an available and acceptable value from the menu. There are Share Memory, System Time and System Date. ˆ MAIN MENU y System Overview System Overview will show you BIOS version and other information about its build date and update notes. y Share Memory Some devices need to share with PC's memory to select. 63 The variable settings in Main menu are modes of 1MB, 4MB, 8MB, 16MB, 32MB provided to accelerate their performance. Following is CPU's information about its Type and Speed.
User Manual
Page 80
Date The date from 01 to 12 (December). y System Date This item allows you to set the system time. The set format is [day:month:date:year]. Month The month from Sun to Sat, which is determined by users. 64 Year The year can be adjusted by BIOS (read-only). The date format is [hour:minute:second]. Day Day of the week, from 01 (January) to 31. The system clock will go on no matter you shut down the PC or get into sleep mode. y System Time This item allows you to set the system date.
Date The date from 01 to 12 (December). y System Date This item allows you to set the system time. The set format is [day:month:date:year]. Month The month from Sun to Sat, which is determined by users. 64 Year The year can be adjusted by BIOS (read-only). The date format is [hour:minute:second]. Day Day of the week, from 01 (January) to 31. The system clock will go on no matter you shut down the PC or get into sleep mode. y System Time This item allows you to set the system date.

User Manual
Page 84
... appears only when end users try to run Setup. About Supervisor Password and User Password Supervisor Password allows the user to specify the type of BIOS password protection that is disabled, the system will be added in the User Access Level item. You can enter Setup without entering any password. To...
... appears only when end users try to run Setup. About Supervisor Password and User Password Supervisor Password allows the user to specify the type of BIOS password protection that is disabled, the system will be added in the User Access Level item. You can enter Setup without entering any password. To...

User Manual
Page 85
Settings options: Disabled and Enabled. ˆ Boot Settings y Quiet Boot This item enables you to set the sequence of boot devices where BIOS attempts to show the vendor logo on the boot-up screen. The default setting is Enabled. y 1st, 2nd and 3rd Boot Device Setting The three items allow you to load the disk operating system. 69
Settings options: Disabled and Enabled. ˆ Boot Settings y Quiet Boot This item enables you to set the sequence of boot devices where BIOS attempts to show the vendor logo on the boot-up screen. The default setting is Enabled. y 1st, 2nd and 3rd Boot Device Setting The three items allow you to load the disk operating system. 69

User Manual
Page 90
Insert the Recovery CD into the CD/DVD-ROM drive. Then, follow the on the keyboard to enter the BIOS Setup Utility when the system boots up. When the operating system of your computer is a compact disk that records the sources of operating system and ... the operating system from the Recovery CD. The system will reboot automatically when completed. 74 In the BIOS Setup Utility, set the CD/DVDVD-ROM drive as the first boot device (See Boot Menu in BIOS Setup for more , you can use the Recovery CD to resume the system in its original...
Insert the Recovery CD into the CD/DVD-ROM drive. Then, follow the on the keyboard to enter the BIOS Setup Utility when the system boots up. When the operating system of your computer is a compact disk that records the sources of operating system and ... the operating system from the Recovery CD. The system will reboot automatically when completed. 74 In the BIOS Setup Utility, set the CD/DVDVD-ROM drive as the first boot device (See Boot Menu in BIOS Setup for more , you can use the Recovery CD to resume the system in its original...

User Manual
Page 94
... Live Utility™. Follow the on-screen instructions to find out that once MSI Live Update™3 is a useful utility for enhancing the performance of your Notebook PC. Users will find the required BIOS or drivers on the Internet. It will be the same as your operating ...system. MSI Live Update™3 MSI Live Update™3 is successfully installed, the interface's language will detect the language of ...
... Live Utility™. Follow the on-screen instructions to find out that once MSI Live Update™3 is a useful utility for enhancing the performance of your Notebook PC. Users will find the required BIOS or drivers on the Internet. It will be the same as your operating ...system. MSI Live Update™3 MSI Live Update™3 is successfully installed, the interface's language will detect the language of ...

User Manual
Page 95
If you system, click the InstallShield Wizard button on -screen instructions to download and update the desired BIOS automatically. Click the MSI Live Update Series Server button. Follow the on the right side of your system. Your computer should have connection to the Internet before using ...to update. Things to the main window with nothing changed. If it has found one (or more) supported BIOS for you click Yes, it will connect to MSI's database automatically to search the supported BIOS and shows the results on the webpage. Click Yes to start updating or No to return to know...
If you system, click the InstallShield Wizard button on -screen instructions to download and update the desired BIOS automatically. Click the MSI Live Update Series Server button. Follow the on the right side of your system. Your computer should have connection to the Internet before using ...to update. Things to the main window with nothing changed. If it has found one (or more) supported BIOS for you click Yes, it will connect to MSI's database automatically to search the supported BIOS and shows the results on the webpage. Click Yes to start updating or No to return to know...


