
User Guide
Page 3
... not use another power adapter other than the one enclosed with the system. Disconnect the AC/DC adapter before handling system components such as CPU, Memory, HDD, mini PCI-E card, etc. Place system components on a grounded antistatic pad or on the bed that the acquisition of replaceable parts (or...
... not use another power adapter other than the one enclosed with the system. Disconnect the AC/DC adapter before handling system components such as CPU, Memory, HDD, mini PCI-E card, etc. Place system components on a grounded antistatic pad or on the bed that the acquisition of replaceable parts (or...
User Guide
Page 5
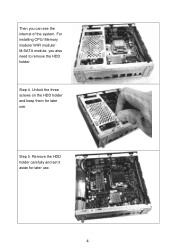
Step 5. Unlock the three screws on the HDD holder and keep them for later use . Remove the HDD holder carefully and set it aside for later use . 4 For installing CPU/ Memory module/ WIFI module/ M-SATA module, you can see the internal of the system. Then you also need to remove the HDD holder. Step 4.
Step 5. Unlock the three screws on the HDD holder and keep them for later use . Remove the HDD holder carefully and set it aside for later use . 4 For installing CPU/ Memory module/ WIFI module/ M-SATA module, you can see the internal of the system. Then you also need to remove the HDD holder. Step 4.
User Guide
Page 6
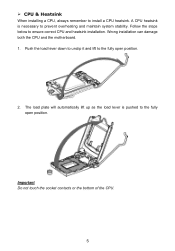
Wrong installation can damage both the CPU and the motherboard. 1. Important Do not touch the socket contacts or the bottom of the CPU. 5 Push the load lever down to unclip it and lift to the fully open position. Follow the steps below to install a CPU heatsink. The load plate will automatically lift up as the load lever is necessary to the fully open position. 2. A CPU heatsink is pushed to prevent overheating and maintain system stability. CPU & Heatsink When installing a CPU, always remember to ensure correct CPU and heatsink installation.
Wrong installation can damage both the CPU and the motherboard. 1. Important Do not touch the socket contacts or the bottom of the CPU. 5 Push the load lever down to unclip it and lift to the fully open position. Follow the steps below to install a CPU heatsink. The load plate will automatically lift up as the load lever is necessary to the fully open position. 2. A CPU heatsink is pushed to prevent overheating and maintain system stability. CPU & Heatsink When installing a CPU, always remember to ensure correct CPU and heatsink installation.
User Guide
Page 7
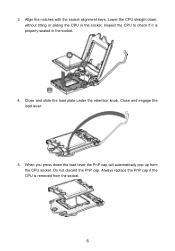
Close and slide the load plate under the retention knob. Always replace the PnP cap if the CPU is properly seated in the socket. When you press down , without tilting or sliding the CPU in the socket. 4. Close and engage the load lever. 5. Inspect the CPU to check if it is removed from the CPU socket. Do not discard the PnP cap. Lower the CPU straight down the load lever the PnP cap will automatically pop up from the socket. 6 3. Align the notches with the socket alignment keys.
Close and slide the load plate under the retention knob. Always replace the PnP cap if the CPU is properly seated in the socket. When you press down , without tilting or sliding the CPU in the socket. 4. Close and engage the load lever. 5. Inspect the CPU to check if it is removed from the CPU socket. Do not discard the PnP cap. Lower the CPU straight down the load lever the PnP cap will automatically pop up from the socket. 6 3. Align the notches with the socket alignment keys.

User Guide
Page 8
...motherboard. 8. This will help in place. 7 As each fastener locks into the holes on the top of the CPU. Inspect the motherboard to fasten the heatsink. 6. Locate the CPU fan connector on the motherboard. 9. Push down to ensure that the fastener-ends have been properly locked in heat ...dissipation and prevent CPU overheating. 7. Evenly spread a thin layer of thermal paste (or thermal tape) on the motherboard. Press the four fasteners down the heatsink ...
...motherboard. 8. This will help in place. 7 As each fastener locks into the holes on the top of the CPU. Inspect the motherboard to fasten the heatsink. 6. Locate the CPU fan connector on the motherboard. 9. Push down to ensure that the fastener-ends have been properly locked in heat ...dissipation and prevent CPU overheating. 7. Evenly spread a thin layer of thermal paste (or thermal tape) on the motherboard. Press the four fasteners down the heatsink ...

User Guide
Page 9
Important Confirm that the CPU heatsink has formed a tight seal with the CPU before booting your system. Whenever the CPU is not installed, always protect the CPU socket pins by covering the socket with the plastic cap. If you purchased a separate CPU and heatsink/ cooler, Please refer to the CPU fan connector on the motherboard. Finally, attach the CPU fan cable to the documentation in the heatsink/ cooler package for more details about installation. 8 11.
Important Confirm that the CPU heatsink has formed a tight seal with the CPU before booting your system. Whenever the CPU is not installed, always protect the CPU socket pins by covering the socket with the plastic cap. If you purchased a separate CPU and heatsink/ cooler, Please refer to the CPU fan connector on the motherboard. Finally, attach the CPU fan cable to the documentation in the heatsink/ cooler package for more details about installation. 8 11.