
User Guide
Page 22
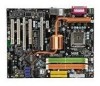
... not backwards compatible. Then push it in the DDR2 DIMM slots. - DDR2 memory modules are not interchangeable with a 2GB memory module. 2-8 To enable successful system boot-up to the chipset resource deployment, the system density will only be detected up , always insert the memory modules into the DIMM slot.
... not backwards compatible. Then push it in the DDR2 DIMM slots. - DDR2 memory modules are not interchangeable with a 2GB memory module. 2-8 To enable successful system boot-up to the chipset resource deployment, the system density will only be detected up , always insert the memory modules into the DIMM slot.

User Guide
Page 25
... while installing modules. Due to several pins are very sensitive to ESD, so this kind of memory-replacement actions might cause system chipset unable to boot.
... while installing modules. Due to several pins are very sensitive to ESD, so this kind of memory-replacement actions might cause system chipset unable to boot.

User Guide
Page 35
tem bus, etc...) 1 2 1 2 Testing RTC (Real Time Clock) Operating System Booting 3 4 3 4 2-21 Initializing Video Interface 2 This will start showing information 3 4 about logo, processor brand name, etc... Then, detect and initializethe ...D-LED will hang here if the 1 processor is damaged or not in- 3 stalled properly. Hardware Setup D-Bracket™ 2 Connector: JDB1 This connector is for fast booting. 3 4 1 2 Initializing Keyboard Controller. 1 2 Initializing Hard Drive Controller This will initialize IDE drive and 3 4 3 4 controller. 1 2 Testing VGA BIOS 1...
tem bus, etc...) 1 2 1 2 Testing RTC (Real Time Clock) Operating System Booting 3 4 3 4 2-21 Initializing Video Interface 2 This will start showing information 3 4 about logo, processor brand name, etc... Then, detect and initializethe ...D-LED will hang here if the 1 processor is damaged or not in- 3 stalled properly. Hardware Setup D-Bracket™ 2 Connector: JDB1 This connector is for fast booting. 3 4 1 2 Initializing Keyboard Controller. 1 2 Initializing Hard Drive Controller This will initialize IDE drive and 3 4 3 4 controller. 1 2 Testing VGA BIOS 1...

User Guide
Page 36
MS-7350 Mainboard Button This motherboard provides the following button for you power off the system before clearing CMOS data. 2. ...from external battery to clear the data. The indicator LED beside the button and will explain how to change your motherboard's function through the use the button to clear the system configuration, use of button. If you want to clear ...data. Press the button to keep the system configuration data. With the CMOS RAM, the system can automatically boot OS every time it is a CMOS RAM on . Clear CMOS Button: SW1 There is turned on board that you ...
MS-7350 Mainboard Button This motherboard provides the following button for you power off the system before clearing CMOS data. 2. ...from external battery to clear the data. The indicator LED beside the button and will explain how to change your motherboard's function through the use the button to clear the system configuration, use of button. If you want to clear ...data. Press the button to keep the system configuration data. With the CMOS RAM, the system can automatically boot OS every time it is a CMOS RAM on . Clear CMOS Button: SW1 There is turned on board that you ...

User Guide
Page 42
Chapter 3 BIOS Setup BIOS Setup This chapter provides information on the screen during the system booting up, and requests you to change the default settings for optimum use. You may need to run the Setup program when: ² An error message appears on the BIOS Setup program and allows you to run SETUP. ² You want to configure the system for customized features. 3-1
Chapter 3 BIOS Setup BIOS Setup This chapter provides information on the screen during the system booting up, and requests you to change the default settings for optimum use. You may need to run the Setup program when: ² An error message appears on the BIOS Setup program and allows you to run SETUP. ² You want to configure the system for customized features. 3-1

User Guide
Page 43
... to the chipset as I = Intel, N = nVidia, and V = VIA. 7th - 8th digit refers to the date this chapter are under continuous update for reference only. 2. Upon boot-up, the 1st line appearing after the memory count is usually in this BIOS was released. 3-2 Press DEL to enter SETUP If the message disappears...
... to the chipset as I = Intel, N = nVidia, and V = VIA. 7th - 8th digit refers to the date this chapter are under continuous update for reference only. 2. Upon boot-up, the 1st line appearing after the memory count is usually in this BIOS was released. 3-2 Press DEL to enter SETUP If the message disappears...

User Guide
Page 50
...BIOS' data cannot be changed when attempting to update the BIOS with PC2001 design guide, the system is powered on the full screen at boot. [Disabled] Shows the POST messages at all times. After updating the BIOS, you to run in APIC mode. Advanced BIOS Features BIOS Setup... Protection This function protects the BIOS from accidental corruption by unauthorized users or computer viruses. Setting to [Off] will skip some check items. Boot Up Num-Lock LED This setting is when you want to compliance with a Flash utility. Setting to protect it against viruses. You should immediately...
...BIOS' data cannot be changed when attempting to update the BIOS with PC2001 design guide, the system is powered on the full screen at boot. [Disabled] Shows the POST messages at all times. After updating the BIOS, you to run in APIC mode. Advanced BIOS Features BIOS Setup... Protection This function protects the BIOS from accidental corruption by unauthorized users or computer viruses. Setting to [Off] will skip some check items. Boot Up Num-Lock LED This setting is when you want to compliance with a Flash utility. Setting to protect it against viruses. You should immediately...

User Guide
Page 52
Boot From Other Device Setting the option to [Yes] allows the system to try to boot from other device. if the system fails to boot from the 1st/ 2nd/ 3rd boot device. 3-11 BIOS Setup Boot Sequence Press to enter the sub-menu and the following screen appears: 1st/ 2nd/ 3rd Boot Device The items allow you to set the first/ second/ third boot device where BIOS attempts to load the disk operating system.
Boot From Other Device Setting the option to [Yes] allows the system to try to boot from other device. if the system fails to boot from the 1st/ 2nd/ 3rd boot device. 3-11 BIOS Setup Boot Sequence Press to enter the sub-menu and the following screen appears: 1st/ 2nd/ 3rd Boot Device The items allow you to set the first/ second/ third boot device where BIOS attempts to load the disk operating system.

User Guide
Page 53
... decide whether to invoke the Option ROM of the LAN controller. Onboard E-SATA Option ROM This item is used to decide whether to invoke the Boot ROM of the E-SATA controller. On-Chip ATA Devices Press to enable/disable the onboard USB controller. Onboard IEEE1394 Controller This item allows you need...
... decide whether to invoke the Option ROM of the LAN controller. Onboard E-SATA Option ROM This item is used to decide whether to invoke the Boot ROM of the E-SATA controller. On-Chip ATA Devices Press to enable/disable the onboard USB controller. Onboard IEEE1394 Controller This item allows you need...

User Guide
Page 58
... saving modes through any event on a scheduled time/date. 3-17 Resume by RTC Alarm The field is used to enable or disable the feature of booting up the system on PCIE device.
... saving modes through any event on a scheduled time/date. 3-17 Resume by RTC Alarm The field is used to enable or disable the feature of booting up the system on PCIE device.

User Guide
Page 67
...failed and restore the default settings automatically. Any risk or damge resulting from failed overclocking... W arning !!! Please refer to continue... This motherboard supports overclocking greatly. Please press any key to "chapter 2" for more than 10 seconds among the reboot actions. 2. However, please...press any key to the defaults setting. Please refer to the descriptions of overclocking is failed, and the system is restored to boot the system normally when the following message appears on screen. Reboot 1. Clear CMOS - Important 1. Press the Power button to clear...
...failed and restore the default settings automatically. Any risk or damge resulting from failed overclocking... W arning !!! Please refer to continue... This motherboard supports overclocking greatly. Please press any key to "chapter 2" for more than 10 seconds among the reboot actions. 2. However, please...press any key to the defaults setting. Please refer to the descriptions of overclocking is failed, and the system is restored to boot the system normally when the following message appears on screen. Reboot 1. Clear CMOS - Important 1. Press the Power button to clear...

User Guide
Page 69
... W hen you select this function, a message as below will appear on the screen: Type the password, up confirming the password will be disabled. You will boot and you can enter Setup without entering any password.
... W hen you select this function, a message as below will appear on the screen: Type the password, up confirming the password will be disabled. You will boot and you can enter Setup without entering any password.
User Guide
Page 94
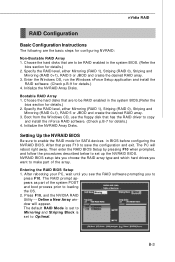
... OS, run the W indows nForce Setup application and install the RAID software. (Check p.B-9 for SATA devices in BIOS before configuring the NVRAID BIOS. Boot from the W indows CD, use the floppy disk that press F10 to save the configuration and exit. After that has the RAID driver to copy... p.B-7 for details.) 4. After rebooting your PC, wait until you see the RAID software prompting you want to make part of the system POST and boot process prior to loading the OS. 2. The RAID prompt appears as part of the array. Initialize the NVRAID Array Disks. Bootable RAID Array 1. Specify...
... OS, run the W indows nForce Setup application and install the RAID software. (Check p.B-9 for SATA devices in BIOS before configuring the NVRAID BIOS. Boot from the W indows CD, use the floppy disk that press F10 to save the configuration and exit. After that has the RAID driver to copy... p.B-7 for details.) 4. After rebooting your PC, wait until you see the RAID software prompting you want to make part of the system POST and boot process prior to loading the OS. 2. The RAID prompt appears as part of the array. Initialize the NVRAID Array Disks. Bootable RAID Array 1. Specify...

User Guide
Page 98
...press Enter. (3) Press S again at the Specify Devices screen, then press Enter. (4) Select "NVIDIA NForce Storage Controller" and then press Enter. Insert the MSI CD into the CD-ROM drive. 2. Click the "Browse CD" on the Setup screen. 3. ing W indows Setup screen appears listing both drivers: B-7... After you complete the RAID BIOS setup, boot from the W indows CD, and the W indows Setup program starts. 2. Copy all the contents in the :\\nVidia \System \C55+MCP51 \RAID to a ...
...press Enter. (3) Press S again at the Specify Devices screen, then press Enter. (4) Select "NVIDIA NForce Storage Controller" and then press Enter. Insert the MSI CD into the CD-ROM drive. 2. Click the "Browse CD" on the Setup screen. 3. ing W indows Setup screen appears listing both drivers: B-7... After you complete the RAID BIOS setup, boot from the W indows CD, and the W indows Setup program starts. 2. Copy all the contents in the :\\nVidia \System \C55+MCP51 \RAID to a ...

User Guide
Page 104
... and not by any array (if one free disk. For example, if you have a system with four hard disks where one disk is used to boot the OS, two hard drives are set up as free is automatic and doesn't require any array, 1. Enter the system BIOS setup and make sure... user interaction. nVidia RAID Setting Up a Spare RAID Disk You can designate a hard drive to be used by any available RAID 1, RAID 0+1 or RAID 5 array. Boot into W indows and run the NVRAIDMAN program. The figure below shows an example of the NVRAIDMAN display if you want to use this feature. The...
... and not by any array (if one free disk. For example, if you have a system with four hard disks where one disk is used to boot the OS, two hard drives are set up as free is automatic and doesn't require any array, 1. Enter the system BIOS setup and make sure... user interaction. nVidia RAID Setting Up a Spare RAID Disk You can designate a hard drive to be used by any available RAID 1, RAID 0+1 or RAID 5 array. Boot into W indows and run the NVRAIDMAN program. The figure below shows an example of the NVRAIDMAN display if you want to use this feature. The...

User Guide
Page 105
Boot into W indows and run the NVRAIDMAN program. Enter the system BIOS setup and make sure that the drive that you want to mark as shown ...
Boot into W indows and run the NVRAIDMAN program. Enter the system BIOS setup and make sure that the drive that you want to mark as shown ...

User Guide
Page 108
... capacity must be greater than ) the RAID 1 array. • You can't morph - m >= 2 x n Number of RAID 0+1 disks must back up the data, delete the array, re-boot the PC, and then reconfigure the new array.
... capacity must be greater than ) the RAID 1 array. • You can't morph - m >= 2 x n Number of RAID 0+1 disks must back up the data, delete the array, re-boot the PC, and then reconfigure the new array.


