User Guide
Page 10
Sy stem Assembly 3-1 O ver view ...3-2 Installation Tools 3-2 Installation Screws 3-2 Packing Checklist 3-3 Installation Procedures 3-4 Removing Top Cover 3-4 Installing Hard Disk Driver 3-6 Installing Optical Disk Driver 3-8 Installing PCI Card 3-11 Installing CPU 3-13 Installing CPU Cooler 3-14 Installing Memory Modules 3-15 Restoring Top Cover 3-16 Chapter 4. BIOS Setup 4-1 Entering Setup ...4-2 Control ...
Sy stem Assembly 3-1 O ver view ...3-2 Installation Tools 3-2 Installation Screws 3-2 Packing Checklist 3-3 Installation Procedures 3-4 Removing Top Cover 3-4 Installing Hard Disk Driver 3-6 Installing Optical Disk Driver 3-8 Installing PCI Card 3-11 Installing CPU 3-13 Installing CPU Cooler 3-14 Installing Memory Modules 3-15 Restoring Top Cover 3-16 Chapter 4. BIOS Setup 4-1 Entering Setup ...4-2 Control ...

User Guide
Page 11
...C-2 RAID Configuration C-3 Basic Configuration Instructions C-3 Setting Up the NVRAID BIOS C-3 xi Realtek ALC883 Audio A-1 Installing the Realtek HD Audio Driver A-2 Installation for W indows 2000/XP A-2 Software Configuration A-4 Sound Effect A-5 Mixer ...A-8 Audio I/O ...A-12 Microphone A-16 3D Audio...A-19 Appendix B. Software Setup 5-1 Setting Up ...5-2 Completing the Setup W izard Steps 5-2 Getting Started ...5-4 Opening the Media Center 5-4 Media Center Start Menu Overview 5-5 Play DVD ...5-7 Online Spotlight 5-8 My Videos ...5-9 My Pictures 5-10 My Music ...5-11 More...
...C-2 RAID Configuration C-3 Basic Configuration Instructions C-3 Setting Up the NVRAID BIOS C-3 xi Realtek ALC883 Audio A-1 Installing the Realtek HD Audio Driver A-2 Installation for W indows 2000/XP A-2 Software Configuration A-4 Sound Effect A-5 Mixer ...A-8 Audio I/O ...A-12 Microphone A-16 3D Audio...A-19 Appendix B. Software Setup 5-1 Setting Up ...5-2 Completing the Setup W izard Steps 5-2 Getting Started ...5-4 Opening the Media Center 5-4 Media Center Start Menu Overview 5-5 Play DVD ...5-7 Online Spotlight 5-8 My Videos ...5-9 My Pictures 5-10 My Music ...5-11 More...

User Guide
Page 12
nVidia System Driver D-1 NVIDIA System Driver Installation D-2 NVIDIA System Driver D-2 NVIDIA Utility Installation D-5 xii Installing the RAID Driver (for bootable RAID Array C-7 NVIDIA IDE Driver/ RAID Utility Installation C-9 Installing the NVIDIA RAID Software Under W indows C-9 Initializing and Using the Disk Array C-10 NVRAID Management Utility C-12 Viewing RAID Array Configurations C-...
nVidia System Driver D-1 NVIDIA System Driver Installation D-2 NVIDIA System Driver D-2 NVIDIA Utility Installation D-5 xii Installing the RAID Driver (for bootable RAID Array C-7 NVIDIA IDE Driver/ RAID Utility Installation C-9 Installing the NVIDIA RAID Software Under W indows C-9 Initializing and Using the Disk Array C-10 NVRAID Management Utility C-12 Viewing RAID Array Configurations C-...

User Guide
Page 19
Getting Started System Picture CPU Expansion slots M em ory Back Panel Socket Power Supply Driver Bay x1 (for ODD) Front Panel Driver Bay x2 (for HDD) 1-7
Getting Started System Picture CPU Expansion slots M em ory Back Panel Socket Power Supply Driver Bay x1 (for ODD) Front Panel Driver Bay x2 (for HDD) 1-7

User Guide
Page 48
MS-6421 Media Center 2. Follow the direction arrow to take out the HDD holder carefully with a screwdriver. Installing Hard Disk Driver (HDD) Unlock the two screws (screw type 1) on the front panel with hands. 12 Always keep your fingers away from these two sharp edges of the HDD holder or you maImy gpeot rhtuarnt etasily. 1 2 3-6
MS-6421 Media Center 2. Follow the direction arrow to take out the HDD holder carefully with a screwdriver. Installing Hard Disk Driver (HDD) Unlock the two screws (screw type 1) on the front panel with hands. 12 Always keep your fingers away from these two sharp edges of the HDD holder or you maImy gpeot rhtuarnt etasily. 1 2 3-6

User Guide
Page 50
ing the pinheadeIrmonptohertbaonatrd because the damages can be made easily. 3-8 Installing Optical Disk Driver (ODD) Unlock the two screws (screw type 1) on the front panel with a screwdriver. 12 Follow the direction arrow to push the ODD tray forward carefully with hands. Insert the ODD interface board into the slim slot-in ODD and please avoid touch- MS-6421 Media Center 3.
ing the pinheadeIrmonptohertbaonatrd because the damages can be made easily. 3-8 Installing Optical Disk Driver (ODD) Unlock the two screws (screw type 1) on the front panel with a screwdriver. 12 Follow the direction arrow to push the ODD tray forward carefully with hands. Insert the ODD interface board into the slim slot-in ODD and please avoid touch- MS-6421 Media Center 3.

User Guide
Page 71
... the boot process. Integrated Peripherals BIOS Setup USB Controller Select [Enabled] if your system contains a Universal Serial Bus (USB) controller and you have any USB 1.1/2.0 driver installed, such as DOS and SCO Unix. GigaBit LAN Option ROM The item enables or disables the GigaBit LAN Option ROM during bootup.
... the boot process. Integrated Peripherals BIOS Setup USB Controller Select [Enabled] if your system contains a Universal Serial Bus (USB) controller and you have any USB 1.1/2.0 driver installed, such as DOS and SCO Unix. GigaBit LAN Option ROM The item enables or disables the GigaBit LAN Option ROM during bootup.

User Guide
Page 108
...drive. The following illustrations are based on W indows® XP environment and could look slightly different if you install the drivers in this section may be slightly different from the latest software utility and shall be held for reference only. Click here ...utility is under continuous update to enhance audio applications. A-2 channel or 7.1+2 channel audio operations. Follow the procedures described below to install the drivers for different operating systems. Installation for Realtek ALC883 codec to function properly before you can get access to 2-, 4-, 6-, 8- MS-6421...
...drive. The following illustrations are based on W indows® XP environment and could look slightly different if you install the drivers in this section may be slightly different from the latest software utility and shall be held for reference only. Click here ...utility is under continuous update to enhance audio applications. A-2 channel or 7.1+2 channel audio operations. Follow the procedures described below to install the drivers for different operating systems. Installation for Realtek ALC883 codec to function properly before you can get access to 2-, 4-, 6-, 8- MS-6421...

User Guide
Page 109
Click Next to restart the system. Click Finish to install the Realtek High Definition Audio Driver. 4. Click here Select this option Click here A-3 Realtek ALC883 Audio 3.
Click Next to restart the system. Click Finish to install the Realtek High Definition Audio Driver. 4. Click here Select this option Click here A-3 Realtek ALC883 Audio 3.

User Guide
Page 110
channel audio feature now. It is also available to activate the HD Audio Configuration. Click the audio icon from the system tray at the lower-right corner of the screen to enable the audio driver by clicking the Azalia HD Sound Effect M anager from the Control Panel. Double click A-4 MS-6421 MediaLive Software Configuration After installing the audio driver, you are able to use the 2-, 4-, 6- or 8-
channel audio feature now. It is also available to activate the HD Audio Configuration. Click the audio icon from the system tray at the lower-right corner of the screen to enable the audio driver by clicking the Azalia HD Sound Effect M anager from the Control Panel. Double click A-4 MS-6421 MediaLive Software Configuration After installing the audio driver, you are able to use the 2-, 4-, 6- or 8-
User Guide
Page 124
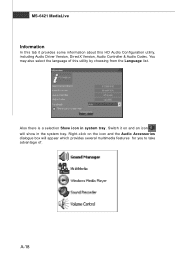
Also there is a selection Show icon in the system tray. Right-click on and an icon will appear which provides several multimedia features for you to take advantage of this HD Audio Configuration utility, including Audio Driver Version, DirectX Version, Audio Controller & Audio Codec. Switch it provides some information about this utility by choosing from the Language list. MS-6421 MediaLive Information In this tab it on the icon and the Audio Accessories dialogue box will show in system tray. You may also select the language of . A-18
Also there is a selection Show icon in the system tray. Right-click on and an icon will appear which provides several multimedia features for you to take advantage of this HD Audio Configuration utility, including Audio Driver Version, DirectX Version, Audio Controller & Audio Codec. Switch it provides some information about this utility by choosing from the Language list. MS-6421 MediaLive Information In this tab it on the icon and the Audio Accessories dialogue box will show in system tray. You may also select the language of . A-18

User Guide
Page 135
... the SATA 0/ 1 Primary/ Secondary Channel in On-Chip ATA Device of the array. The PC will appear. Choose the hard disks that has the RAID driver to make part of Integrated Peripherals in BIOS.) 2. Specify the RAID level, either Mirroring (RAID 1), Striping (RAID 0), Striping and Mirroring (RAID 0+1), RAID 5 or JBOD and...
... the SATA 0/ 1 Primary/ Secondary Channel in On-Chip ATA Device of the array. The PC will appear. Choose the hard disks that has the RAID driver to make part of Integrated Peripherals in BIOS.) 2. Specify the RAID level, either Mirroring (RAID 1), Striping (RAID 0), Striping and Mirroring (RAID 0+1), RAID 5 or JBOD and...

User Guide
Page 138
MS-6421 Media Center Completing the RAID BIOS Setup 1. Press Y if you want to wipe out all the data from the RAID BIOS, the next step is to configure and load NVRAID drivers under W indows, as explained in "Installing the NVIDIA RAID Software Under Windows" on C-9. You must choose Yes if the drives...
MS-6421 Media Center Completing the RAID BIOS Setup 1. Press Y if you want to wipe out all the data from the RAID BIOS, the next step is to configure and load NVRAID drivers under W indows, as explained in "Installing the NVIDIA RAID Software Under Windows" on C-9. You must choose Yes if the drives...
User Guide
Page 139
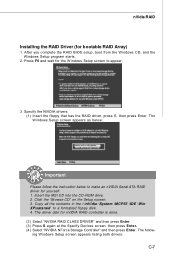
... that has the RAID driver, press S, then press Enter. The driver disk for the W indows Setup screen to a formatted floppy disk. 4. nVidia RAID Installing the RAID Driver (for yourself. 1. Click the "Browse CD" on the Setup screen. 3. The W indows Setup screen appears as below: Important Please follow - Insert the MSI CD into the CD...
... that has the RAID driver, press S, then press Enter. The driver disk for the W indows Setup screen to a formatted floppy disk. 4. nVidia RAID Installing the RAID Driver (for yourself. 1. Click the "Browse CD" on the Setup screen. 3. The W indows Setup screen appears as below: Important Please follow - Insert the MSI CD into the CD...

User Guide
Page 140
... installed, it is completed, then take out the floppy. 5. Follow the instructions on how to continue with W indows XP Installation. MS-6421 Media Center 4. Be sure to leave the floppy disk inserted in the floppy drive until the blue screen portion of W indows XP installation is recommended ...that you add a new hard drive to a RAID array, the RAID driver will not have to be installed under Windows once for that , the driver will have to be installed. After that hard drive. Important Each time you install the the RAID management tool...
... installed, it is completed, then take out the floppy. 5. Follow the instructions on how to continue with W indows XP Installation. MS-6421 Media Center 4. Be sure to leave the floppy disk inserted in the floppy drive until the blue screen portion of W indows XP installation is recommended ...that you add a new hard drive to a RAID array, the RAID driver will not have to be installed under Windows once for that , the driver will have to be installed. After that hard drive. Important Each time you install the the RAID management tool...

User Guide
Page 141
... RAID Software Under Windows (for Non-bootable RAID Array) The existing W indows IDE Parallel ATA driver (as well as the Serial ATA driver if SATA is enabled) must install the NVIDIA IDE driver in order to enable NVIDIA RAID. C-9 If you want to reboot the PC. 5.After the...you do not install the NVIDIA IDE driver, NVIDIA RAID will upgrade the W indows IDE driver and install the RAID software. 1.Start the NVIDIA nForce Drivers installation program to open the NVIDIA W indows nForce Drivers page. 2.Select the modules that the "NVIDIA IDE Driver" is enabled). This section describes ...
... RAID Software Under Windows (for Non-bootable RAID Array) The existing W indows IDE Parallel ATA driver (as well as the Serial ATA driver if SATA is enabled) must install the NVIDIA IDE driver in order to enable NVIDIA RAID. C-9 If you want to reboot the PC. 5.After the...you do not install the NVIDIA IDE driver, NVIDIA RAID will upgrade the W indows IDE driver and install the RAID software. 1.Start the NVIDIA nForce Drivers installation program to open the NVIDIA W indows nForce Drivers page. 2.Select the modules that the "NVIDIA IDE Driver" is enabled). This section describes ...

User Guide
Page 159
Installation of nVidia System Driver Appendix D nVidia System Driver MSI provides a setup CD along with your mainboard, which contains the required drivers for your system, and many other useful and powerful utility to bring you the best experience for your office professional working and for your home leisure entertainment. D-1
Installation of nVidia System Driver Appendix D nVidia System Driver MSI provides a setup CD along with your mainboard, which contains the required drivers for your system, and many other useful and powerful utility to bring you the best experience for your office professional working and for your home leisure entertainment. D-1

User Guide
Page 160
D-2 MS-6421 MediaLive nVidia System Driver Installation Click on the NVIDIA C51/M CP51 System Driver button to install the NVIDIA System Drivers for W indows 2000 and W indows XP operating system. Then the welcome dialogue will display. Please follow the following step to continue. Click Next to install the driver correctly. 1. NVIDIA System Driver This driver is only available for your W indows OS. Click on the Driver tab and the screen below will display.
D-2 MS-6421 MediaLive nVidia System Driver Installation Click on the NVIDIA C51/M CP51 System Driver button to install the NVIDIA System Drivers for W indows 2000 and W indows XP operating system. Then the welcome dialogue will display. Please follow the following step to continue. Click Next to install the driver correctly. 1. NVIDIA System Driver This driver is only available for your W indows OS. Click on the Driver tab and the screen below will display.

User Guide
Page 161
Click Next to be selected to continue. All the components shown here will start installing the selected driver components automatically. 4. The system will be installed by default. Then click Next. 3. Then the following screen displays the available components to install. Installation of nVidia System Driver 2. D-3 Then the following screen displays the information for the NVIDIA IDE SW Driver installation.
Click Next to be selected to continue. All the components shown here will start installing the selected driver components automatically. 4. The system will be installed by default. Then click Next. 3. Then the following screen displays the available components to install. Installation of nVidia System Driver 2. D-3 Then the following screen displays the information for the NVIDIA IDE SW Driver installation.

User Guide
Page 162
Important The installation of NVIDIA IDE SW Driver. Insert the MSI CD into the CD-ROM drive. 2. Please follow the instruction below to make a software firewall CD for software firewall CD is done. 6. Click Yes to ... screen and use "Explorer" to continue. The following screen displays the installation of NVIDIA Firewall and ForceW are Network Access Manager. However, it later. The driver disk for yourself. 1. MS-6421 MediaLive 5. Then the following screen indicates that you do not install this component. It is complete. In the \\nVidia\Firewall...
Important The installation of NVIDIA IDE SW Driver. Insert the MSI CD into the CD-ROM drive. 2. Please follow the instruction below to make a software firewall CD for software firewall CD is done. 6. Click Yes to ... screen and use "Explorer" to continue. The following screen displays the installation of NVIDIA Firewall and ForceW are Network Access Manager. However, it later. The driver disk for yourself. 1. MS-6421 MediaLive 5. Then the following screen indicates that you do not install this component. It is complete. In the \\nVidia\Firewall...