User Guide
Page 10
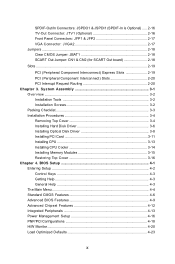
... Connector: JTV1 (Optional 2-16 Front Panel Connectors: JFP1 & JFP2 2-17 VGA Connector: JVGA2 2-17 Jumpers ...2-18 Clear CMOS Jumper: JBAT1 2-18 SCART Out Jumper: CN1 & CN2 (for SCART Out board 2-18 Slots ...2-19 PCI (Peripheral Component Interconnect) Express Slots 2-19 PCI (Peripheral Component Interconnect) Slots 2-20 PCI Interrupt Request Routing 2-20 Chapter 3. Sy stem Assembly 3-1 O ver view ...3-2 Installation Tools 3-2 Installation Screws 3-2 Packing Checklist 3-3 Installation Procedures 3-4 Removing Top Cover 3-4 Installing Hard Disk Driver 3-6 Installing Optical Disk...
... Connector: JTV1 (Optional 2-16 Front Panel Connectors: JFP1 & JFP2 2-17 VGA Connector: JVGA2 2-17 Jumpers ...2-18 Clear CMOS Jumper: JBAT1 2-18 SCART Out Jumper: CN1 & CN2 (for SCART Out board 2-18 Slots ...2-19 PCI (Peripheral Component Interconnect) Express Slots 2-19 PCI (Peripheral Component Interconnect) Slots 2-20 PCI Interrupt Request Routing 2-20 Chapter 3. Sy stem Assembly 3-1 O ver view ...3-2 Installation Tools 3-2 Installation Screws 3-2 Packing Checklist 3-3 Installation Procedures 3-4 Removing Top Cover 3-4 Installing Hard Disk Driver 3-6 Installing Optical Disk...

User Guide
Page 11
... Opening the Media Center 5-4 Media Center Start Menu Overview 5-5 Play DVD ...5-7 Online Spotlight 5-8 My Videos ...5-9 My Pictures 5-10 My Music ...5-11 More Programs 5-12 Settings ...5-13 My TV ...5-16 Radio ...5-17 Remote Control 5-18 Media Center Remote Control Buttons Overview 5-19 Installing the Remote Control Batteries 5-23 Appendix A. nVidia RAID C-1 Introduction ...C-2 System Requirement C-2 RAID Arrays C-2 Summary of RAID Configurations C-2 RAID Configuration C-3 Basic Configuration Instructions C-3 Setting Up the NVRAID BIOS C-3 xi TV-Out Function B-1 Display Setup...
... Opening the Media Center 5-4 Media Center Start Menu Overview 5-5 Play DVD ...5-7 Online Spotlight 5-8 My Videos ...5-9 My Pictures 5-10 My Music ...5-11 More Programs 5-12 Settings ...5-13 My TV ...5-16 Radio ...5-17 Remote Control 5-18 Media Center Remote Control Buttons Overview 5-19 Installing the Remote Control Batteries 5-23 Appendix A. nVidia RAID C-1 Introduction ...C-2 System Requirement C-2 RAID Arrays C-2 Summary of RAID Configurations C-2 RAID Configuration C-3 Basic Configuration Instructions C-3 Setting Up the NVRAID BIOS C-3 xi TV-Out Function B-1 Display Setup...

User Guide
Page 12
nVidia System Driver D-1 NVIDIA System Driver Installation D-2 NVIDIA System Driver D-2 NVIDIA Utility Installation D-5 xii Installing the RAID Driver (for bootable RAID Array C-7 NVIDIA IDE Driver/ RAID Utility Installation C-9 Installing the NVIDIA RAID Software Under W indows C-9 Initializing and Using the Disk Array C-10 NVRAID Management Utility C-12 Viewing RAID Array Configurations C-12 Setting Up a Spare RAID Disk C-13 Morphing From One RAID Array to Another C-17 Hot Plug Array C-18 Initializing a RAID Array C-19 Rebuilding a RAID Array C-22 Synchronizing a RAID Array ...
nVidia System Driver D-1 NVIDIA System Driver Installation D-2 NVIDIA System Driver D-2 NVIDIA Utility Installation D-5 xii Installing the RAID Driver (for bootable RAID Array C-7 NVIDIA IDE Driver/ RAID Utility Installation C-9 Installing the NVIDIA RAID Software Under W indows C-9 Initializing and Using the Disk Array C-10 NVRAID Management Utility C-12 Viewing RAID Array Configurations C-12 Setting Up a Spare RAID Disk C-13 Morphing From One RAID Array to Another C-17 Hot Plug Array C-18 Initializing a RAID Array C-19 Rebuilding a RAID Array C-22 Synchronizing a RAID Array ...

User Guide
Page 14
...® ALC883 - MS-6421 Media Center Mainboard Specifications Processor Support - Supports 10/100/1000 Fast Ethernet LAN by nVidia® MCP51 - Supports 2 IDE ports by Vitesse® VSC8601 IEEE 1394 - Supports Ultra DMA 66/100/133 mode - Supports AMD® Athlon64 X2 / Athlon64 processors in the socket AM2 (940-pin) package. (For the latest information about CPU, please visit http://www.msi.com. Supports storage and data transfers...
...® ALC883 - MS-6421 Media Center Mainboard Specifications Processor Support - Supports 10/100/1000 Fast Ethernet LAN by nVidia® MCP51 - Supports 2 IDE ports by Vitesse® VSC8601 IEEE 1394 - Supports Ultra DMA 66/100/133 mode - Supports AMD® Athlon64 X2 / Athlon64 processors in the socket AM2 (940-pin) package. (For the latest information about CPU, please visit http://www.msi.com. Supports storage and data transfers...

User Guide
Page 32
...: Pb (not all modes support DVD playback due to content protection ) Audio RCA Out 8 RCA jacks. (Audio 7.1 Pre-Out) 1. CENTER / SUBWOOFER VGA Out 15-pin D-sub 2-10 MS-6421 Media Center Back Panel The following illustration shows the Media Live back panel: Item Connector Power Switch Power Jack (AC In) Type Left side: On Right side: Off AC 110-240V, 50-60 Hz. Expansion Slot For expansion use only . FRONT 3. REAR SURROUND 4.
...: Pb (not all modes support DVD playback due to content protection ) Audio RCA Out 8 RCA jacks. (Audio 7.1 Pre-Out) 1. CENTER / SUBWOOFER VGA Out 15-pin D-sub 2-10 MS-6421 Media Center Back Panel The following illustration shows the Media Live back panel: Item Connector Power Switch Power Jack (AC In) Type Left side: On Right side: Off AC 110-240V, 50-60 Hz. Expansion Slot For expansion use only . FRONT 3. REAR SURROUND 4.

User Guide
Page 35
Refer to the hard disk documentation supplied by setting its jumper. Hardware Setup Important If you install two hard disks on cable, you must configure the second drive to Slave mode by hard disk vendors for jumper setting in s t ru c t io ns . Serial ATA II Connectors: SATA1~SATA4 SATA1~SATA4 are optional) Serial ATA cable (Blue Colour) Important Take off the Dust Cover and connect to the Hard Disk Devices Connect to 1 hard disk device. (For Media Live, 2 SATA II ports can connect to SATA1~SATA4 Please do...
Refer to the hard disk documentation supplied by setting its jumper. Hardware Setup Important If you install two hard disks on cable, you must configure the second drive to Slave mode by hard disk vendors for jumper setting in s t ru c t io ns . Serial ATA II Connectors: SATA1~SATA4 SATA1~SATA4 are optional) Serial ATA cable (Blue Colour) Important Take off the Dust Cover and connect to the Hard Disk Devices Connect to 1 hard disk device. (For Media Live, 2 SATA II ports can connect to SATA1~SATA4 Please do...

User Guide
Page 40
... Media Center Jumpers The motherboard provides the following jumpers for SCART Out board) The CN1 Jumper determines the aspect ratio of system configuration. W ith the CMOS RAM, the system can clear CMOS by shorting 2-3 pin while the system is a CMOS RAM onboard that has a power supply from external battery to 1-2 pin position. You can display external composite video source by shorting 1-2 pin and display external RGB video source by shorting 2-3 pin. Avoid clearing the CMOS while the system is turned on ; Clear CMOS Jumper...
... Media Center Jumpers The motherboard provides the following jumpers for SCART Out board) The CN1 Jumper determines the aspect ratio of system configuration. W ith the CMOS RAM, the system can clear CMOS by shorting 2-3 pin while the system is a CMOS RAM onboard that has a power supply from external battery to 1-2 pin position. You can display external composite video source by shorting 1-2 pin and display external RGB video source by shorting 2-3 pin. Avoid clearing the CMOS while the system is turned on ; Clear CMOS Jumper...

User Guide
Page 44
... jumpers. Pliers, can be used as an auxiliary tool to connect some connectors or cables. Rubber gloves, can be better. Forceps, can prevent yourself from being incised and suffering the static charge. In this chapter we'll show you how to install Optical Disk Drive(ODD), Hard Disk Drive(HDD), PCI Card, CPU, CPU Cooler and Memory Modules. Installation Screws Two types of the barebone include Power Supply and 8 other cards. MS-6421 Media Center...
... jumpers. Pliers, can be used as an auxiliary tool to connect some connectors or cables. Rubber gloves, can be better. Forceps, can prevent yourself from being incised and suffering the static charge. In this chapter we'll show you how to install Optical Disk Drive(ODD), Hard Disk Drive(HDD), PCI Card, CPU, CPU Cooler and Memory Modules. Installation Screws Two types of the barebone include Power Supply and 8 other cards. MS-6421 Media Center...

User Guide
Page 65
.... [Access Mode] The settings are : [Not Installed], [Auto], [CD/DVD] or [ARMD]. Available setting options are CHS, LBA, Large, Auto. [Capacity] The formatted size of the storage device. [Cylinder] Number of cylinders. [Head] Number of heads. [Precomp] W rite precompensation. [Landing Zone] Cylinder location of the landing zone. [Sector] Number of your own drive type manually.If you to predict hard disk failure. This allows you to select the hard disk type...
.... [Access Mode] The settings are : [Not Installed], [Auto], [CD/DVD] or [ARMD]. Available setting options are CHS, LBA, Large, Auto. [Capacity] The formatted size of the storage device. [Cylinder] Number of cylinders. [Head] Number of heads. [Precomp] W rite precompensation. [Landing Zone] Cylinder location of the landing zone. [Sector] Number of your own drive type manually.If you to predict hard disk failure. This allows you to select the hard disk type...

User Guide
Page 72
... ATA Devices Press to enter the sub-menu: PCI IDE BusM aster Set this option to [Enabled] to disable/enable the High Definition Audio interface integrated in southbridge. The field is the codename of "High Definition Audio." MS-6421 Media Center Azalia Audio Azalia is optional. Serial-ATA 0/1 This allows you to enable or disable onchip Serial-ATA controller. Onchip RAID Controller This allows you to enable or disable onchip IDE RAID controller. This setting allows users to...
... ATA Devices Press to enter the sub-menu: PCI IDE BusM aster Set this option to [Enabled] to disable/enable the High Definition Audio interface integrated in southbridge. The field is the codename of "High Definition Audio." MS-6421 Media Center Azalia Audio Azalia is optional. Serial-ATA 0/1 This allows you to enable or disable onchip Serial-ATA controller. Onchip RAID Controller This allows you to enable or disable onchip IDE RAID controller. This setting allows users to...

User Guide
Page 75
... of booting up the system on state. [Last State] Restores the system to [Enabled], this setting allows your system will reboot after a power failure or interrupt occurs. Setting options: [Disabled], [Enabled]. Settings are : [Power Off] Leaves the computer in the power off . Resume By PCIE Device W hen setting to [Enabled], this setting allows your system to be awakened from the power saving modes through any event on PME (Power Management Event). BIOS Setup Power Button Function...
... of booting up the system on state. [Last State] Restores the system to [Enabled], this setting allows your system will reboot after a power failure or interrupt occurs. Setting options: [Disabled], [Enabled]. Settings are : [Power Off] Leaves the computer in the power off . Resume By PCIE Device W hen setting to [Enabled], this setting allows your system to be awakened from the power saving modes through any event on PME (Power Management Event). BIOS Setup Power Button Function...

User Guide
Page 77
... from the available DMAs passed to devices that are : [PCI Device] For Plug & Play compatible devices designed for PCI bus architecture. [ Res er ved ] The IRQ will enter the sub-menu of device using . Settings are configurable by assigning an [ISA/EISA] setting to enter the sub-menu: DM A Channel [0-7] These items specify the bus that the system DMA (Direct Memory Access) channel is determined by reading...
... from the available DMAs passed to devices that are : [PCI Device] For Plug & Play compatible devices designed for PCI bus architecture. [ Res er ved ] The IRQ will enter the sub-menu of device using . Settings are configurable by assigning an [ISA/EISA] setting to enter the sub-menu: DM A Channel [0-7] These items specify the bus that the system DMA (Direct Memory Access) channel is determined by reading...

User Guide
Page 82
...-6421 Media Center BIOS Setting Password W hen you select this function, a message as below will boot and you can enter Setup without entering any password. To clear a set password, just press when you try to enter Setup. Retype the password and press . W hen a password has been set password from CMOS memory. A message will show up to confirm the password. This prevents an unauthorized person from changing any previously set , you will be prompted to enter...
...-6421 Media Center BIOS Setting Password W hen you select this function, a message as below will boot and you can enter Setup without entering any password. To clear a set password, just press when you try to enter Setup. Retype the password and press . W hen a password has been set password from CMOS memory. A message will show up to confirm the password. This prevents an unauthorized person from changing any previously set , you will be prompted to enter...
User Guide
Page 84
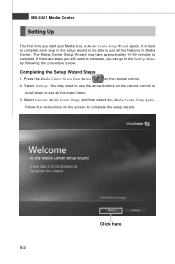
... to the Settings Menu by following the procedure below: Completing the Setup Wizard Steps 1. The Media Center Setup W izard may need to use the arrow buttons on the remote control to scroll down to see all the features in the setup wizard to be able to complete, you start your Media Live, a Media Center Setup Wizard opens. Select Settings. Follow the instructions on the remote control. 2. Select General, Media Center Setup, and then select Run Media Center Setup Again. If...
... to the Settings Menu by following the procedure below: Completing the Setup Wizard Steps 1. The Media Center Setup W izard may need to use the arrow buttons on the remote control to scroll down to see all the features in the setup wizard to be able to complete, you start your Media Live, a Media Center Setup Wizard opens. Select Settings. Follow the instructions on the remote control. 2. Select General, Media Center Setup, and then select Run Media Center Setup Again. If...

User Guide
Page 85
... receiver or a cable box, the setup wizard will make your remote control to work with and Internet Service Provider (ISP) to have and test them . Important You can change the Media Center's settings in the Media Center Setup Wizard: Check for the Internet connection An Internet connection allows your Media Center to update and download the TV Program Guide and to display the information of your Media Center receive the TV signal and TV Program Guide correctly. Software Setup Listed below are...
... receiver or a cable box, the setup wizard will make your remote control to work with and Internet Service Provider (ISP) to have and test them . Important You can change the Media Center's settings in the Media Center Setup Wizard: Check for the Internet connection An Internet connection allows your Media Center to update and download the TV Program Guide and to display the information of your Media Center receive the TV signal and TV Program Guide correctly. Software Setup Listed below are...

User Guide
Page 86
...-6421 Media Center Getting Started To make full use of its features, complete the following items before getting started. Or, 2. The remote control has two AA 1.5V alkaline batteries installed. Opening the Media Center 1. Click here 5-4 The Media Live is properly connected to all of Media Center and to ensure access to your TV signal source. Press the Media Center Green Start Button on the taskbar, and then click Media Center. The Media Live has a properly configured and working Internet connection.
...-6421 Media Center Getting Started To make full use of its features, complete the following items before getting started. Or, 2. The remote control has two AA 1.5V alkaline batteries installed. Opening the Media Center 1. Click here 5-4 The Media Live is properly connected to all of Media Center and to ensure access to your TV signal source. Press the Media Center Green Start Button on the taskbar, and then click Media Center. The Media Live has a properly configured and working Internet connection.
User Guide
Page 96
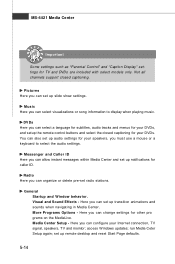
... to select the audio settings. Media Center Setup - Here you can configure your DVDs. run Media Ceter Setup again; MS-6421 Media Center Important Some settings such as "Parental Control" and "Caption Display" settings for caller ID. More Programs Options - Here you can change settings for your Internet connection, TV signal, speakers, TV and mointor; Radio Here you can organize or delete pre-set up remote desktop and reset Start Page defaults. 5-14 Visual and Sound Effects - Messenger and...
... to select the audio settings. Media Center Setup - Here you can configure your DVDs. run Media Ceter Setup again; MS-6421 Media Center Important Some settings such as "Parental Control" and "Caption Display" settings for caller ID. More Programs Options - Here you can change settings for your Internet connection, TV signal, speakers, TV and mointor; Radio Here you can organize or delete pre-set up remote desktop and reset Start Page defaults. 5-14 Visual and Sound Effects - Messenger and...

User Guide
Page 127
Realtek ALC883 Audio n 6-Channel Mode for 6-Speaker Output 3 1 5 7 2 4 8 6 Description: Connect two speakers to back panel's Front-channel Line Out connector, two speakers to the Rear-channel Line out connector and two speakers to the Center/ Subwoofer-channel Line Out c onn ec tor. 6-Channel Analog Audio Output 1 Line Out (Side surround channels) Right. 2 Line Out (Side surround channels) Left. 3 Line Out (Front channels) Right. 4 Line...
Realtek ALC883 Audio n 6-Channel Mode for 6-Speaker Output 3 1 5 7 2 4 8 6 Description: Connect two speakers to back panel's Front-channel Line Out connector, two speakers to the Rear-channel Line out connector and two speakers to the Center/ Subwoofer-channel Line Out c onn ec tor. 6-Channel Analog Audio Output 1 Line Out (Side surround channels) Right. 2 Line Out (Side surround channels) Left. 3 Line Out (Front channels) Right. 4 Line...

User Guide
Page 135
... be RAID enabled in the system BIOS. (To enable the SATA 0/ 1 Primary/ Secondary Channel in On-Chip ATA Devices of Integrated Peripherals in BIOS.) 2. NVRAID BIOS setup lets you choose the RAID array type and which hard drives you to loading the OS. 2. Press F10, and the NVIDIA RAID Utility --- C-9 for configuring NVRAID: Non-Bootable RAID Array 1. Entering the RAID BIOS Setup 1. C-3 After rebooting your PC, wait until you see the RAID software prompting...
... be RAID enabled in the system BIOS. (To enable the SATA 0/ 1 Primary/ Secondary Channel in On-Chip ATA Devices of Integrated Peripherals in BIOS.) 2. NVRAID BIOS setup lets you choose the RAID array type and which hard drives you to loading the OS. 2. Press F10, and the NVIDIA RAID Utility --- C-9 for configuring NVRAID: Non-Bootable RAID Array 1. Entering the RAID BIOS Setup 1. C-3 After rebooting your PC, wait until you see the RAID software prompting...
User Guide
Page 139
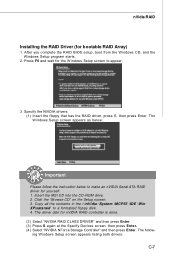
... the RAID BIOS setup, boot from the W indows CD, and the W indows Setup program starts. 2. The W indows Setup screen appears as below: Important Please follow - nVidia RAID Installing the RAID Driver (for yourself. 1. Press F6 and wait for nVIDIA RAID controller is done. (2) Select "NVIDIA RAID CLASS DRIVER" and then press Enter. (3) Press S again at the Specify Devices screen, then press Enter. (4) Select "NVIDIA NForce Storage Controller" and then press Enter. The...
... the RAID BIOS setup, boot from the W indows CD, and the W indows Setup program starts. 2. The W indows Setup screen appears as below: Important Please follow - nVidia RAID Installing the RAID Driver (for yourself. 1. Press F6 and wait for nVIDIA RAID controller is done. (2) Select "NVIDIA RAID CLASS DRIVER" and then press Enter. (3) Press S again at the Specify Devices screen, then press Enter. (4) Select "NVIDIA NForce Storage Controller" and then press Enter. The...


