User Manual
Page 1
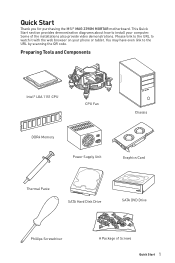
... Paste SATA Hard Disk Drive SATA DVD Drive Phillips Screwdriver A Package of the installations also provide video demonstrations. Quick Start Thank you for purchasing the MSI® MAG Z390M MORTAR motherboard.
... Paste SATA Hard Disk Drive SATA DVD Drive Phillips Screwdriver A Package of the installations also provide video demonstrations. Quick Start Thank you for purchasing the MSI® MAG Z390M MORTAR motherboard.

User Manual
Page 2
...before installation is recommended to wear an electrostatic discharge (ESD) wrist strap when handling the motherboard to user guide. ƒ The motherboard has been dropped and damaged. ƒ The motherboard has obvious sign of breakage. y Before turning on the computer, ensure that all ...components are no loose screws or metal components on the motherboard or anywhere within the computer case. y All cautions and warnings on the PSU, before handling the motherboard. y If any of static electricity by service personnel: ƒ Liquid has penetrated...
...before installation is recommended to wear an electrostatic discharge (ESD) wrist strap when handling the motherboard to user guide. ƒ The motherboard has been dropped and damaged. ƒ The motherboard has obvious sign of breakage. y Before turning on the computer, ensure that all ...components are no loose screws or metal components on the motherboard or anywhere within the computer case. y All cautions and warnings on the PSU, before handling the motherboard. y If any of static electricity by service personnel: ƒ Liquid has penetrated...

User Manual
Page 6
Installing the Motherboard 1 2 3 6 Safety Information
Installing the Motherboard 1 2 3 6 Safety Information

User Manual
Page 12
Contents Quick Start ...1 Preparing Tools and Components 1 Safety Information 2 Installing a Processor 3 Installing DDR4 memory 4 Connecting the Front Panel Header 5 Installing the Motherboard 6 Installing SATA Drives 7 Installing a Graphics Card 8 Connecting Peripheral Devices 9 Connecting the Power Connectors 10 Power On...11 Specifications...14 Package contents 19 Block Diagram ...20 ...
Contents Quick Start ...1 Preparing Tools and Components 1 Safety Information 2 Installing a Processor 3 Installing DDR4 memory 4 Connecting the Front Panel Header 5 Installing the Motherboard 6 Installing SATA Drives 7 Installing a Graphics Card 8 Connecting Peripheral Devices 9 Connecting the Power Connectors 10 Power On...11 Specifications...14 Package contents 19 Block Diagram ...20 ...
User Manual
Page 19
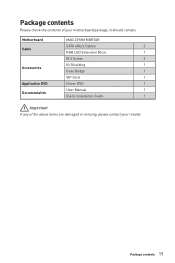
It should contain: Motherboard MAG Z390M MORTAR SATA 6Gb/s Cables 2 Cable RGB LED Extension 80cm 1 M.2 Screw 2 IO Shielding 1 Accessories Case Badge 1 VIP Card 1 Application DVD Driver DVD 1 User Manual 1 Documentation Quick Installation Guide 1 Important If any of your retailer. Package contents Please check the contents of the above items are damaged or missing, please contact your motherboard package. Package contents 19
It should contain: Motherboard MAG Z390M MORTAR SATA 6Gb/s Cables 2 Cable RGB LED Extension 80cm 1 M.2 Screw 2 IO Shielding 1 Accessories Case Badge 1 VIP Card 1 Application DVD Driver DVD 1 User Manual 1 Documentation Quick Installation Guide 1 Important If any of your retailer. Package contents Please check the contents of the above items are damaged or missing, please contact your motherboard package. Package contents 19

User Manual
Page 26
...outlet before booting your system. y Overheating can tolerate overclocking. y This motherboard is necessary to prevent overheating and maintain system stability. MSI will deal with Return Merchandise Authorization (RMA) requests if only the motherboard comes with the CPU before installing or removing the CPU. Always make ...sure that the CPU heatsink has formed a tight seal with the protective cap on the CPU socket. MSI® does not guarantee the damages or...
...outlet before booting your system. y Overheating can tolerate overclocking. y This motherboard is necessary to prevent overheating and maintain system stability. MSI will deal with Return Merchandise Authorization (RMA) requests if only the motherboard comes with the CPU before installing or removing the CPU. Always make ...sure that the CPU heatsink has formed a tight seal with the protective cap on the CPU socket. MSI® does not guarantee the damages or...

User Manual
Page 27
... due to the memory address limitation. Therefore, we recommended that the maximum capacity of installed. y It is recommended to protect the CPU. y Based on the motherboard. to set the memory frequency if you want to operate the memory at the marked or at a lower frequency than the amount of addressable memory...
... due to the memory address limitation. Therefore, we recommended that the maximum capacity of installed. y It is recommended to protect the CPU. y Based on the motherboard. to set the memory frequency if you want to operate the memory at the marked or at a lower frequency than the amount of addressable memory...

User Manual
Page 29
... Switch No Pin 1 JFP2 1 Speaker - 2 3 Buzzer - 4 Buzzer + Speaker + Overview of the cable. Data loss may result during transmission otherwise. Each connector can connect to the motherboard for space saving purposes. y SATA2 port will be connected to one SATA device.
... Switch No Pin 1 JFP2 1 Speaker - 2 3 Buzzer - 4 Buzzer + Speaker + Overview of the cable. Data loss may result during transmission otherwise. Each connector can connect to the motherboard for space saving purposes. y SATA2 port will be connected to one SATA device.

User Manual
Page 30
Loosen the M.2 riser screw from the motherboard. 2. Move and fasten the M.2 riser screw to Install M.2 SSD. M2_1~2: M.2 Slots (Key M) M2_1 M2_2 Important y Intel® RST only supports PCIe M.2 SSD with the supplied M.2 ...
Loosen the M.2 riser screw from the motherboard. 2. Move and fasten the M.2 riser screw to Install M.2 SSD. M2_1~2: M.2 Slots (Key M) M2_1 M2_2 Important y Intel® RST only supports PCIe M.2 SSD with the supplied M.2 ...

User Manual
Page 31
... on the front panel. 2 10 1 9 1 MIC L 2 Ground 3 MIC R 4 NC 5 Head Phone R 6 MIC Detection 7 SENSE_SEND 8 No Pin 9 Head Phone L 10 Head Phone Detection Overview of the motherboard. CPU_PWR1, ATX_PWR1: Power Connectors These connectors allow you to ensure stable operation of Components 31
... on the front panel. 2 10 1 9 1 MIC L 2 Ground 3 MIC R 4 NC 5 Head Phone R 6 MIC Detection 7 SENSE_SEND 8 No Pin 9 Head Phone L 10 Head Phone Detection Overview of the motherboard. CPU_PWR1, ATX_PWR1: Power Connectors These connectors allow you to ensure stable operation of Components 31

User Manual
Page 36
... to save system configuration data. Power off the computer and unplug the power cord 2. indicates DRAM is not detected or fail. 36 Overview of the motherboard. JBAT1: Clear CMOS (Reset BIOS) Jumper There is CMOS memory onboard that is external powered from JBAT1. 4. Plug the power cord and power on the...
... to save system configuration data. Power off the computer and unplug the power cord 2. indicates DRAM is not detected or fail. 36 Overview of the motherboard. JBAT1: Clear CMOS (Reset BIOS) Jumper There is CMOS memory onboard that is external powered from JBAT1. 4. Plug the power cord and power on the...
User Manual
Page 43
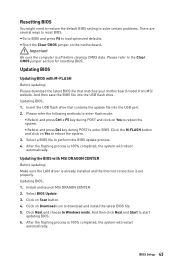
...download the latest BIOS file that contains the update file into the USB flash drive. Install and launch MSI DRAGON CENTER. 2. After the flashing process is off before clearing CMOS data. Resetting BIOS You might ...process. 4. Please refer to download and install the latest BIOS file. 5. Updating BIOS: 1. Click on the motherboard. BIOS Setup 43 After the flashing process is set properly. And then save the BIOS file into the USB ...for resetting BIOS. Insert the USB flash drive that matches your motherboard model from MSI website. Click Next and choose In Windows mode.
...download the latest BIOS file that contains the update file into the USB flash drive. Install and launch MSI DRAGON CENTER. 2. After the flashing process is off before clearing CMOS data. Resetting BIOS You might ...process. 4. Please refer to download and install the latest BIOS file. 5. Updating BIOS: 1. Click on the motherboard. BIOS Setup 43 After the flashing process is set properly. And then save the BIOS file into the USB ...for resetting BIOS. Insert the USB flash drive that matches your motherboard model from MSI website. Click Next and choose In Windows mode.

User Manual
Page 46
... and boot devices. ƒ OC - the following options are available: ƒ SETTINGS - y BIOS menu selection - allows you to the descriptions of installed devices on this motherboard. provides the information of EZ Mode Overview section. y Menu display - Advanced Mode Press Setup Mode switch or F7 function key can switch between EZ Mode...
... and boot devices. ƒ OC - the following options are available: ƒ SETTINGS - y BIOS menu selection - allows you to the descriptions of installed devices on this motherboard. provides the information of EZ Mode Overview section. y Menu display - Advanced Mode Press Setup Mode switch or F7 function key can switch between EZ Mode...

User Manual
Page 47
... Dec. f System Time Sets the system time. f DMI Information Shows system information, desktop Board Information and chassis Information. (Read only). Day of the device and motherboard. Read-only. f System Information Shows detailed system information, including CPU type, BIOS version, and Memory (read only). Press Enter to switch between time elements. The...
... Dec. f System Time Sets the system time. f DMI Information Shows system information, desktop Board Information and chassis Information. (Read only). Day of the device and motherboard. Read-only. f System Information Shows detailed system information, including CPU type, BIOS version, and Memory (read only). Press Enter to switch between time elements. The...
User Manual
Page 63
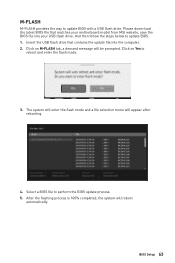
... flashing process is 100% completed, the system will appear after rebooting. 4. Please down-load the latest BIOS file that contains the update file into your motherboard model from MSI website, save the BIOS file into the computer. 2.
... flashing process is 100% completed, the system will appear after rebooting. 4. Please down-load the latest BIOS file that contains the update file into your motherboard model from MSI website, save the BIOS file into the computer. 2.
User Manual
Page 72
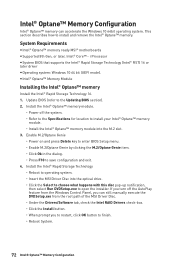
... Click the Select to choose what happens with this disc pop-up notification, then select Run DVDSetup.exe to operating system. ˜ Insert the MSI Driver Disc into the M.2 slot. 3. Install the Intel® Optane™ memory module. ˜ Power off the AutoPlay feature from the... mode). Install the Intel® Rapid Storage Technology ˜ Reboot to open the installer. System Requirements y Intel® Optane™ memory ready MSI® motherboards y Supported 8th Gen, or later, Intel® Core™ - If you to restart, click OK button to save configuration and exit. 4....
... Click the Select to choose what happens with this disc pop-up notification, then select Run DVDSetup.exe to operating system. ˜ Insert the MSI Driver Disc into the M.2 slot. 3. Install the Intel® Optane™ memory module. ˜ Power off the AutoPlay feature from the... mode). Install the Intel® Rapid Storage Technology ˜ Reboot to open the installer. System Requirements y Intel® Optane™ memory ready MSI® motherboards y Supported 8th Gen, or later, Intel® Core™ - If you to restart, click OK button to save configuration and exit. 4....

User Manual
Page 75
...y Use the secondary BIOS to bootup the system (Only for RMA repair, try to audio ports on the motherboard rear IO panel. Troubleshooting Before sending the motherboard for motherboard with Dual BIOS) Troubleshooting 75 y Test with another known working power supply of equal or greater wattage. y ... USB audio devices. There is turned on , but that will cause you to Keep DATA. y Connect the AC power cord to the motherboard? y Check if all customized settings in Windows® Device Manager. y Verify your got similar symptoms as mentioned below. y Make sure the...
...y Use the secondary BIOS to bootup the system (Only for RMA repair, try to audio ports on the motherboard rear IO panel. Troubleshooting Before sending the motherboard for motherboard with Dual BIOS) Troubleshooting 75 y Test with another known working power supply of equal or greater wattage. y ... USB audio devices. There is turned on , but that will cause you to Keep DATA. y Connect the AC power cord to the motherboard? y Check if all customized settings in Windows® Device Manager. y Verify your got similar symptoms as mentioned below. y Make sure the...


