
User Manual
Page 12
...Start ...1 Preparing Tools and Components 1 Safety Information 2 Installing a Processor 3 Installing DDR4 memory 4 Connecting the Front Panel Header 5 Installing the Motherboard 6 Installing SATA Drives 7 Installing a Graphics Card 8 Connecting Peripheral Devices 9 Connecting the Power Connectors 10 Power On...11 Specifications...14 Package contents 19 Block Diagram ...20 Rear I/O Panel...21 LAN Port LED Status Table 21 Audio Ports Configuration 21 Realtek Audio Console 22 Overview of Components 24 CPU Socket ...26 DIMM Slots...27 PCI_E1~3: PCIe Expansion Slots 28 SATA1~4: SATA...
...Start ...1 Preparing Tools and Components 1 Safety Information 2 Installing a Processor 3 Installing DDR4 memory 4 Connecting the Front Panel Header 5 Installing the Motherboard 6 Installing SATA Drives 7 Installing a Graphics Card 8 Connecting Peripheral Devices 9 Connecting the Power Connectors 10 Power On...11 Specifications...14 Package contents 19 Block Diagram ...20 Rear I/O Panel...21 LAN Port LED Status Table 21 Audio Ports Configuration 21 Realtek Audio Console 22 Overview of Components 24 CPU Socket ...26 DIMM Slots...27 PCI_E1~3: PCIe Expansion Slots 28 SATA1~4: SATA...

User Manual
Page 13
JUSB4: USB 3.1 Gen2 Type-C Connector 37 Installing OS, Drivers & Utilities 38 Installing Windows® 10 38 Installing Drivers 38 Installing Utilities 38 MYSTIC LIGHT...39 Device LED effect control screen 39 BIOS Setup ...42 Entering BIOS Setup 42 Resetting BIOS...43 Updating BIOS...43 EZ Mode ...44 Advanced Mode ...46 SETTINGS...47 Advanced...47 Boot...54 Security ...55 Save & Exit...56 OC...57 M-FLASH ...63 OC PROFILE ...64 HARDWARE MONITOR 65 RAID Configuration 66 Enabling Intel® Rapid Storage Technology 66 Creating RAID Volume 67 Removing a RAID Volume 68 Resetting Disks ...
JUSB4: USB 3.1 Gen2 Type-C Connector 37 Installing OS, Drivers & Utilities 38 Installing Windows® 10 38 Installing Drivers 38 Installing Utilities 38 MYSTIC LIGHT...39 Device LED effect control screen 39 BIOS Setup ...42 Entering BIOS Setup 42 Resetting BIOS...43 Updating BIOS...43 EZ Mode ...44 Advanced Mode ...46 SETTINGS...47 Advanced...47 Boot...54 Security ...55 Save & Exit...56 OC...57 M-FLASH ...63 OC PROFILE ...64 HARDWARE MONITOR 65 RAID Configuration 66 Enabling Intel® Rapid Storage Technology 66 Creating RAID Volume 67 Removing a RAID Volume 68 Resetting Disks ...

User Manual
Page 36
... a battery located on the computer. indicates DRAM is not detected or fail. VGA - BOOT - Keep Data (default) Clear CMOS/ Reset BIOS Resetting BIOS to short JBAT1 for about 5-10 seconds. 3. Power off the computer and unplug the power cord 2. Use a jumper cap to default values 1. indicates CPU is not detected or fail. DRAM - Plug the power cord and power on the motherboard to clear the CMOS memory. indicates GPU is external powered from JBAT1. 4. JBAT1: Clear CMOS (Reset BIOS) Jumper There is CMOS memory onboard that...
... a battery located on the computer. indicates DRAM is not detected or fail. VGA - BOOT - Keep Data (default) Clear CMOS/ Reset BIOS Resetting BIOS to short JBAT1 for about 5-10 seconds. 3. Power off the computer and unplug the power cord 2. Use a jumper cap to default values 1. indicates CPU is not detected or fail. DRAM - Plug the power cord and power on the motherboard to clear the CMOS memory. indicates GPU is external powered from JBAT1. 4. JBAT1: Clear CMOS (Reset BIOS) Jumper There is CMOS memory onboard that...

User Manual
Page 38
... Drivers/Software tab. 5. Installing Utilities Before you install utilities, you can still manually execute the DVDSetup.exe from the Windows Control Panel, you must complete drivers installation. 1. Click the Install button in Windows® 10. 2. Press F11 key during the computer POST (Power-On Self Test) to restart. 7. Start up notification, then select Run DVDSetup.exe to install. 4. Restart your computer. Installing OS, Drivers & Utilities Please download and update the latest utilities and drivers at www.msi.com Installing Windows...
... Drivers/Software tab. 5. Installing Utilities Before you install utilities, you can still manually execute the DVDSetup.exe from the Windows Control Panel, you must complete drivers installation. 1. Click the Install button in Windows® 10. 2. Press F11 key during the computer POST (Power-On Self Test) to restart. 7. Start up notification, then select Run DVDSetup.exe to install. 4. Restart your computer. Installing OS, Drivers & Utilities Please download and update the latest utilities and drivers at www.msi.com Installing Windows...
User Manual
Page 43
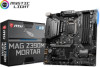
... the LAN driver is already installed and the Internet connection is 100% completed, the system will restart automatically. Insert the USB flash drive that matches your motherboard model from MSI website. Select a BIOS file to load optimized defaults. After the flashing process is set properly. Updating the BIOS with M-FLASH Before updating: Please download the latest BIOS file that contains the update file into the USB flash drive. Select BIOS Update. 3. Click Next and choose In Windows mode. Updating BIOS: 1. Click on Yes to start updating BIOS. 6. Install...
... the LAN driver is already installed and the Internet connection is 100% completed, the system will restart automatically. Insert the USB flash drive that matches your motherboard model from MSI website. Select a BIOS file to load optimized defaults. After the flashing process is set properly. Updating the BIOS with M-FLASH Before updating: Please download the latest BIOS file that contains the update file into the USB flash drive. Select BIOS Update. 3. Click Next and choose In Windows mode. Updating BIOS: 1. Click on Yes to start updating BIOS. 6. Install...

User Manual
Page 44
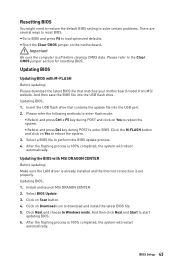
.... The boot priority from high to low is installed. click on this tab or the F12 key to take a screenshot and save it to USB flash drive (FAT/ FAT32 format only). click on it to enable/ disable the X.M.P. (Extreme Memory Profile). allows you to change the boot priority. y System information - you can move the device icons to select the language of BIOS setup. y XMP switch - Switch the...
.... The boot priority from high to low is installed. click on this tab or the F12 key to take a screenshot and save it to USB flash drive (FAT/ FAT32 format only). click on it to enable/ disable the X.M.P. (Extreme Memory Profile). allows you to change the boot priority. y System information - you can move the device icons to select the language of BIOS setup. y XMP switch - Switch the...

User Manual
Page 45
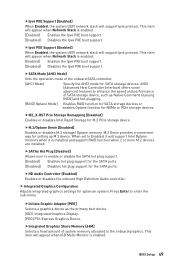
... to display related information. enable or disable the LAN Option ROM, M.2/ Optane Genie, HD audio controller, AHCI/ RAID, CPU Fan Fail Warning Control and BIOS Log Review by percentage. y Hardware Monitor - press the F3 key to select a BIOS menu (e.g. BIOS Setup 45 click on this button to perform M-Flash function that allows you can save and access favorite/ frequently-used / favorite BIOS setting items in one page. ƒ To add a BIOS item to add the frequently-used BIOS setting items. ƒ Default...
... to display related information. enable or disable the LAN Option ROM, M.2/ Optane Genie, HD audio controller, AHCI/ RAID, CPU Fan Fail Warning Control and BIOS Log Review by percentage. y Hardware Monitor - press the F3 key to select a BIOS menu (e.g. BIOS Setup 45 click on this button to perform M-Flash function that allows you can save and access favorite/ frequently-used / favorite BIOS setting items in one page. ƒ To add a BIOS item to add the frequently-used BIOS setting items. ƒ Default...

User Manual
Page 48
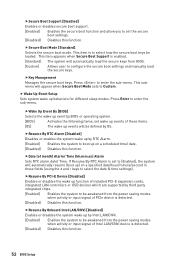
...Enabled] Enables the onboard LAN Boot ROM. [Disabled] Disables the onboard LAN Boot ROM. f ACPI Settings Sets ACPI parameters of PCI interface device. [Options: 32, 64, 96, 128, 160, 192, 224, 248 PCI Bus clocks] fAbove 4G memory/ Crypto Currency mining [Disabled] Enables or disables 64-bit capable devices to be configured automatically by BIOS. [Gen1] Enables PCIe Gen1 support only. [Gen2] Enables PCIe Gen2 support only. [Gen3] Enables PCIe Gen3 support only. Press Enter to enter the sub-menu. f Integrated Peripherals Sets integrated peripherals' parameters, such as LAN, HDD, USB...
...Enabled] Enables the onboard LAN Boot ROM. [Disabled] Disables the onboard LAN Boot ROM. f ACPI Settings Sets ACPI parameters of PCI interface device. [Options: 32, 64, 96, 128, 160, 192, 224, 248 PCI Bus clocks] fAbove 4G memory/ Crypto Currency mining [Disabled] Enables or disables 64-bit capable devices to be configured automatically by BIOS. [Gen1] Enables PCIe Gen1 support only. [Gen2] Enables PCIe Gen2 support only. [Gen3] Enables PCIe Gen3 support only. Press Enter to enter the sub-menu. f Integrated Peripherals Sets integrated peripherals' parameters, such as LAN, HDD, USB...
User Manual
Page 49
...) and hot-plugging. [RAID/ Optane Mode] Enables RAID function for SATA storage devices or enables Optane function for the SATA ports. BIOS Setup 49 fHD Audio Controller [Enabled] Enables or disables the onboard High Definition Audio controller. fIpv6 PXE Support [Enabled] When Enabled, the system UEFI network stack will appear when Network Stack is enabled. [Enabled] Enables the Ipv4 PXE boot support. [Disabled] Disables the Ipv4 PXE boot support. AHCI (Advanced Host Controller Interface) offers some advanced features to the onboard graphics. fSATA Mode [AHCI Mode] Sets the...
...) and hot-plugging. [RAID/ Optane Mode] Enables RAID function for SATA storage devices or enables Optane function for the SATA ports. BIOS Setup 49 fHD Audio Controller [Enabled] Enables or disables the onboard High Definition Audio controller. fIpv6 PXE Support [Enabled] When Enabled, the system UEFI network stack will appear when Network Stack is enabled. [Enabled] Enables the Ipv4 PXE boot support. [Disabled] Disables the Ipv4 PXE boot support. AHCI (Advanced Host Controller Interface) offers some advanced features to the onboard graphics. fSATA Mode [AHCI Mode] Sets the...

User Manual
Page 50
...-Monitor [Disabled] Enables or disables the multi-screen output from integrated graphics and external graphics card. Press Enter to enter the submenu. f USB Configuration Sets the onboard USB controller and device function. f Power Management Setup Sets system Power Management of ErP and AC Power Loss behaviors. Press Enter to enter the sub-menu. fLegacy USB Support [Enabled] Sets Legacy USB function support. [Auto] The system will automatically detect if any USB device is connected and enable the legacy USB support. [Enabled] Enable the USB support under legacy mode. [Disabled...
...-Monitor [Disabled] Enables or disables the multi-screen output from integrated graphics and external graphics card. Press Enter to enter the submenu. f USB Configuration Sets the onboard USB controller and device function. f Power Management Setup Sets system Power Management of ErP and AC Power Loss behaviors. Press Enter to enter the sub-menu. fLegacy USB Support [Enabled] Sets Legacy USB function support. [Auto] The system will automatically detect if any USB device is connected and enable the legacy USB support. [Enabled] Enable the USB support under legacy mode. [Disabled...
User Manual
Page 51
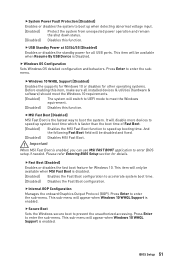
... is enabled, you can use MSI FAST BOOT application to enter the sub-menu. This sub-menu will appear when Windows 10 WHQL Support is enabled. f Windows OS Configuration Sets Windows OS detailed configuration and behaviors. Please refer Entering BIOS Setup section for Windows 10. Press Enter to enter BIOS setup if needed. This sub-menu will appear when Windows 10 WHQL Support is enabled. It will switch to UEFI mode to accelerate system boot time. [Disabled] Disables the Fast Boot configuration. Important When MSI Fast Boot...
... is enabled, you can use MSI FAST BOOT application to enter the sub-menu. This sub-menu will appear when Windows 10 WHQL Support is enabled. f Windows OS Configuration Sets Windows OS detailed configuration and behaviors. Please refer Entering BIOS Setup section for Windows 10. Press Enter to enter BIOS setup if needed. This sub-menu will appear when Windows 10 WHQL Support is enabled. It will switch to UEFI mode to accelerate system boot time. [Disabled] Disables the Fast Boot configuration. Important When MSI Fast Boot...
User Manual
Page 52
... of installed PCI-E expansion cards, integrated LAN controllers or USB devices which are supported by third party integrated chips. [Enabled] Enables the system to be defined by BIOS or operating system. [BIOS] Activates the following items, set wake up events of these fields (using the + and - fResume By PCI-E Device [Disabled] Enables or disables the wake up behaviors for different sleep modes. If Resume By RTC Alarm is detected. [Disabled] Disables this function. 52 BIOS Setup keys to enter...
... of installed PCI-E expansion cards, integrated LAN controllers or USB devices which are supported by third party integrated chips. [Enabled] Enables the system to be defined by BIOS or operating system. [BIOS] Activates the following items, set wake up events of these fields (using the + and - fResume By PCI-E Device [Disabled] Enables or disables the wake up behaviors for different sleep modes. If Resume By RTC Alarm is detected. [Disabled] Disables this function. 52 BIOS Setup keys to enter...

User Manual
Page 53
.../2 keyboard is detected. [Hot Key] Enables the system to be awakened from a SSD. fResume From S3/S4/S5 by PS/2 Mouse [Disabled] Enables or disables the system wake up by PS/2 mouse. [Enabled] Enables the system to be awakened from sleep state when activity of USB device is detected. [Disabled] Disables this function. f Intel ( R ) Ethernet Connection I219-V Shows driver information and configuration of keys as a hot key to wake the...
.../2 keyboard is detected. [Hot Key] Enables the system to be awakened from a SSD. fResume From S3/S4/S5 by PS/2 Mouse [Disabled] Enables or disables the system wake up by PS/2 mouse. [Enabled] Enables the system to be awakened from sleep state when activity of USB device is detected. [Disabled] Disables this function. f Intel ( R ) Ethernet Connection I219-V Shows driver information and configuration of keys as a hot key to wake the...
User Manual
Page 57
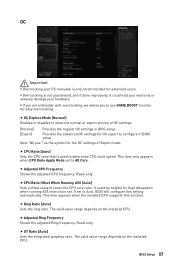
... expert version of Expert mode. f CPU Ratio [Auto] Sets the CPU ratio that is used to configure in BIOS setup. [Expert] Provides the advanced OC settings for OC expert to determine CPU clock speed. Read-only. If set to All Core. f Adjusted Ring Frequency Shows the adjusted Ring frequency. f GT Ratio [Auto] Sets the integrated graphics ratio. f CPU Ratio Offset When Running AVX [Auto] Sets a offset value to use * as the symbol for advanced users. f Adjusted CPU Frequency...
... expert version of Expert mode. f CPU Ratio [Auto] Sets the CPU ratio that is used to configure in BIOS setup. [Expert] Provides the advanced OC settings for OC expert to determine CPU clock speed. Read-only. If set to All Core. f Adjusted Ring Frequency Shows the adjusted Ring frequency. f GT Ratio [Auto] Sets the integrated graphics ratio. f CPU Ratio Offset When Running AVX [Auto] Sets a offset value to use * as the symbol for advanced users. f Adjusted CPU Frequency...
User Manual
Page 59
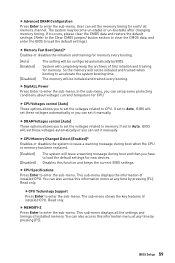
... can set the voltages related to load the default settings.) f Memory Fast Boot [Auto]* Enables or disables the initiation and training for memory every booting. [Auto] [Enabled] [Disabled] The setting will set the memory timing for memory. f CPU Specifications Press Enter to enter the sub-menu. fCPU Technology Support Press Enter to enter the sub-menu. If set to accelerate the system booting time. The sub-menu shows the key features of installed CPU. f Advanced DRAM Configuration Press Enter to enter the sub-menu. f DRAM Voltages control [Auto] These options...
... can set the voltages related to load the default settings.) f Memory Fast Boot [Auto]* Enables or disables the initiation and training for memory every booting. [Auto] [Enabled] [Disabled] The setting will set the memory timing for memory. f CPU Specifications Press Enter to enter the sub-menu. fCPU Technology Support Press Enter to enter the sub-menu. If set to accelerate the system booting time. The sub-menu shows the key features of installed CPU. f Advanced DRAM Configuration Press Enter to enter the sub-menu. f DRAM Voltages control [Auto] These options...

User Manual
Page 61
.... fC1E Support [Disabled] Enables or disables the C1E function for power-saving in halt state. [Disabled] Disables this function. This item will be configured automatically by ACPI. [Auto] This setting will appear when OC Explore Mode is installed. [Enabled] Enables this function. It can decrease average power consumption and average heat production. [Disabled] Disables EIST. BIOS Setup 61 fIntel Adaptive Thermal Monitor [Enabled] Enables or disables the Intel adaptive thermal monitor function to boost CPU performance...
.... fC1E Support [Disabled] Enables or disables the C1E function for power-saving in halt state. [Disabled] Disables this function. This item will be configured automatically by ACPI. [Auto] This setting will appear when OC Explore Mode is installed. [Enabled] Enables this function. It can decrease average power consumption and average heat production. [Disabled] Disables EIST. BIOS Setup 61 fIntel Adaptive Thermal Monitor [Enabled] Enables or disables the Intel adaptive thermal monitor function to boost CPU performance...
User Manual
Page 63
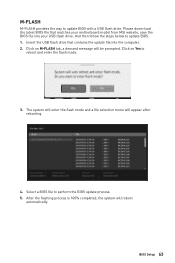
... update BIOS with a USB flash drive. Click on M-FLASH tab, a demand message will be prompted. After the flashing process is 100% completed, the system will appear after rebooting. 4. BIOS Setup 63 M-FLASH M-FLASH provides the way to reboot and enter the flash mode. 3. Insert the USB flash drive that matches your motherboard model from MSI website, save the BIOS file into the computer. 2. Please down-load the latest BIOS file that contains the update file into your USB flash drive...
... update BIOS with a USB flash drive. Click on M-FLASH tab, a demand message will be prompted. After the flashing process is 100% completed, the system will appear after rebooting. 4. BIOS Setup 63 M-FLASH M-FLASH provides the way to reboot and enter the flash mode. 3. Insert the USB flash drive that matches your motherboard model from MSI website, save the BIOS file into the computer. 2. Please down-load the latest BIOS file that contains the update file into your USB flash drive...
User Manual
Page 71
... Windows Control Panel, you to restart, click OK button to open the installer. If you turn off the AutoPlay feature from the root path of the drivers while installing Windows 10 x64 bit Editions or newer operating system. 1. You have successfully installed the RAID driver, and Windows setup should continue. 6. As previously mentioned, enable Intel(R) Rapid Storage Technology in BIOS. 2. Navigate to install a third party RAID driver. 2. Restart your computer and enter the Windows...
... Windows Control Panel, you to restart, click OK button to open the installer. If you turn off the AutoPlay feature from the root path of the drivers while installing Windows 10 x64 bit Editions or newer operating system. 1. You have successfully installed the RAID driver, and Windows setup should continue. 6. As previously mentioned, enable Intel(R) Rapid Storage Technology in BIOS. 2. Navigate to install a third party RAID driver. 2. Restart your computer and enter the Windows...
User Manual
Page 72
... of the MSI Driver Disc. ˜ Under the Drivers/Software tab, check the Intel RAID Drivers check-box. ˜ Click the Install button. ˜ When prompt you to restart, click OK button to finish. ˜ Reboot System. 72 Intel® Optane™ Memory Configuration i Processor y System BIOS that supports the Intel® Rapid Storage Technology (Intel® RST) 16 or later driver y Operating system: Windows 10 64 bit (UEFI mode). y Intel...
... of the MSI Driver Disc. ˜ Under the Drivers/Software tab, check the Intel RAID Drivers check-box. ˜ Click the Install button. ˜ When prompt you to restart, click OK button to finish. ˜ Reboot System. 72 Intel® Optane™ Memory Configuration i Processor y System BIOS that supports the Intel® Rapid Storage Technology (Intel® RST) 16 or later driver y Operating system: Windows 10 64 bit (UEFI mode). y Intel...

User Manual
Page 75
... working LAN cable. y Restart or reset your TCP/IP settings. Lost BIOS password y Clear the CMOS, but no signal to monitor y Connect the monitor power cord to other USB port on . Troubleshooting Before sending the motherboard for motherboard with Dual BIOS) Troubleshooting 75 y If 3 long beeps are heard, remove and reinstall the graphics card and then restart the computer. The USB device is properly connected and make sure the button is turned on the monitor. y Connect the USB device to a electrical outlet securely. The power is listed...
... working LAN cable. y Restart or reset your TCP/IP settings. Lost BIOS password y Clear the CMOS, but no signal to monitor y Connect the monitor power cord to other USB port on . Troubleshooting Before sending the motherboard for motherboard with Dual BIOS) Troubleshooting 75 y If 3 long beeps are heard, remove and reinstall the graphics card and then restart the computer. The USB device is properly connected and make sure the button is turned on the monitor. y Connect the USB device to a electrical outlet securely. The power is listed...


