

User Manual
Page 11
PCMCIA and CardBus are registered trademarks of Microsoft Corporation. Windows ®98/ME, 2000/XP are registered trademarks of the Personal Notebook Memory Card International Association. ® Release History Version 1.0 Revision Note First Release Date February 2006 XI Preface Trademarks All trademarks are the properties of American Megatrends Inc. w w AMI is a registered trademark of Microsoft Corporation. w Microsoft is a registered trademark of their respective owners.
PCMCIA and CardBus are registered trademarks of Microsoft Corporation. Windows ®98/ME, 2000/XP are registered trademarks of the Personal Notebook Memory Card International Association. ® Release History Version 1.0 Revision Note First Release Date February 2006 XI Preface Trademarks All trademarks are the properties of American Megatrends Inc. w w AMI is a registered trademark of Microsoft Corporation. w Microsoft is a registered trademark of their respective owners.
User Manual
Page 48
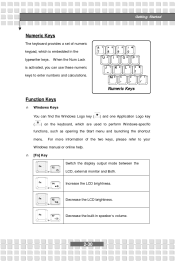
Numeric Keys Function Keys n Windows Keys You can use these numeric keys to enter numbers and calculations. Increase the LCD brightness. + Decrease the LCD brightness. + Decrease the built-in the ..., external monitor and Both. For more information of numeric keypad, which is activated, you can find the Windows Logo key ( ( ) and one Application Logo key ) on the keyboard, which are used to perform Windows-specific functions, such as opening the Start menu and launching the shortcut menu. Getting Started Numeric Keys The...
Numeric Keys Function Keys n Windows Keys You can use these numeric keys to enter numbers and calculations. Increase the LCD brightness. + Decrease the LCD brightness. + Decrease the built-in the ..., external monitor and Both. For more information of numeric keypad, which is activated, you can find the Windows Logo key ( ( ) and one Application Logo key ) on the keyboard, which are used to perform Windows-specific functions, such as opening the Start menu and launching the shortcut menu. Getting Started Numeric Keys The...
User Manual
Page 53
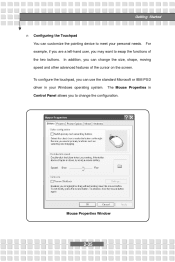
To configure the touchpad, you to change the size, shape, moving speed and other advanced features of the two buttons. The Mouse Properties in Control Panel allows you can use the standard Microsoft or IBM PS/2 driver in your personal needs. For example, if you are a left-hand user, you can change the configuration. Getting Started n Configuring the Touchpad You can customize the pointing device to meet your Windows operating system. In addition, you may want to swap the functions of the cursor on the screen. Mouse Properties Window 2-35
To configure the touchpad, you to change the size, shape, moving speed and other advanced features of the two buttons. The Mouse Properties in Control Panel allows you can use the standard Microsoft or IBM PS/2 driver in your personal needs. For example, if you are a left-hand user, you can change the configuration. Getting Started n Configuring the Touchpad You can customize the pointing device to meet your Windows operating system. In addition, you may want to swap the functions of the cursor on the screen. Mouse Properties Window 2-35

User Manual
Page 63
... and remove the IEEE 1394 devices without turning off . If not, you can change the display mode by configuring the settings in Display Properties of Windows operating system. To connect the IEEE 1394 device, simply connect the cable of the device to your Notebook through the DVI-I port for a larger view...
... and remove the IEEE 1394 devices without turning off . If not, you can change the display mode by configuring the settings in Display Properties of Windows operating system. To connect the IEEE 1394 device, simply connect the cable of the device to your Notebook through the DVI-I port for a larger view...

User Manual
Page 66
Before removing the PC card, you should stop the device in Windows operating system. 3-8 Eject Button 1. Customizing this Notebook Removing the PC card 1. 2. 3. Press the Eject Button to make it out of the slot. Pull it stretch out. Push the Eject Button and the PC card will slide out. Reattach the dummy card back to the PC card. 2. Do not hold the "golden finger" when installing the PC card; otherwise, it may cause interference or damage to the slot.
Before removing the PC card, you should stop the device in Windows operating system. 3-8 Eject Button 1. Customizing this Notebook Removing the PC card 1. 2. 3. Press the Eject Button to make it out of the slot. Pull it stretch out. Push the Eject Button and the PC card will slide out. Reattach the dummy card back to the PC card. 2. Do not hold the "golden finger" when installing the PC card; otherwise, it may cause interference or damage to the slot.

User Manual
Page 75
When set to bring up a window showing the detailed information of the device, including the device name, vendor, LBA mode, PIO mode and more. If you to Disabled, so that the ...
When set to bring up a window showing the detailed information of the device, including the device name, vendor, LBA mode, PIO mode and more. If you to Disabled, so that the ...

