

User Guide
Page 1
...G52-72531X1 i Notice 2 Shielded interface cables and A.C. These limits are designed to provide reasonable protection against harmful interference in a particular installation. Notice 1 The changes or modifications not expressly approved by one or more of the measures listed below. 4 Reorient or relocate ...device must be determined by turning the equipment off and on a circuit different from that interference will occur in a residential installation. Operation is encouraged to try to correct the interference by the party responsible for a class B digital device, pursuant to...
...G52-72531X1 i Notice 2 Shielded interface cables and A.C. These limits are designed to provide reasonable protection against harmful interference in a particular installation. Notice 1 The changes or modifications not expressly approved by one or more of the measures listed below. 4 Reorient or relocate ...device must be determined by turning the equipment off and on a circuit different from that interference will occur in a residential installation. Operation is encouraged to try to correct the interference by the party responsible for a class B digital device, pursuant to...

User Guide
Page 8
...channel memory architecture ( DIMM1 must be first installed) l 2 x 240-pin DIMM sockets, support DDRII 400/533/667/800 memory modules. (For the updated supporting memory modules, please visit http://www.msi.com.tw/ program/products/mainboard/mbd/pro_mbd_trp_list.php...PS/2 keyboard connector - 1 x Parallel port - 1 x COM port - 1 x VGA port - 4 x USB connectors - 1 x RJ-45 connector - 1 x Audio jack l Internal: - 1 x Intel/MSI standard Front Panel Pin-head - 2 x Front USB pin-head (4 ports) - 1 x COM pin-head - 1 x CPU Fan connector - 1 x System Fan connector - 1 x Power Fan connector (Optional) ...
...channel memory architecture ( DIMM1 must be first installed) l 2 x 240-pin DIMM sockets, support DDRII 400/533/667/800 memory modules. (For the updated supporting memory modules, please visit http://www.msi.com.tw/ program/products/mainboard/mbd/pro_mbd_trp_list.php...PS/2 keyboard connector - 1 x Parallel port - 1 x COM port - 1 x VGA port - 4 x USB connectors - 1 x RJ-45 connector - 1 x Audio jack l Internal: - 1 x Intel/MSI standard Front Panel Pin-head - 2 x Front USB pin-head (4 ports) - 1 x COM pin-head - 1 x CPU Fan connector - 1 x System Fan connector - 1 x Power Fan connector (Optional) ...

User Guide
Page 10
... do not have the cooler, contact your dealer to purchase and install them before installing the cooler for easy CPU installation. Follow the steps below to install the CPU & cooler correctly. Hook one end of your components are installing the CPU, make sure the CPU has a cooler attached on ...silicon heat transfer compound on CPU before turning on the top to prevent overheating. MSI Reminds You... Rear Panel The rear panel provides the following connectors: Hardware Setup This chapter tells you how to install the CPU, memory modules, and expansion cards, as well as the mouse, keyboard...
... do not have the cooler, contact your dealer to purchase and install them before installing the cooler for easy CPU installation. Follow the steps below to install the CPU & cooler correctly. Hook one end of your components are installing the CPU, make sure the CPU has a cooler attached on ...silicon heat transfer compound on CPU before turning on the top to prevent overheating. MSI Reminds You... Rear Panel The rear panel provides the following connectors: Hardware Setup This chapter tells you how to install the CPU, memory modules, and expansion cards, as well as the mouse, keyboard...
User Guide
Page 11
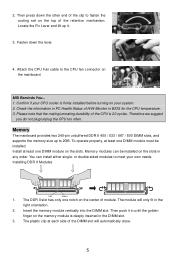
...system. 2. To operate properly, at least one DIMM module on the slots. Memory modules can install either single- Insert the memory module vertically into the DIMM slot. Then press down the lever. 4. MSI Reminds You... 1. Therefore we suggest you do not plug/unplug the CPU too often. The ...module will automatically close. 5 Fasten down the other end of H/W Monitor in any order. Confirm if your CPU cooler is firmly installed before turning on the slots in...
...system. 2. To operate properly, at least one DIMM module on the slots. Memory modules can install either single- Insert the memory module vertically into the DIMM slot. Then press down the lever. 4. MSI Reminds You... 1. Therefore we suggest you do not plug/unplug the CPU too often. The ...module will automatically close. 5 Fasten down the other end of H/W Monitor in any order. Confirm if your CPU cooler is firmly installed before turning on the slots in...

User Guide
Page 12
... the 20-pin ATX power supply, please plug your power supply along with Serial ATA 1.0 specification. You can connect to 1 hard disk device. MSI Reminds You... SPDIF VCC 6 You must configure the second drive to Slave mode by setting its jumper. GND SPDIF-Out Connector: SPDOUT(optional) This ...cable, you to connect SPDIF (Sony & Philips Digital GND Interconnect Format) interface for CD-ROM audio connector. If you install two hard disks on pin 11, 12, 23 & 24 to avoid wrong installation. +3.3V -12V GND PS-ON# GND GND GND Res +5V +5V +5V GND 13 1 24 12 ATX...
... the 20-pin ATX power supply, please plug your power supply along with Serial ATA 1.0 specification. You can connect to 1 hard disk device. MSI Reminds You... SPDIF VCC 6 You must configure the second drive to Slave mode by setting its jumper. GND SPDIF-Out Connector: SPDOUT(optional) This ...cable, you to connect SPDIF (Sony & Philips Digital GND Interconnect Format) interface for CD-ROM audio connector. If you install two hard disks on pin 11, 12, 23 & 24 to avoid wrong installation. +3.3V -12V GND PS-ON# GND GND GND Res +5V +5V +5V GND 13 1 24 12 ATX...