

User Guide
Page 8
... 3-22 Appendix A Realtek ALC888 Audio A-1 Installing the Realtek HD Audio Driver A-2 Setup audio outpur to HDMI A-4 Software Configuration A-5 Hardware Setup A-20 viii Getting Started 1-1 Mainboard Specifications 1-2 Mainboard Layout 1-4 Packing Checklist 1-4 Chapter 2. CONTENTS Copyright Notice ...ii Trademarks ...ii Revision History ...ii Technical Support ...ii Safety Instructions ...iii FCC-B Radio Frequency Interference Statement...
... 3-22 Appendix A Realtek ALC888 Audio A-1 Installing the Realtek HD Audio Driver A-2 Setup audio outpur to HDMI A-4 Software Configuration A-5 Hardware Setup A-20 viii Getting Started 1-1 Mainboard Specifications 1-2 Mainboard Layout 1-4 Packing Checklist 1-4 Chapter 2. CONTENTS Copyright Notice ...ii Trademarks ...ii Revision History ...ii Technical Support ...ii Safety Instructions ...iii FCC-B Radio Frequency Interference Statement...

User Guide
Page 11
... Realtek® ALC888/ ALC883 (optional) - Compliant with Fan Speed Control (For the latest information about CPU, please visit http://global.msi. ms i. Transfer rate is up to 400Mbps - MS-7367 Mainboard Mainboard Specifications Processor Support - c om. AMD® Athlon64 / Athlon64 X2 processors in AM2 package - php?f u nc =c puf orm) Supported FSB - 400...
... Realtek® ALC888/ ALC883 (optional) - Compliant with Fan Speed Control (For the latest information about CPU, please visit http://global.msi. ms i. Transfer rate is up to 400Mbps - MS-7367 Mainboard Mainboard Specifications Processor Support - c om. AMD® Athlon64 / Athlon64 X2 processors in AM2 package - php?f u nc =c puf orm) Supported FSB - 400...

User Guide
Page 35
Hardware Setup PCI (Peripheral Component Interconnect) Slot The PCI slot supports LAN card, SCSI card, USB card, and other add-on cards that comply with PCI specifications. 32-bit PCI Slot PCI Interrupt Request Routing The IRQ, acronym of interrupt request line and pronounced I-R-Q, are typically connected to the microprocessor. The PCI IRQ pins are hardware lines over which devices can send interrupt signals to the PCI bus pins as follows: PCI Slot 1 PCI Slot 2 Order 1 INT A# INT B# Order 2 INT B# INT C# Order 3 INT C# INT D# Order 4 INT D# INT A# 2-21
Hardware Setup PCI (Peripheral Component Interconnect) Slot The PCI slot supports LAN card, SCSI card, USB card, and other add-on cards that comply with PCI specifications. 32-bit PCI Slot PCI Interrupt Request Routing The IRQ, acronym of interrupt request line and pronounced I-R-Q, are typically connected to the microprocessor. The PCI IRQ pins are hardware lines over which devices can send interrupt signals to the PCI bus pins as follows: PCI Slot 1 PCI Slot 2 Order 1 INT A# INT B# Order 2 INT B# INT C# Order 3 INT C# INT D# Order 4 INT D# INT A# 2-21
User Guide
Page 39
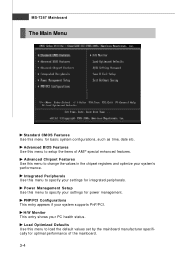
.../PCI Configurations This entry appears if your PC health status. Integrated Peripherals Use this menu to load the default values set by the mainboard manufacturer specifically for basic system configurations, such as time, date etc. Advanced BIOS Features Use this menu to change the values in the chipset registers and optimize...
.../PCI Configurations This entry appears if your PC health status. Integrated Peripherals Use this menu to load the default values set by the mainboard manufacturer specifically for basic system configurations, such as time, date etc. Advanced BIOS Features Use this menu to change the values in the chipset registers and optimize...

User Guide
Page 44
... system. Removable Drives This feature allows you to select which version to be used for the operating system. To find out which MPS (Multi-Processor Specification) version to use, consult the vendor of boot devices where BIOS attempts to load the disk operating system.
... system. Removable Drives This feature allows you to select which version to be used for the operating system. To find out which MPS (Multi-Processor Specification) version to use, consult the vendor of boot devices where BIOS attempts to load the disk operating system.
User Guide
Page 49
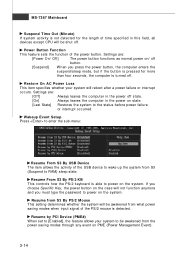
... if the button is pressed for more than four seconds, the computer is not detected for the length of the power button. If you choose Specific Key, the power button on state. [Last State] Restores the system to RAM) sleep state. Power Button Function This feature sets the function of time...
... if the button is pressed for more than four seconds, the computer is not detected for the length of the power button. If you choose Specific Key, the power button on state. [Last State] Restores the system to RAM) sleep state. Power Button Function This feature sets the function of time...

User Guide
Page 54
CPU/System Temperature, CPU FAN/ SYSTEM FAN Speed, CPU Vcore, 3.3VCC, 5V, 12V, 3.3V SB These items display the current status of all of the monitored hardware devices/ components such as CPU voltage, temperatures and all fans' speeds. 3-19 PC Health Status Press to keep it with in a specific range. BIOS Setup Smart Fan Target The mainboard provides the Smart Fan system which can control the fan speed automatically depending on the current temperature to enter the sub-menu and following screen appears.
CPU/System Temperature, CPU FAN/ SYSTEM FAN Speed, CPU Vcore, 3.3VCC, 5V, 12V, 3.3V SB These items display the current status of all of the monitored hardware devices/ components such as CPU voltage, temperatures and all fans' speeds. 3-19 PC Health Status Press to keep it with in a specific range. BIOS Setup Smart Fan Target The mainboard provides the Smart Fan system which can control the fan speed automatically depending on the current temperature to enter the sub-menu and following screen appears.

User Guide
Page 55
... entering any part of the mainboard. Once the password is disabled, the system will be disabled. W hen a password has been set by the mainboard manufacturer specifically for optimal system performance.
... entering any part of the mainboard. Once the password is disabled, the system will be disabled. W hen a password has been set by the mainboard manufacturer specifically for optimal system performance.

User Guide
Page 94
On the next screen, to select the display that your display and click "Apply" and "Finish". If you enabled a HDTV in step 3 and you would like to the monitor manufacturer's specifications. On the next screen, to select the proper format for your monitor supports, To determine the supported formats, refer to enable. C-7 If not, skip this step. Using TV-Out Function 3. Then click "Next" . Then click "Next" to the step5. On this step, select the HDTV fromat that you have to access this step and go to enter the next screen. 4.
On the next screen, to select the display that your display and click "Apply" and "Finish". If you enabled a HDTV in step 3 and you would like to the monitor manufacturer's specifications. On the next screen, to select the proper format for your monitor supports, To determine the supported formats, refer to enable. C-7 If not, skip this step. Using TV-Out Function 3. Then click "Next" . Then click "Next" to the step5. On this step, select the HDTV fromat that you have to access this step and go to enter the next screen. 4.