User Guide
Page 2
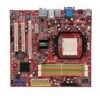
... other countries. www.devicemanuals.eu marks of Intel Corporation. Netware® is a registered trademark of American Megatrends Inc. Visit the MSI website for further guidance. Revision History Revision V1.0 Revision History First release for PCB 1.X Date May 2007 Technical Support If a problem...of M ICRO-STAR INTERNATIONAL. Copyright Notice The material in this document, but no solution can be obtained from the user's manual, please contact your place of purchase or local distributor. Our products are registered trademarks of NVIDIA Corporation in the United States...
... other countries. www.devicemanuals.eu marks of Intel Corporation. Netware® is a registered trademark of American Megatrends Inc. Visit the MSI website for further guidance. Revision History Revision V1.0 Revision History First release for PCB 1.X Date May 2007 Technical Support If a problem...of M ICRO-STAR INTERNATIONAL. Copyright Notice The material in this document, but no solution can be obtained from the user's manual, please contact your place of purchase or local distributor. Our products are registered trademarks of NVIDIA Corporation in the United States...
User Guide
Page 3
ment from humidity. 4. fore connecting the equipment to User's Manual. † The equipment has dropped and damaged. † The equipment has obvious sign of the following situations arises, get it . DO NOT LEAVETHIS EQUIPMENT INANENVIRONMENT ... on card or module. 9. www.devicemanuals.eu 8. CAUT ION: Danger of the power source and adjust properly 110/220V be noted. 10. Keep this User's Manual for air convection hence protects the equip- Never pour any add-on the enclosure are for future reference. 3. Make sure the voltage of expl os...
ment from humidity. 4. fore connecting the equipment to User's Manual. † The equipment has dropped and damaged. † The equipment has obvious sign of the following situations arises, get it . DO NOT LEAVETHIS EQUIPMENT INANENVIRONMENT ... on card or module. 9. www.devicemanuals.eu 8. CAUT ION: Danger of the power source and adjust properly 110/220V be noted. 10. Keep this User's Manual for air convection hence protects the equip- Never pour any add-on the enclosure are for future reference. 3. Make sure the voltage of expl os...

User Guide
Page 23
... USB-compatible devices. 2-9 It provides a high-speed digital interconnection between the computer and its display device. To connect an LCD monitor, simply plug your monitor manual for more information.) IEEE 1394 Port (optional) The 1394 port on a single cable. VGA Port The DB15-pin female connector is for a PS/2® mouse...
... USB-compatible devices. 2-9 It provides a high-speed digital interconnection between the computer and its display device. To connect an LCD monitor, simply plug your monitor manual for more information.) IEEE 1394 Port (optional) The 1394 port on a single cable. VGA Port The DB15-pin female connector is for a PS/2® mouse...

User Guide
Page 82
... the Main Menu screen to the Drives Assignments window. • Initialize logical drive, zero the disk drives. and press Enter to allow the greatest flexibility, manually. 1. RAID sets can be based upon factors including performance, data security, and the number of the system and plan the data storage strategy.
... the Main Menu screen to the Drives Assignments window. • Initialize logical drive, zero the disk drives. and press Enter to allow the greatest flexibility, manually. 1. RAID sets can be based upon factors including performance, data security, and the number of the system and plan the data storage strategy.

User Guide
Page 83
A message will show up on the bottom, press any key to "Y". If you allocate the first LD capacity manually, you want to make part of the LD, use the space key to change the assignment to save the configuration. Important 1. B-5 On the Drives ...replacement drives. • Cache Mode, W riteThru or W riteBack. 4. RAID 0 or 10 only. • Gigabyte Boundary, allows use the arrow key to allocate the RAID capacity manually. www.devicemanuals.eu 5. ATi SATA RAID • Stripe Block Size, the default 64KB is the full capacity of the selected hard drives. 2. Then press [Ctrl...
A message will show up on the bottom, press any key to "Y". If you allocate the first LD capacity manually, you want to make part of the LD, use the space key to change the assignment to save the configuration. Important 1. B-5 On the Drives ...replacement drives. • Cache Mode, W riteThru or W riteBack. 4. RAID 0 or 10 only. • Gigabyte Boundary, allows use the arrow key to allocate the RAID capacity manually. www.devicemanuals.eu 5. ATi SATA RAID • Stripe Block Size, the default 64KB is the full capacity of the selected hard drives. 2. Then press [Ctrl...


