
User Guide
Page 8
... 3-11 Power Management Setup 3-13 PNP/PCI Configurations 3-16 H/W Monitor ...3-18 Load Optimized Defaults 3-22 BIOS Setting Password 3-22 Appendix A Realtek ALC888 Audio A-1 Installing the Realtek HD Audio Driver A-2 Setup audio outpur to HDMI A-4 Software Configuration A-5 Hardware Setup A-20 viii Getting Started 1-1 Mainboard Specifications 1-2 Mainboard Layout 1-4 www.devicemanuals.eu Packing Checklist 1-4 Chapter 2. CONTENTS...
... 3-11 Power Management Setup 3-13 PNP/PCI Configurations 3-16 H/W Monitor ...3-18 Load Optimized Defaults 3-22 BIOS Setting Password 3-22 Appendix A Realtek ALC888 Audio A-1 Installing the Realtek HD Audio Driver A-2 Setup audio outpur to HDMI A-4 Software Configuration A-5 Hardware Setup A-20 viii Getting Started 1-1 Mainboard Specifications 1-2 Mainboard Layout 1-4 www.devicemanuals.eu Packing Checklist 1-4 Chapter 2. CONTENTS...
User Guide
Page 11
...at up to 300MB/s Floppy - 1 floppy port - c om. Controlled by Realtek® ALC888/ ALC883 (optional) - Chip integrated by VIA VT6308P (optional) Audio - AMD® Athlon64 / Athlon64 X2 processors in AM2 package - Transfer rate is up to 400Mbps - Supports 1 FDD with Fan Speed Control (For the ...latest information about CPU, please visit http://global.msi. Supports 4 pin CPU Fan Pin-Header with 360KB, 720KB, 1.2MB, 1.44MB and 2.88MB RAID - Supports 10/100/1000 Fast Ethernet by SB600...
...at up to 300MB/s Floppy - 1 floppy port - c om. Controlled by Realtek® ALC888/ ALC883 (optional) - Chip integrated by VIA VT6308P (optional) Audio - AMD® Athlon64 / Athlon64 X2 processors in AM2 package - Transfer rate is up to 400Mbps - Supports 1 FDD with Fan Speed Control (For the ...latest information about CPU, please visit http://global.msi. Supports 4 pin CPU Fan Pin-Header with 360KB, 720KB, 1.2MB, 1.44MB and 2.88MB RAID - Supports 10/100/1000 Fast Ethernet by SB600...
User Guide
Page 12
...Micro-ATX (24.4cm X 23.0 cm) Mounting - 6 mounting holes 1-3 Getting Started Connectors Back panel - 1 PS/2 mouse port - 1 PS/2 keyboard port - 1 HDMI port (optional for AMD® 690G) - 1 VGA port - 1 DVI-D port (optional for AMD® 690G) - 4 USB 2.0 Ports - 1 LAN jack - 6 flexible audio... jacks - 1 1394 port (optional) On-Board Pinheaders www.devicemanuals.eu - 3 USB 2.0 pinheaders - 1 1394 pinheader (optional) - 1 TV-out pinheader (optional) - 1 Front Panel Audio pinheader - 1 CD-in pinheader - 1 SPDIF-out pinheader (optional) - ...
...Micro-ATX (24.4cm X 23.0 cm) Mounting - 6 mounting holes 1-3 Getting Started Connectors Back panel - 1 PS/2 mouse port - 1 PS/2 keyboard port - 1 HDMI port (optional for AMD® 690G) - 1 VGA port - 1 DVI-D port (optional for AMD® 690G) - 4 USB 2.0 Ports - 1 LAN jack - 6 flexible audio... jacks - 1 1394 port (optional) On-Board Pinheaders www.devicemanuals.eu - 3 USB 2.0 pinheaders - 1 1394 pinheader (optional) - 1 TV-out pinheader (optional) - 1 Front Panel Audio pinheader - 1 CD-in pinheader - 1 SPDIF-out pinheader (optional) - ...
User Guide
Page 13
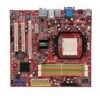
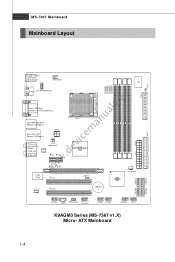
ATX Mainboard 1-4 SATA4 SATA1 SATA3 SATA2 Out B:SS-Ou t JTV1 (option al ) LAN Chip PCI _EX2 PCI _EX16 RS690G/RS690V SYSFAN 1394 Chip PCI1 JBAT1 SB600 Audio codec PCI 2 BATT + JAU D1 JCD1 SPDOUT1 JUSB1 JUSB2 JU SB3 JFP1 K9AGM3 Series (MS-7367 v1.X) Micro- MS-7367 Mainboard Mainboard Layout DIMM1 DIMM3 DIMM2 DIMM4 FDD...
ATX Mainboard 1-4 SATA4 SATA1 SATA3 SATA2 Out B:SS-Ou t JTV1 (option al ) LAN Chip PCI _EX2 PCI _EX16 RS690G/RS690V SYSFAN 1394 Chip PCI1 JBAT1 SB600 Audio codec PCI 2 BATT + JAU D1 JCD1 SPDOUT1 JUSB1 JUSB2 JU SB3 JFP1 K9AGM3 Series (MS-7367 v1.X) Micro- MS-7367 Mainboard Mainboard Layout DIMM1 DIMM3 DIMM2 DIMM4 FDD...

User Guide
Page 23
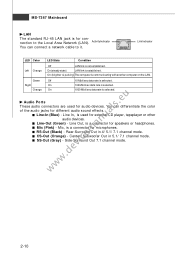
.../2® mouse/keyboard DIN connector is for attaching USB devices such as keyboard, mouse, or other end of transmitting uncompressed streams. HDMI supports all -digital audio/video interface capable of the cable is properly connected to your monitor (refer to your monitor manual for monitor. HDM I Port (optional) The High-Definition...-compatible devices. 2-9 VGA Port The DB15-pin female connector is an all TV format, including standard, enhanced, or high-definition video, plus multi-channel digital audio on the back panel provides connection to connect a LCD monitor.
.../2® mouse/keyboard DIN connector is for attaching USB devices such as keyboard, mouse, or other end of transmitting uncompressed streams. HDMI supports all -digital audio/video interface capable of the cable is properly connected to your monitor (refer to your monitor manual for monitor. HDM I Port (optional) The High-Definition...-compatible devices. 2-9 VGA Port The DB15-pin female connector is an all TV format, including standard, enhanced, or high-definition video, plus multi-channel digital audio on the back panel provides connection to connect a LCD monitor.
User Guide
Page 24
... mode. 2-10 Green Off 10 Mbit/sec data rate is selected. Mic (Pink) - ActivityIndicator You can differentiate the color of the audio jacks for external CD player, tapeplayer or other audio devices. On (brighter & pulsing) The computer is selected. Right On 100 Mbit/sec data rate is communicating with another computer on...
... mode. 2-10 Green Off 10 Mbit/sec data rate is selected. Mic (Pink) - ActivityIndicator You can differentiate the color of the audio jacks for external CD player, tapeplayer or other audio devices. On (brighter & pulsing) The computer is selected. Right On 100 Mbit/sec data rate is communicating with another computer on...
User Guide
Page 27
.... 3. L GND R JCD1 2-13 If the mainboard has a System Hardware Monitor chipset on the screen. CPUFAN1 supports fan control. If the chassis is provided for external audio input.. the black wire is the positive and should be activated. GND +12V SENSOR Control GND SE NS OR +1 2V CPUFAN1 SYSFAN www.devicemanuals.eu...
.... 3. L GND R JCD1 2-13 If the mainboard has a System Hardware Monitor chipset on the screen. CPUFAN1 supports fan control. If the chassis is provided for external audio input.. the black wire is the positive and should be activated. GND +12V SENSOR Control GND SE NS OR +1 2V CPUFAN1 SYSFAN www.devicemanuals.eu...
User Guide
Page 28
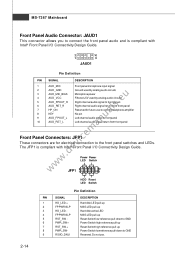
... signal www.devicemanuals.eu 2 AUD_GND Ground used by analog audio circuits 3 AUD_MIC_BIAS Microphone power 4 AUD_VCC Filtered +5V used by analog audio circuits 5 AUD_FPOUT_R Right channel audio signal to front panel 6 AUD_RET_R Right channel audio signal return from front panel 7 HP_ON Reserved for future use... LEDs. Do not use to control headphone amplifier 8 KEY No pin 9 AUD_FPOUT_L Left channel audio signal to front panel 10 AUD_RET_L Left channel audio signal return from front panel Front Panel Connectors: JFP1 These connectors are for electrical connection to ...
... signal www.devicemanuals.eu 2 AUD_GND Ground used by analog audio circuits 3 AUD_MIC_BIAS Microphone power 4 AUD_VCC Filtered +5V used by analog audio circuits 5 AUD_FPOUT_R Right channel audio signal to front panel 6 AUD_RET_R Right channel audio signal return from front panel 7 HP_ON Reserved for future use... LEDs. Do not use to control headphone amplifier 8 KEY No pin 9 AUD_FPOUT_L Left channel audio signal to front panel 10 AUD_RET_L Left channel audio signal return from front panel Front Panel Connectors: JFP1 These connectors are for electrical connection to ...
User Guide
Page 32
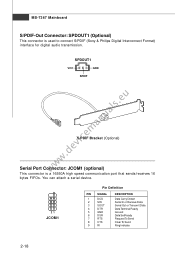
....devicemanuals.eu S/PDIF Bracket (Optional) Serial Port Connector: JCOM1 (optional) This connector is used to connect S/PDIF (Sony & Philips Digital Interconnect Format) interface for digital audio transmission.
....devicemanuals.eu S/PDIF Bracket (Optional) Serial Port Connector: JCOM1 (optional) This connector is used to connect S/PDIF (Sony & Philips Digital Interconnect Format) interface for digital audio transmission.
User Guide
Page 46
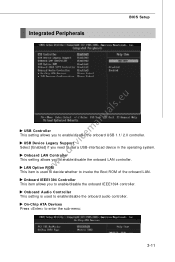
... ATA Devices Press to invoke the Boot ROM of the onboard LAN. Onboard IEEE1394 Controller This item allows you to enable/disable the onboard audio controller. Onboard Audio Controller This setting is used to enable/disable the onboard IEEE1394 controller. Onboard LAN Controller This setting allows you to enable/disable the onboard...
... ATA Devices Press to invoke the Boot ROM of the onboard LAN. Onboard IEEE1394 Controller This item allows you to enable/disable the onboard audio controller. Onboard Audio Controller This setting is used to enable/disable the onboard IEEE1394 controller. Onboard LAN Controller This setting allows you to enable/disable the onboard...
User Guide
Page 56
Appendix A Realtek ALC888 Audio www.devicemanuals.eu The Realtek ALC888 provides 10-channel DAC that simultaneously supports 7.1 sound playback and 2 channels of independent stereo sound output (multiple streaming) through the Front-Out-Left and Front-OutRight channels.
Appendix A Realtek ALC888 Audio www.devicemanuals.eu The Realtek ALC888 provides 10-channel DAC that simultaneously supports 7.1 sound playback and 2 channels of independent stereo sound output (multiple streaming) through the Front-Out-Left and Front-OutRight channels.
User Guide
Page 57
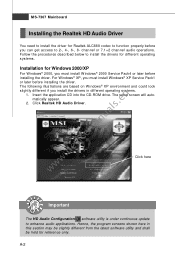
...indows® XP Service Pack1 or later before installing the driver. channel or 7.1+2 channel audio operations. Insert the application CD into the CD-ROM drive. Click Realtek HD Audio Driver. A-2 Follow the procedures described below to install the drivers for different operating systems. ... or later before installing the driver. Hence, the program screens shown here in different operating systems. 1. Click here Important The HD Audio Configuration software utility is under continuous update to 2-, 4-, 6-, 8- For Windows® XP, you install the drivers in this section...
...indows® XP Service Pack1 or later before installing the driver. channel or 7.1+2 channel audio operations. Insert the application CD into the CD-ROM drive. Click Realtek HD Audio Driver. A-2 Follow the procedures described below to install the drivers for different operating systems. ... or later before installing the driver. Hence, the program screens shown here in different operating systems. 1. Click here Important The HD Audio Configuration software utility is under continuous update to 2-, 4-, 6-, 8- For Windows® XP, you install the drivers in this section...
User Guide
Page 58
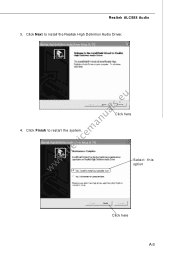
Click here Select this option Click here A-3 Click Next to restart the system. Click Finish to install the Realtek High Definition Audio Driver. Realtek ALC888 Audio 3. www.devicemanuals.eu 4.
Click here Select this option Click here A-3 Click Next to restart the system. Click Finish to install the Realtek High Definition Audio Driver. Realtek ALC888 Audio 3. www.devicemanuals.eu 4.
User Guide
Page 59
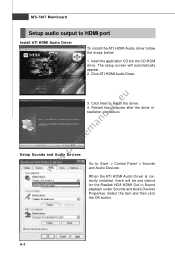
... there will automatically appear. 2. Click ATI HDMI Audio Driver. Click Next to : Start -> Control Panel -> Sounds and Audio Devices W hen the ATI HDMI Audio Driver is cor- Select the item and then click the OK button. Setup Sounds and Audio Devices Go to install the driver. 4. A-4... MS-7367 Mainboard Setup audio output to HDMI port Install ATI HDMI Audio Driver To install the ATI HDMI Audio driver follow the steps below. 1. Insert the application CD ...
... there will automatically appear. 2. Click ATI HDMI Audio Driver. Click Next to : Start -> Control Panel -> Sounds and Audio Devices W hen the ATI HDMI Audio Driver is cor- Select the item and then click the OK button. Setup Sounds and Audio Devices Go to install the driver. 4. A-4... MS-7367 Mainboard Setup audio output to HDMI port Install ATI HDMI Audio Driver To install the ATI HDMI Audio driver follow the steps below. 1. Insert the application CD ...
User Guide
Page 60
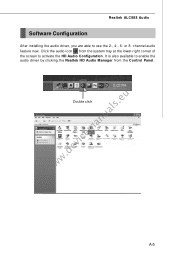
Realtek ALC888 Audio Software Configuration After installing the audio driver, you are able to activate the HD Audio Configuration. Click the audio icon from the Control Panel. or 8- channel audio feature now. It is also available to enable the audio driver by clicking the Realtek HD Audio M anager from the system tray at the lower-right corner of the screen to use the 2-, 4-, 6- www.dDeovubileccelicmk anuals.eu A-5
Realtek ALC888 Audio Software Configuration After installing the audio driver, you are able to activate the HD Audio Configuration. Click the audio icon from the Control Panel. or 8- channel audio feature now. It is also available to enable the audio driver by clicking the Realtek HD Audio M anager from the system tray at the lower-right corner of the screen to use the 2-, 4-, 6- www.dDeovubileccelicmk anuals.eu A-5
User Guide
Page 61
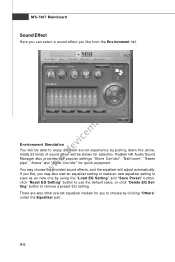
... Manager also provides five popular settings "Stone Corridor", "Bathroom", "Sewer pipe", "Arena" and "Audio Corridor" for selection. There are also other pre-set equalizer models for you to choose by pulling down the arrow, totally 23 kinds of sound ...
... Manager also provides five popular settings "Stone Corridor", "Bathroom", "Sewer pipe", "Arena" and "Audio Corridor" for selection. There are also other pre-set equalizer models for you to choose by pulling down the arrow, totally 23 kinds of sound ...
User Guide
Page 62
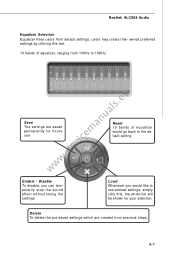
Realtek ALC888 Audio Equalizer Selection Equalizer frees users from previous steps. A-7 Delete To delete the pre-saved settings which are saved permanently for your selection. users may create ...
Realtek ALC888 Audio Equalizer Selection Equalizer frees users from previous steps. A-7 Delete To delete the pre-saved settings which are saved permanently for your selection. users may create ...
User Guide
Page 63
..." shown on "Voice Cancellation", the vocal of the song or adjust the key to accommodate your vocal range. By leveraging our long experience at audio field, Realtek HD Audio Sound Manager provides you certain optimized equalizer settings that you . Karaoke Mode Karaoke mode brings Karaoke fun back home. www.devicemanuals.eu 1.Vocal...
..." shown on "Voice Cancellation", the vocal of the song or adjust the key to accommodate your vocal range. By leveraging our long experience at audio field, Realtek HD Audio Sound Manager provides you certain optimized equalizer settings that you . Karaoke Mode Karaoke mode brings Karaoke fun back home. www.devicemanuals.eu 1.Vocal...
User Guide
Page 64
... the jacks on the rear or front panel. A-9 Click the button and the Mixer ToolBox menu will appear after you may play different audio sources simultaneously and let them output respectively from the indicated real panel or front panel. Then check the Enable playback multi-streaming and click... supports an outstanding feature called Multi-Stream, which means you use AC97 front panel, the device have to save the setup. Realtek ALC888 Audio Mixer In the Mixer part, you pluging the speakers into the jacks on the panel before enable the multi-stream function. Adjust Volume You...
... the jacks on the rear or front panel. A-9 Click the button and the Mixer ToolBox menu will appear after you may play different audio sources simultaneously and let them output respectively from the indicated real panel or front panel. Then check the Enable playback multi-streaming and click... supports an outstanding feature called Multi-Stream, which means you use AC97 front panel, the device have to save the setup. Realtek ALC888 Audio Mixer In the Mixer part, you pluging the speakers into the jacks on the panel before enable the multi-stream function. Adjust Volume You...
User Guide
Page 65
A-10 Then you are playing the first audio source (for example: use W indows Media Player to play DVD/VCD), the output will come out from the Line-Out audio jack of Front Panel. You will find that the second audio source (MP3 music) will be played from the rear panel, which is the default setting. MS-7367 Mainboard www.devicemanuals.eu W hen you must to select the Realtek HD Audio front output from the scroll list first, and use a different program to play the second audio source (for example: use Winamp to play MP3 files).
A-10 Then you are playing the first audio source (for example: use W indows Media Player to play DVD/VCD), the output will come out from the Line-Out audio jack of Front Panel. You will find that the second audio source (MP3 music) will be played from the rear panel, which is the default setting. MS-7367 Mainboard www.devicemanuals.eu W hen you must to select the Realtek HD Audio front output from the scroll list first, and use a different program to play the second audio source (for example: use Winamp to play MP3 files).
