
User Guide
Page 9
Appendix A X-Fi Xtreme Audio Card A-1 Introduction ...A-2 Hardware Installation A-4 Installing the Creative Audio Driver A-7 Software Configuration A-9 Appendix B Overclocking Center B-1 Activating Overclocking Center B-2 System Info ...B-3 DOT ...B-5 Appendix C Intel ICH10R SATA RAID C-1 Introduction ...C-2 BIOS Configuration C-3 Installing Driver C-10 Installing Software C-12 RAID Migration Instructions C-16 Recovery Volume Creation C-...
Appendix A X-Fi Xtreme Audio Card A-1 Introduction ...A-2 Hardware Installation A-4 Installing the Creative Audio Driver A-7 Software Configuration A-9 Appendix B Overclocking Center B-1 Activating Overclocking Center B-2 System Info ...B-3 DOT ...B-5 Appendix C Intel ICH10R SATA RAID C-1 Introduction ...C-2 BIOS Configuration C-3 Installing Driver C-10 Installing Software C-12 RAID Migration Instructions C-16 Recovery Volume Creation C-...

User Guide
Page 18
... turning on it for better heat dispersion. Alignment Key Yellow triangle is the Pin 1 indicator Alignment Key Yellow triangle is designed to support overclocking. Replaceing the CPU While replacing the CPU, always turn off the ATX power supply or unplug the power supply's power cord from overheating....recommended. Make sure that you apply an even layer of LGA 1366 CPU. For the latest information about CPU, please visit http://global.msi.com.tw/index.php? The surface of thermal paste (or thermal tape) between the CPU and the heatsink to enhance heat dissipation. Hardware...
... turning on it for better heat dispersion. Alignment Key Yellow triangle is the Pin 1 indicator Alignment Key Yellow triangle is designed to support overclocking. Replaceing the CPU While replacing the CPU, always turn off the ATX power supply or unplug the power supply's power cord from overheating....recommended. Make sure that you apply an even layer of LGA 1366 CPU. For the latest information about CPU, please visit http://global.msi.com.tw/index.php? The surface of thermal paste (or thermal tape) between the CPU and the heatsink to enhance heat dissipation. Hardware...

User Guide
Page 36
... the CPU fan control. IEEE1394 Connector: J1394_1 This connector allows you must use a specially designed fan with +12V. CPUFAN supports fan control. You can install Overclocking Center utility that the red wire is Ground and should be connected to the +12V; J1394_1 2 10 1 9 Pin Definition PIN SIGNAL PIN 1 TPA+ 2 3 Ground 4 5 TPB...
... the CPU fan control. IEEE1394 Connector: J1394_1 This connector allows you must use a specially designed fan with +12V. CPUFAN supports fan control. You can install Overclocking Center utility that the red wire is Ground and should be connected to the +12V; J1394_1 2 10 1 9 Pin Definition PIN SIGNAL PIN 1 TPA+ 2 3 Ground 4 5 TPB...

User Guide
Page 45
... depends on the system's configuration (memory capability, thermal solution...etc), and it is not guaranteed. 3. HW overclocking may also cause crash during boot, then please re-set the CPU clock. Make sure that you power off the system before changing the switch.... 2. For more details, please refer to default. 4. You can overclock the Base clock to restore default BIOS settings. BIOS overclocking may cause instability or crash during boot and then please reboot the system 3 times to increase the processor frequency by setting...
... depends on the system's configuration (memory capability, thermal solution...etc), and it is not guaranteed. 3. HW overclocking may also cause crash during boot, then please re-set the CPU clock. Make sure that you power off the system before changing the switch.... 2. For more details, please refer to default. 4. You can overclock the Base clock to restore default BIOS settings. BIOS overclocking may cause instability or crash during boot and then please reboot the system 3 times to increase the processor frequency by setting...

User Guide
Page 51
H/W Monitor This entry shows your settings for BIOS. Cell Menu Use this menu to specify your settings for frequency/voltage control and overclocking. 3-4 Advanced BIOS Features Use this menu to specify the power phase. Power Management Setup Use this menu to specify your PC health status. Integrated Peripherals ...
H/W Monitor This entry shows your settings for BIOS. Cell Menu Use this menu to specify your settings for frequency/voltage control and overclocking. 3-4 Advanced BIOS Features Use this menu to specify the power phase. Power Management Setup Use this menu to specify your PC health status. Integrated Peripherals ...

User Guide
Page 69
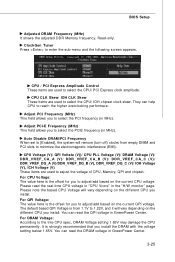
... CPU core ratio. 1/2/3/4-Core Ratio Limit These items allow you to [Enable] activates the following fields, and use the following screen appears. Please note the overclocking behavior is the Intel newly technology within i7 CPU. You may...
... CPU core ratio. 1/2/3/4-Core Ratio Limit These items allow you to [Enable] activates the following fields, and use the following screen appears. Please note the overclocking behavior is the Intel newly technology within i7 CPU. You may...
User Guide
Page 72
... CPU Voltage will vary depending on the different CPU you to select the CPU/ PCI Express clock amplitude. ClockGen Tuner Press to reach the higher overclocking performace. They can help CPU to enter the sub-menu and the following screen appears. It is the offset for you install. Please read the...
... CPU Voltage will vary depending on the different CPU you to select the CPU/ PCI Express clock amplitude. ClockGen Tuner Press to reach the higher overclocking performace. They can help CPU to enter the sub-menu and the following screen appears. It is the offset for you install. Please read the...

User Guide
Page 73
... leave the setting at Disabled for optimal system stability and performance. But if you are overclocking because even a slight jitter can introduce a temporary boost in clock speed which may just cause your overclocked processor to lock up . Remember to disable Spread Spectrum if you are plagued by EMI..., set to flatter curves. For the most suitable Spread Spectrum value, please consult your overclocked processor to lock up . 3-26 The greater the Spread Spectrum value is, the greater the EMI is reduced, and the system will ...
... leave the setting at Disabled for optimal system stability and performance. But if you are overclocking because even a slight jitter can introduce a temporary boost in clock speed which may just cause your overclocked processor to lock up . Remember to disable Spread Spectrum if you are plagued by EMI..., set to flatter curves. For the most suitable Spread Spectrum value, please consult your overclocked processor to lock up . 3-26 The greater the Spread Spectrum value is, the greater the EMI is reduced, and the system will ...

User Guide
Page 74
...the defaults setting, Press any key to boot the system normally when the following message appears on screen. BIOS Setup CPU and Memory Clock Overclocking The D.O.T Control, Base Clock, Memory Ratio items for more information about how to clear CMOS data. 3-27 Please note that, to ...avoid electric current to reboot the system three times. Please press any key exclude "DEL" to the descriptions of overclocking is failed, and the system is failed and restore the default settings automatically. Please refer to enter SETUP....... Important 1. However, please make ...
...the defaults setting, Press any key to boot the system normally when the following message appears on screen. BIOS Setup CPU and Memory Clock Overclocking The D.O.T Control, Base Clock, Memory Ratio items for more information about how to clear CMOS data. 3-27 Please note that, to ...avoid electric current to reboot the system three times. Please press any key exclude "DEL" to the descriptions of overclocking is failed, and the system is failed and restore the default settings automatically. Please refer to enter SETUP....... Important 1. However, please make ...

User Guide
Page 96
CD-ROM drive for software installation. 3. Operation system: W indows XP or up. 4. Overclocking Center Appendix B Overclocking Center Overclocking Center, the most useful and powerful utility that MSI has spent much research and efforts to develop, helps users to monitor or configure the hardware status of MSI Mainboard in windows, such as CPU clock, voltage, fan speed and temperature. DotNet Frame Work 2.0 B-1 Before you install the Overclocking Center, please make sure the system has meet the following requirements: 1. 256MB system memory. 2.
CD-ROM drive for software installation. 3. Operation system: W indows XP or up. 4. Overclocking Center Appendix B Overclocking Center Overclocking Center, the most useful and powerful utility that MSI has spent much research and efforts to develop, helps users to monitor or configure the hardware status of MSI Mainboard in windows, such as CPU clock, voltage, fan speed and temperature. DotNet Frame Work 2.0 B-1 Before you install the Overclocking Center, please make sure the system has meet the following requirements: 1. 256MB system memory. 2.

User Guide
Page 97
You may double-click on the desktop short-cut path in your "Start-up menu (path: Start-->Program Files-->MSI--> Overclocking Center-->Overclocking Center) B-2 MS-7520 Mainboard Activating Overclocking Center Once you have your Overclocking Center installed (locate the setup source file in the setup CD accompanying with your mainboard, path: Utility --> M SI Utility --> Overclocking Center), it will have a short cut icon on the desktop, and a short cut path in the start-up " menu. short-cut icon on each icon to activate Overclocking Center.
You may double-click on the desktop short-cut path in your "Start-up menu (path: Start-->Program Files-->MSI--> Overclocking Center-->Overclocking Center) B-2 MS-7520 Mainboard Activating Overclocking Center Once you have your Overclocking Center installed (locate the setup source file in the setup CD accompanying with your mainboard, path: Utility --> M SI Utility --> Overclocking Center), it will have a short cut icon on the desktop, and a short cut path in the start-up " menu. short-cut icon on each icon to activate Overclocking Center.

User Guide
Page 98
Overclocking Center System Info In the System Info screen, you can read the informations of mainboard/ memory/ PCI. Motherboard Click Motherboard to read the informations of mainboard, mainboard BIOS, installed CPU and installed graphics card. B-3
Overclocking Center System Info In the System Info screen, you can read the informations of mainboard/ memory/ PCI. Motherboard Click Motherboard to read the informations of mainboard, mainboard BIOS, installed CPU and installed graphics card. B-3

User Guide
Page 100
In DOT, you can adjust advanced values for overclocking in Basic menu are not adjustable. You may change the values of the settings that you can select the basic setting to enter the DOT ... provides one of each environment setting/ default setting in Advance menu. Important You may choose one default setting and five common settings for more details. Overclocking Center DOT Click DOT to reach optimal perf ormance in Basic menu or you need. B-5
In DOT, you can adjust advanced values for overclocking in Basic menu are not adjustable. You may change the values of the settings that you can select the basic setting to enter the DOT ... provides one of each environment setting/ default setting in Advance menu. Important You may choose one default setting and five common settings for more details. Overclocking Center DOT Click DOT to reach optimal perf ormance in Basic menu or you need. B-5

User Guide
Page 102
B-7 Overclocking Center In each setting menu, you can set . The system will appear below the button, then select a value. Simply click the right side of CPU ... menu will popup a warning message to warning you when the temperature/ fan speed is over/ lower the values you can select desired values for manual overclocking. In the "System W arning" block, you set the maximum CPU/ system temperature and the minimum CPU/ system fan speed by using the scroll bar. Set...
B-7 Overclocking Center In each setting menu, you can set . The system will appear below the button, then select a value. Simply click the right side of CPU ... menu will popup a warning message to warning you when the temperature/ fan speed is over/ lower the values you can select desired values for manual overclocking. In the "System W arning" block, you set the maximum CPU/ system temperature and the minimum CPU/ system fan speed by using the scroll bar. Set...


