

User Manual
Page 24
... optical storage drive. It is recommended to help users getting familiar with this notebook. Chapter 2, Introductions, includes the descriptions of all the accessories included when you purchased this notebook is damaged or missing, please contact the vendor where you open the packing ...Chapter 3, Getting Started, gives the basic operation instructions on using this notebook. Beside, the steps of this notebook, the finely designed notebook. Also, this chapter provides the specification of this notebook, and introduces the function buttons, quick launch buttons, connectors, LEDs and...
... optical storage drive. It is recommended to help users getting familiar with this notebook. Chapter 2, Introductions, includes the descriptions of all the accessories included when you purchased this notebook is damaged or missing, please contact the vendor where you open the packing ...Chapter 3, Getting Started, gives the basic operation instructions on using this notebook. Beside, the steps of this notebook, the finely designed notebook. Also, this chapter provides the specification of this notebook, and introduces the function buttons, quick launch buttons, connectors, LEDs and...
User Manual
Page 25
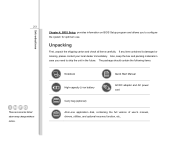
... Setup, provides information on BIOS Setup program and allows you need to configure the system for optimum use. The package should contain the following items: Notebook Quick Start Manual High-capacity Li-ion battery AC/DC adapter and AC power cord Carry bag (optional) All-in the future. 2-3 These accessories listed...
... Setup, provides information on BIOS Setup program and allows you need to configure the system for optimum use. The package should contain the following items: Notebook Quick Start Manual High-capacity Li-ion battery AC/DC adapter and AC power cord Carry bag (optional) All-in the future. 2-3 These accessories listed...
User Manual
Page 26
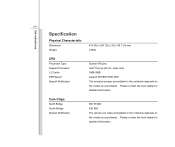
... the local dealer for detailed information. Core Chips North Bridge South Bridge Special Notification SIS 672DX SIS 968 The actual core chips preinstalled in the notebook depends on the model you purchased. dual core) 3MB/ 6MB support 667/800/1066 MHz The actual processor preinstalled in the...
... the local dealer for detailed information. Core Chips North Bridge South Bridge Special Notification SIS 672DX SIS 968 The actual core chips preinstalled in the notebook depends on the model you purchased. dual core) 3MB/ 6MB support 667/800/1066 MHz The actual processor preinstalled in the...

User Manual
Page 27
...) HDD form factor 2.5" 160/250/320/500/640 GB Optical Storage Device DVD Combo (optional) Special Notification The actual HDD and OSD preinstalled in the notebook depends on the model you purchased, and may very without notice.
...) HDD form factor 2.5" 160/250/320/500/640 GB Optical Storage Device DVD Combo (optional) Special Notification The actual HDD and OSD preinstalled in the notebook depends on the model you purchased, and may very without notice.

User Manual
Page 30
...-open view and description shown below will help you to know more about the appearance of the notebook. Webcam/ Webcam LED 2 2. Touchpad 3 5 4 Keyboard/ Quick Launch [Fn] Buttons 5. Please be aware that the notebook shown in this notebook before using it. The figures show here are for reference only. 1 1. Introductions 2-8 Product Overview This section...
...-open view and description shown below will help you to know more about the appearance of the notebook. Webcam/ Webcam LED 2 2. Touchpad 3 5 4 Keyboard/ Quick Launch [Fn] Buttons 5. Please be aware that the notebook shown in this notebook before using it. The figures show here are for reference only. 1 1. Introductions 2-8 Product Overview This section...

User Manual
Page 31
Power Button / Power LED Power Button Š Press the power button to turn the notebook power ON and OFF. Š Press the power button to activate the specific applications or tools. With the help of a full-sized keyboard. Introductions 2-9 1. Keyboard ... turned off . 4. LED goes out when this function is activated; Power/ Power Saving function LED: Š Glowing blue when the notebook power is turned on the keyboard to awake the notebook from the sleep state. Internal Microphone This is the built-in Webcam can be able to the webcam, grows orange when...
Power Button / Power LED Power Button Š Press the power button to turn the notebook power ON and OFF. Š Press the power button to activate the specific applications or tools. With the help of a full-sized keyboard. Introductions 2-9 1. Keyboard ... turned off . 4. LED goes out when this function is activated; Power/ Power Saving function LED: Š Glowing blue when the notebook power is turned on the keyboard to awake the notebook from the sleep state. Internal Microphone This is the built-in Webcam can be able to the webcam, grows orange when...

User Manual
Page 33
Press again to turn it off. Š This 3G function is optional supported depending on . Touchpad This is the pointing device of the notebook. 2-11 Introductions + 3G (Not Supported) Š Press and hold the Fn button, and then press the F10 button to turn the 3G function on the model users purchased. Š This function button will not be available when the 3G function is not supported. 5.
Press again to turn it off. Š This 3G function is optional supported depending on . Touchpad This is the pointing device of the notebook. 2-11 Introductions + 3G (Not Supported) Š Press and hold the Fn button, and then press the F10 button to turn the 3G function on the model users purchased. Š This function button will not be available when the 3G function is not supported. 5.

User Manual
Page 37
USB Port 3. USB Port The USB 2.0 port allows you to connect USB-interface peripheral devices, such as the mouse, keyboard, modem, portable hard disk module, printer and more. ExpressCard Slot 2. Audio Port Connectors 1. ExpressCard Slot The notebook provides an ExpressCard slot. The new ExpressCard interface is smaller and faster than PC Card interface. Card Reader 4. The ExpressCard technology takes advantage of the scalable, high-bandwidth serial PCI Express and USB 2.0 interfaces. 2. Introductions 2-15 Right Side View 1 2 3 4 1.
USB Port 3. USB Port The USB 2.0 port allows you to connect USB-interface peripheral devices, such as the mouse, keyboard, modem, portable hard disk module, printer and more. ExpressCard Slot 2. Audio Port Connectors 1. ExpressCard Slot The notebook provides an ExpressCard slot. The new ExpressCard interface is smaller and faster than PC Card interface. Card Reader 4. The ExpressCard technology takes advantage of the scalable, high-bandwidth serial PCI Express and USB 2.0 interfaces. 2. Introductions 2-15 Right Side View 1 2 3 4 1.

User Manual
Page 39
...USB Port 1. The end of the cable has a small loop which allows users to secure the notebook in place. 2. USB Port The USB 2.0 port allows you purchased. 3. Kensington Lock This notebook provides a Kensington Lock hole, which allows the whole cable to connect USB-interface peripheral devices, ...such as a heavy table or other similar equipment, thus securing the notebook in place with an optical drive device. Optical Drive Device 3. The actual device preinstalled in the notebook depends on the model you to be looped around a permanent object, such as the...
...USB Port 1. The end of the cable has a small loop which allows users to secure the notebook in place. 2. USB Port The USB 2.0 port allows you purchased. 3. Kensington Lock This notebook provides a Kensington Lock hole, which allows the whole cable to connect USB-interface peripheral devices, ...such as a heavy table or other similar equipment, thus securing the notebook in place with an optical drive device. Optical Drive Device 3. The actual device preinstalled in the notebook depends on the model you to be looped around a permanent object, such as the...

User Manual
Page 40
..., keyboard, modem, portable hard disk module, printer and more. 3. Ventilator 5. Power Connector 2. HDMI Connector HDMI (High Definition Multimedia Interface) is a new interface standard for the notebook. 2. Power Connector To connect the AC adapter and supply power for PCs, displays and consumer electronics devices that supports standard, enhanced and high-definition video...
..., keyboard, modem, portable hard disk module, printer and more. 3. Ventilator 5. Power Connector 2. HDMI Connector HDMI (High Definition Multimedia Interface) is a new interface standard for the notebook. 2. Power Connector To connect the AC adapter and supply power for PCs, displays and consumer electronics devices that supports standard, enhanced and high-definition video...

User Manual
Page 43
Ventilator The ventilator is disconnected. 5. Stereo Speakers Give high quality sound blaster with stereo system and Hi-Fi function supported. Battery Pack This notebook will be powered by the battery pack when the AC adapter is designed to cool the system. DO NOT block the ventilator for air circulation. 4. Introductions 2-21 3.
Ventilator The ventilator is disconnected. 5. Stereo Speakers Give high quality sound blaster with stereo system and Hi-Fi function supported. Battery Pack This notebook will be powered by the battery pack when the AC adapter is designed to cool the system. DO NOT block the ventilator for air circulation. 4. Introductions 2-21 3.

User Manual
Page 45
..., recharging the battery will start immediately. When the AC power is strongly recommended to connect the AC/DC adapter to it may damage either the notebook or other adapter model may produce a certain heat while in the package is approved for the first time. Do not cover the AC/DC adapter... since it . Note that the AC/DC adapter included in use. using this notebook for your notebook; Always be aware of heat coming from the AC/DC adapter in use the AC power while using other devices attached to the...
..., recharging the battery will start immediately. When the AC power is strongly recommended to connect the AC/DC adapter to it may damage either the notebook or other adapter model may produce a certain heat while in the package is approved for the first time. Do not cover the AC/DC adapter... since it . Note that the AC/DC adapter included in use. using this notebook for your notebook; Always be aware of heat coming from the AC/DC adapter in use the AC power while using other devices attached to the...

User Manual
Page 46
Disconnecting the AC Power When you disconnect the AC/DC adapter, you should: 4. Unplug the power cord from the notebook. 6. Never pull the cord directly! 4 2 6 3 5 3 Plug the DC end of the adapter to the electrical outlet. When unplugging the power cord, always hold the connector ...part of the power cord to the notebook, and the male end of the cord. Getting Started 3-3 Connecting the AC Power 1. Unpack the package to the connector of AC/DC adapter. 7. Unplug the...
Disconnecting the AC Power When you disconnect the AC/DC adapter, you should: 4. Unplug the power cord from the notebook. 6. Never pull the cord directly! 4 2 6 3 5 3 Plug the DC end of the adapter to the electrical outlet. When unplugging the power cord, always hold the connector ...part of the power cord to the notebook, and the male end of the cord. Getting Started 3-3 Connecting the AC Power 1. Unpack the package to the connector of AC/DC adapter. 7. Unplug the...

User Manual
Page 47
... disassembled not by improper battery replacement, use in a safe place. To prevent explosion caused by an authorized machinist. Getting Started 3-4 Using the Battery Power This notebook is an internal power source of the...
... disassembled not by improper battery replacement, use in a safe place. To prevent explosion caused by an authorized machinist. Getting Started 3-4 Using the Battery Power This notebook is an internal power source of the...

User Manual
Page 48
... It is always recommended to have another battery pack in the battery tray. To insert the battery pack, following the steps below: 1 1. Please contact your notebook.
... It is always recommended to have another battery pack in the battery tray. To insert the battery pack, following the steps below: 1 1. Please contact your notebook.

User Manual
Page 49
... 3-6 Releasing the Battery Pack To install the battery pack, following the steps below: 1. Locate the battery release button on the bottom side. 5. Make sure the notebook is turned off, and the AC power is disconnected. 2.
... 3-6 Releasing the Battery Pack To install the battery pack, following the steps below: 1. Locate the battery release button on the bottom side. 5. Make sure the notebook is turned off, and the AC power is disconnected. 2.

User Manual
Page 52
...; The battery pack uses Lithium-ion battery cells that consuming the battery power completely once a month is necessary. Š If you do not use the notebook for a long time, it is installed in use. This may be helpful to remove the battery pack from your battery life. Š The actual charging... recharged while it is unnecessary to -Disk. Š Plug in an external AC/DC adapter. Š You can be determined by the applications in the notebook. It is suggested to extend your notebook. Please pay attention to the following tips before recharging.
...; The battery pack uses Lithium-ion battery cells that consuming the battery power completely once a month is necessary. Š If you do not use the notebook for a long time, it is installed in use. This may be helpful to remove the battery pack from your battery life. Š The actual charging... recharged while it is unnecessary to -Disk. Š Plug in an external AC/DC adapter. Š You can be determined by the applications in the notebook. It is suggested to extend your notebook. Please pay attention to the following tips before recharging.

User Manual
Page 53
... Engine, or to activate the ECO Engine power saving function: 1. Getting Started 3-10 ECO Engine -- Press and hold the Fn button. 2. Movie Mode Select this notebook. Press the F5 button repeatedly to extend the battery running time while performing different tasks with this mode while playing multimedia applications Read the instructions...
... Engine, or to activate the ECO Engine power saving function: 1. Getting Started 3-10 ECO Engine -- Press and hold the Fn button. 2. Movie Mode Select this notebook. Press the F5 button repeatedly to extend the battery running time while performing different tasks with this mode while playing multimedia applications Read the instructions...

User Manual
Page 58
...as on the desk naturally to support your wrists. Š Adjust the angle/position of time. Š Your work anywhere. Safety and Comfort Tips The notebook is a portable platform that allows you to work area should have enough illumination. Š Choose the proper desk and chair and adjust their height to... your back comfortably. Š Place you have the proper position (about 90-degree) when operating. Š Put your hands on the bed). Š The notebook is important if you feet flat and naturally on the floor, so that your knees and elbows have to work with great care to have...
...as on the desk naturally to support your wrists. Š Adjust the angle/position of time. Š Your work anywhere. Safety and Comfort Tips The notebook is a portable platform that allows you to work area should have enough illumination. Š Choose the proper desk and chair and adjust their height to... your back comfortably. Š Place you have the proper position (about 90-degree) when operating. Š Put your hands on the bed). Š The notebook is important if you feet flat and naturally on the floor, so that your knees and elbows have to work with great care to have...

User Manual
Page 59
Sit straight and keep the following tips in mind when operating. Š Change your notebook for a period of time. Getting Started 3-16 1. Adjust the angle and position of time; Please keep a good posture. 3 5. Adjust the desk's height. 4. Adjust the chair's ...
Sit straight and keep the following tips in mind when operating. Š Change your notebook for a period of time. Getting Started 3-16 1. Adjust the angle and position of time; Please keep a good posture. 3 5. Adjust the desk's height. 4. Adjust the chair's ...

