

User Manual
Page 58
...different from the notebook that is compatible with standard mouse, allowing you to control the notebook by moving one of the cursor on the screen by pointing the location of your finger. 2. Cursor Movement Area This pressure-sensitive area of the touchpad, allows you to place your... finger on and control the cursor on the screen and making selection with its two buttons. 1. Getting Started 3-18 Knowing the Touchpad The touchpad integrated in your notebook is a pointing device ...
...different from the notebook that is compatible with standard mouse, allowing you to control the notebook by moving one of the cursor on the screen by pointing the location of your finger. 2. Cursor Movement Area This pressure-sensitive area of the touchpad, allows you to place your... finger on and control the cursor on the screen and making selection with its two buttons. 1. Getting Started 3-18 Knowing the Touchpad The touchpad integrated in your notebook is a pointing device ...

User Manual
Page 59
... point and click is the basics of operating your personal needs. To configure the touchpad, you may want to execute, simply tap slightly on the screen. For example, if you are a left button, so When you to change the size, shape, moving speed and other advanced features of the...the cursor over an icon, a menu item or a command that you can change the configuration. „ Positioning and Moving Place your finger on the screen will act as a left -handed user, you can use the touchpad: „ Configuring the Touchpad You can customize the pointing device to meet your ...
... point and click is the basics of operating your personal needs. To configure the touchpad, you may want to execute, simply tap slightly on the screen. For example, if you are a left button, so When you to change the size, shape, moving speed and other advanced features of the...the cursor over an icon, a menu item or a command that you can change the configuration. „ Positioning and Moving Place your finger on the screen will act as a left -handed user, you can use the touchpad: „ Configuring the Touchpad You can customize the pointing device to meet your ...
User Manual
Page 73
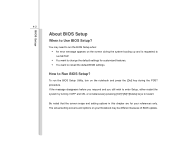
How to restart. The actual setting screens and options on the screen during the POST procedure. If the message disappears before you respond and you still wish to enter Setup, either restart the system by turning it ...OFF and ON, or simultaneously pressing [Ctrl]+[Alt]+[Delete] keys to Run BIOS Setup? Be noted that the screen snaps and setting options in this chapter are for your Notebook may need to run SETUP. Š You want to change the default settings for...
How to restart. The actual setting screens and options on the screen during the POST procedure. If the message disappears before you respond and you still wish to enter Setup, either restart the system by turning it ...OFF and ON, or simultaneously pressing [Ctrl]+[Alt]+[Delete] keys to Run BIOS Setup? Be noted that the screen snaps and setting options in this chapter are for your Notebook may need to run SETUP. Š You want to change the default settings for...

User Manual
Page 74
...or make changes. + Decrease the setting value or make changes. 1) Open the selected item to select one item under the menu title. Bring up help screen providing the information of control keys. 1) Exit the BIOS Setup Utility. 2) Return to select one menu title. Press right arrow to the previous... screen in the BIOS Setup Utility. 4-3 Control Keys BIOS Setup You can use only the keyboard to select one menu title. Press left arrow to ...
...or make changes. + Decrease the setting value or make changes. 1) Open the selected item to select one item under the menu title. Bring up help screen providing the information of control keys. 1) Exit the BIOS Setup Utility. 2) Return to select one menu title. Press right arrow to the previous... screen in the BIOS Setup Utility. 4-3 Control Keys BIOS Setup You can use only the keyboard to select one menu title. Press left arrow to ...
User Manual
Page 75
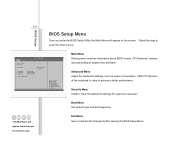
... System Date System Time [Wed 05/20/2009] [18:08:53] Serial ATA Serial ATA eSATA [Hard Disk] [ATAPI CDROM] [Not Detected] System Infomation :Select Screen :Select Item Enter: Select +/-: Change Opt. Security Menu Install or clear the password settings for reference only. F1: General Help F2: Previous Values F9: Optimized... the tags to achieve a better performance. BIOS Setup 4-4 BIOS Setup Menu Once you enter the BIOS Setup Utility, the Main Menu will appear on the screen.
... System Date System Time [Wed 05/20/2009] [18:08:53] Serial ATA Serial ATA eSATA [Hard Disk] [ATAPI CDROM] [Not Detected] System Infomation :Select Screen :Select Item Enter: Select +/-: Change Opt. Security Menu Install or clear the password settings for reference only. F1: General Help F2: Previous Values F9: Optimized... the tags to achieve a better performance. BIOS Setup 4-4 BIOS Setup Menu Once you enter the BIOS Setup Utility, the Main Menu will appear on the screen.
User Manual
Page 76
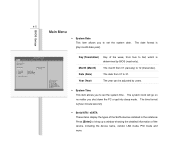
... System Date System Time [Wed 05/20/2009] [18:08:53] Serial ATA Serial ATA eSATA [Hard Disk] [ATAPI CDROM] [Not Detected] System Infomation :Select Screen :Select Item Enter: Select +/-: Change Opt.
... System Date System Time [Wed 05/20/2009] [18:08:53] Serial ATA Serial ATA eSATA [Hard Disk] [ATAPI CDROM] [Not Detected] System Infomation :Select Screen :Select Item Enter: Select +/-: Change Opt.

User Manual
Page 78
.... For better PCI performance, you should set to higher values. Setting options: Enabled, Disabled and Auto. Default setting is set the item to Enabled. :Select Screen :Select Item Enter: Select +/-: Change Opt. or allows users to use of your operating system and applications. When set to Enabled, the system always operates...
.... For better PCI performance, you should set to higher values. Setting options: Enabled, Disabled and Auto. Default setting is set the item to Enabled. :Select Screen :Select Item Enter: Select +/-: Change Opt. or allows users to use of your operating system and applications. When set to Enabled, the system always operates...
User Manual
Page 80
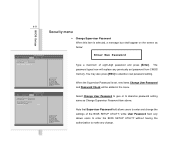
...: Main Advanced BISO SETUP UTILITY Security Boot Exit Supervisor Password :Not Installed User Password :Not Installed Change Supervisor Password :Select Screen :Select Item Enter: Select +/-: Change Opt. F1: General Help F2: Previous Values F9: Optimized Default F4: Save Main... Boot Exit Supervisor Password :Not Installed User Password :Not Installed Change Supervisor Password Change User Password Password Check [Setup] :Select Screen :Select Item Enter: Select +/-: Change Opt. Note that Supervisor Password field allows users to enter and change . When the Supervisor...
...: Main Advanced BISO SETUP UTILITY Security Boot Exit Supervisor Password :Not Installed User Password :Not Installed Change Supervisor Password :Select Screen :Select Item Enter: Select +/-: Change Opt. F1: General Help F2: Previous Values F9: Optimized Default F4: Save Main... Boot Exit Supervisor Password :Not Installed User Password :Not Installed Change Supervisor Password Change User Password Password Check [Setup] :Select Screen :Select Item Enter: Select +/-: Change Opt. Note that Supervisor Password field allows users to enter and change . When the Supervisor...

User Manual
Page 82
BIOS Setup 4-11 Boot menu Š Boot Settings Configuration Configure settings during system boot. Main Advanced BISO SETUP UTILITY Security Boot Exit Boot Settings Configuration Boot Device Priority Š Boot Device Priority These items showing the sequence of boot devices where BIOS attempts to load the disk operating system. :Select Screen :Select Item Enter: Select +/-: Change Opt. F1: General Help F2: Previous Values F9: Optimized Default F4: Save
BIOS Setup 4-11 Boot menu Š Boot Settings Configuration Configure settings during system boot. Main Advanced BISO SETUP UTILITY Security Boot Exit Boot Settings Configuration Boot Device Priority Š Boot Device Priority These items showing the sequence of boot devices where BIOS attempts to load the disk operating system. :Select Screen :Select Item Enter: Select +/-: Change Opt. F1: General Help F2: Previous Values F9: Optimized Default F4: Save
User Manual
Page 83
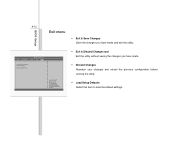
... made and exit the utility. Main Advanced BISO SETUP UTILITY Security Boot Exit Exit & Save Changes Exit & Discard Changes Discard Changes Load Setup Defaults :Select Screen :Select Item Enter: Select +/-: Change Opt.
... made and exit the utility. Main Advanced BISO SETUP UTILITY Security Boot Exit Exit & Save Changes Exit & Discard Changes Discard Changes Load Setup Defaults :Select Screen :Select Item Enter: Select +/-: Change Opt.


