
User Guide
Page 1
Wind Top AE2240 Series All-in-One (AIO) PC MS-AC22 (V1.X) System G52-AC221X1
Wind Top AE2240 Series All-in-One (AIO) PC MS-AC22 (V1.X) System G52-AC221X1

User Guide
Page 16
▍ Overview Rear View 1 4 5 1 2 3 1 8 12 15 11 6 14 7 8 13 9 10 Important We suggest that you connect the AC/DC adapter to your AIO PC first and then connect the AC power cord to the socket-outlet for safety concerns. 1-4
▍ Overview Rear View 1 4 5 1 2 3 1 8 12 15 11 6 14 7 8 13 9 10 Important We suggest that you connect the AC/DC adapter to your AIO PC first and then connect the AC power cord to the socket-outlet for safety concerns. 1-4

User Guide
Page 26
... your hands and feet with great care to work area should have an optimal view. ■ Avoid using your PC in a place where discomfort may occur (such as on the bed). ■ The AIO PC is an electrical device. ture when operating. ■ When sitting on the chair, adjust the chair's back (if... your back comfortably. ■ Place you feet flat and naturally on the desk naturally to support your wrists. ■ Adjust the angle/ position of the AIO PC to have enough illumination. ■ Choose the proper desk and chair and adjust their height to work with your...
... your hands and feet with great care to work area should have an optimal view. ■ Avoid using your PC in a place where discomfort may occur (such as on the bed). ■ The AIO PC is an electrical device. ture when operating. ■ When sitting on the chair, adjust the chair's back (if... your back comfortably. ■ Place you feet flat and naturally on the desk naturally to support your wrists. ■ Adjust the angle/ position of the AIO PC to have enough illumination. ■ Choose the proper desk and chair and adjust their height to work with your...

User Guide
Page 27
MS-AC22 Having Good Working Habits Having good working for long periods of time. 2-3 otherwise, it may cause discomfort or injury to you have to work with your body regularly. ■ Remember to take a break after working habits is important if you . Please keep the following tips in mind when operating. ■ Change your posture frequently. ■ Stretch and exercise your AIO PC for a period of time;
MS-AC22 Having Good Working Habits Having good working for long periods of time. 2-3 otherwise, it may cause discomfort or injury to you have to work with your body regularly. ■ Remember to take a break after working habits is important if you . Please keep the following tips in mind when operating. ■ Change your posture frequently. ■ Stretch and exercise your AIO PC for a period of time;

User Guide
Page 28
Actual product specifications may vary with one touch hot keys * The illustration of keyboard is for MSI LCD display ■ Compatible with Windows 2000/ ME/ XP/ Vista/ 7 ■ Built-in streamline shape ■ Compact size for space saving ■ ... million ■ Dimensions: 376.4 (L) X 155.09 (W) X 21.91 (H) mm ■ Cable Length: 150cm ■ Weight: 440g ▶ Features ■ Multimedia function keys with AIO PC ■ New isolated keycap for easy typing ■ Soft-touch and tactile feedback for comfortable typing ■ New concept elegant and slim keyboard in function...
Actual product specifications may vary with one touch hot keys * The illustration of keyboard is for MSI LCD display ■ Compatible with Windows 2000/ ME/ XP/ Vista/ 7 ■ Built-in streamline shape ■ Compact size for space saving ■ ... million ■ Dimensions: 376.4 (L) X 155.09 (W) X 21.91 (H) mm ■ Cable Length: 150cm ■ Weight: 440g ▶ Features ■ Multimedia function keys with AIO PC ■ New isolated keycap for easy typing ■ Soft-touch and tactile feedback for comfortable typing ■ New concept elegant and slim keyboard in function...

User Guide
Page 30
To stabilize the system, make sure that the stand has been pulled until the mark on a flat and steady surface such as well. 2-6 Proper positioning helps to the back of the system. Place your System Positioning Your AIO PC Step 1. Step 2. Pull the stand open and tilt the monitor. ▍ Getting Started Positioning your AIO PC on its hinge aligns to reduce your eye strain & muscle fatigue as a table or desk.
To stabilize the system, make sure that the stand has been pulled until the mark on a flat and steady surface such as well. 2-6 Proper positioning helps to the back of the system. Place your System Positioning Your AIO PC Step 1. Step 2. Pull the stand open and tilt the monitor. ▍ Getting Started Positioning your AIO PC on its hinge aligns to reduce your eye strain & muscle fatigue as a table or desk.

User Guide
Page 31
...drivers for reference only. All devices listed here are for each device first if necessary, and then connect the device to the AIO PC. Connecting the USB Devices This AIO PC provides USB ports for connecting various USB devices, such as mouse, keyboard, digital camera, webcam, printer, external optical storage device...,.. This AIO PC is capable of auto detecting the USB devices installed, and if there is no detection of the devices, please manually enable the...
...drivers for reference only. All devices listed here are for each device first if necessary, and then connect the device to the AIO PC. Connecting the USB Devices This AIO PC provides USB ports for connecting various USB devices, such as mouse, keyboard, digital camera, webcam, printer, external optical storage device...,.. This AIO PC is capable of auto detecting the USB devices installed, and if there is no detection of the devices, please manually enable the...
User Guide
Page 32
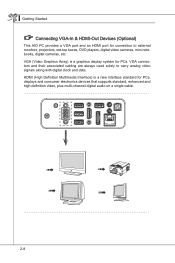
... & HDMI-Out Devices (Optional) This AIO PC provides a VGA port and an HDMI port for connection to carry analog video signals along with digital clock and data. HDMI (High Definition Multimedia Interface) is a graphics display system for PCs, displays and consumer electronics devices that supports...high-definition video, plus multi-channel digital audio on a single cable. 2-8 VGA (Video Graphics Array) is a new interface standard for PCs. VGA connectors and their associated cabling are always used solely to external monitors, projectors, set-top boxes, DVD players, digital video cameras...
... & HDMI-Out Devices (Optional) This AIO PC provides a VGA port and an HDMI port for connection to carry analog video signals along with digital clock and data. HDMI (High Definition Multimedia Interface) is a graphics display system for PCs, displays and consumer electronics devices that supports...high-definition video, plus multi-channel digital audio on a single cable. 2-8 VGA (Video Graphics Array) is a new interface standard for PCs. VGA connectors and their associated cabling are always used solely to external monitors, projectors, set-top boxes, DVD players, digital video cameras...

User Guide
Page 33
MS-AC22 To connect the VGA/ HDMI device, first make sure the AIO PC and the targeted device are both powered off, and then connect the cable of the device to the VGA/ HDMI port of your AIO PC. 2-9
MS-AC22 To connect the VGA/ HDMI device, first make sure the AIO PC and the targeted device are both powered off, and then connect the cable of the device to the VGA/ HDMI port of your AIO PC. 2-9

User Guide
Page 34
To connect the eSATA hard disk device, simply connect the cable of the device to connect an external Serial ATA hard disk device. ▍ Getting Started Connecting the External SATA Hard Disk Drive (Optional) The eSATA Connector allows you can connect and remove the eSATA devices without turning off the AIO PC. The eSATA standard interface supports "plug-and-play" technology, so that you to the eSATA Connector of your AIO PC. 2-10
To connect the eSATA hard disk device, simply connect the cable of the device to connect an external Serial ATA hard disk device. ▍ Getting Started Connecting the External SATA Hard Disk Drive (Optional) The eSATA Connector allows you can connect and remove the eSATA devices without turning off the AIO PC. The eSATA standard interface supports "plug-and-play" technology, so that you to the eSATA Connector of your AIO PC. 2-10

User Guide
Page 35
MS-AC22 Connecting the Communication Device Wired LAN The RJ-45 connector of the AIO PC allows you to connect the LAN (local area network) devices, such as a hub, switch and gateway, to the LAN, please ask your MIS staff or network manager for help. 2-11 For more instructions or detailed steps on connecting to build a network connection.
MS-AC22 Connecting the Communication Device Wired LAN The RJ-45 connector of the AIO PC allows you to connect the LAN (local area network) devices, such as a hub, switch and gateway, to the LAN, please ask your MIS staff or network manager for help. 2-11 For more instructions or detailed steps on connecting to build a network connection.

User Guide
Page 36
... with standard IEEE 802.11 technology for help. 2-12 For more secure solution to the wireless communication. ▍ Getting Started Wireless LAN (Optional) This AIO PC is capable to achieve a more efficient and a more instructions or detailed steps on connecting to the Wireless LAN, please ask your MIS staff or network...
... with standard IEEE 802.11 technology for help. 2-12 For more secure solution to the wireless communication. ▍ Getting Started Wireless LAN (Optional) This AIO PC is capable to achieve a more efficient and a more instructions or detailed steps on connecting to the Wireless LAN, please ask your MIS staff or network...

User Guide
Page 38
... 6 5 2 2-14 Plug the DC end of the adapter to the electrical outlet. Unplug the AC power cord from the AIO PC. Disassemble the AC power cord and the AC/DC adapter. Assemble the AC/DC adapter and the AC power cord. Disconnecting the AC...AC power cord, always hold the connector part of the AC power cord to the AIO PC, and the male end of the cord. Step 2. Important We suggest that you connect the AC/DC adapter... to your AIO PC first and then connect the AC power cord to find the AC/DC adapter and AC power ...
... 6 5 2 2-14 Plug the DC end of the adapter to the electrical outlet. Unplug the AC power cord from the AIO PC. Disassemble the AC power cord and the AC/DC adapter. Assemble the AC/DC adapter and the AC power cord. Disconnecting the AC...AC power cord, always hold the connector part of the AC power cord to the AIO PC, and the male end of the cord. Step 2. Important We suggest that you connect the AC/DC adapter... to your AIO PC first and then connect the AC power cord to find the AC/DC adapter and AC power ...

User Guide
Page 40
...[Next] to proceed without activating the anti-virus software. Step 10. Step 11. The system enters the Windows 7 OS to start using your AIO PC after the personalized settings are done. Please wait until Windows setup finishes the progress loading. Choose a user name for your account and name your user... account from the provided WLAN list. Step 8. You may also click [Skip] to explore your Wind Top Series AIO PC. Alternatively, choose [No, I accept the license terms" box and click [Next] to continue. Step 12. Step 13. Have fun with it...
...[Next] to proceed without activating the anti-virus software. Step 10. Step 11. The system enters the Windows 7 OS to start using your AIO PC after the personalized settings are done. Please wait until Windows setup finishes the progress loading. Choose a user name for your account and name your user... account from the provided WLAN list. Step 8. You may also click [Skip] to explore your Wind Top Series AIO PC. Alternatively, choose [No, I accept the license terms" box and click [Next] to continue. Step 12. Step 13. Have fun with it...