
User Guide
Page 2
... of Replaceable Parts iv Technical Support iv Green Product Features v Environmental Policy v Safety Instructions vi CE Conformity viii FCC-B Radio Frequency Interference Statement viii WEEE Statement ix 1. Overview 1-1 Packing Contents 1-2 System Overview 1-3 System Specifications 1-9 Component Replacement & Upgrade 1-10 2. System Operations 3-1 System Booting Setup for the first time 3-2 Creating System Recovery Disk 3-3 Network Connection under Windows 3-9 RALINK Wireless LAN Connection (Optional 3-14 THX TruStudio PRO (Optional 3-16 On-Screen Display (OSD 3-19 Power...
... of Replaceable Parts iv Technical Support iv Green Product Features v Environmental Policy v Safety Instructions vi CE Conformity viii FCC-B Radio Frequency Interference Statement viii WEEE Statement ix 1. Overview 1-1 Packing Contents 1-2 System Overview 1-3 System Specifications 1-9 Component Replacement & Upgrade 1-10 2. System Operations 3-1 System Booting Setup for the first time 3-2 Creating System Recovery Disk 3-3 Network Connection under Windows 3-9 RALINK Wireless LAN Connection (Optional 3-14 THX TruStudio PRO (Optional 3-16 On-Screen Display (OSD 3-19 Power...
User Guide
Page 4
... distributor. For any upgrade or replace service. Technical Support If a problem arises with your system and no solution can be obtained from the user's manual, please contact your place of the product if you contact the authorized dealer or service center for FAQ, technical guide, BIOS updates, driver updates and other information via http://www.msi.com/index.php?func=service ◙ Contact our technical staff via http://www...
... distributor. For any upgrade or replace service. Technical Support If a problem arises with your system and no solution can be obtained from the user's manual, please contact your place of the product if you contact the authorized dealer or service center for FAQ, technical guide, BIOS updates, driver updates and other information via http://www.msi.com/index.php?func=service ◙ Contact our technical staff via http://www...
User Guide
Page 6
... on card or module to achieve zero energy consumption. vi ▍ Preface Safety Instructions Read the safety instructions carefully and thoroughly. Keep the User's Guide that the power voltage is used for future reference. The equipment must be connected to an earthed mains socket-outlet. ◙ Always unplug the AC power cord before installing any add-on the equipment or user's manual should...
... on card or module to achieve zero energy consumption. vi ▍ Preface Safety Instructions Read the safety instructions carefully and thoroughly. Keep the User's Guide that the power voltage is used for future reference. The equipment must be connected to an earthed mains socket-outlet. ◙ Always unplug the AC power cord before installing any add-on the equipment or user's manual should...
User Guide
Page 7
... away from the equipment. Cable distribution system should be grounded (earthed) in accordance with the same or equivalent type recommended by service personnel: ◙ The power cord or plug is reliably connected to protective earthing system of the building. Use of controls or adjustments or performance of procedures other than those specified is incorrectly replaced. If any liquid into...
... away from the equipment. Cable distribution system should be grounded (earthed) in accordance with the same or equivalent type recommended by service personnel: ◙ The power cord or plug is reliably connected to protective earthing system of the building. Use of controls or adjustments or performance of procedures other than those specified is incorrectly replaced. If any liquid into...
User Guide
Page 8
... and, if not installed and used in compliance with the instruction manual, may not cause harmful interference, and 2. Operation is in order to Part 15 of the measures listed below: ■Reorient or relocate the receiving antenna. ■Increase the separation between the equipment and receiver. ■Connect the equipment into an outlet on , the user is connected. ■Consult...
... and, if not installed and used in compliance with the instruction manual, may not cause harmful interference, and 2. Operation is in order to Part 15 of the measures listed below: ■Reorient or relocate the receiving antenna. ■Increase the separation between the equipment and receiver. ■Connect the equipment into an outlet on , the user is connected. ■Consult...
User Guide
Page 14
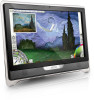
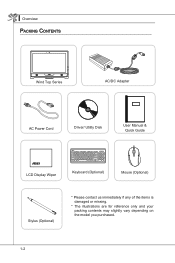
▍ Overview Packing Contents Wind Top Series AC/DC Adapter AC Power Cord Driver/ Utility Disk User Manual & Quick Guide LCD Display Wiper Keyboard (Optional) Mouse (Optional) Stylus (Optional) * Please contact us immediately if any of the items is damaged or missing. * The illustrations are for reference only and your packing contents may slightly vary depending on the model you purchased. 1-2
▍ Overview Packing Contents Wind Top Series AC/DC Adapter AC Power Cord Driver/ Utility Disk User Manual & Quick Guide LCD Display Wiper Keyboard (Optional) Mouse (Optional) Stylus (Optional) * Please contact us immediately if any of the items is damaged or missing. * The illustrations are for reference only and your packing contents may slightly vary depending on the model you purchased. 1-2

User Guide
Page 17
... supported memory cards may support various types of memory card, such as mouse, keyboard, printer, scanner, camera, PDA or other USB-compatible devices. 9 eSATA Port (Optional) - Route the cables through this stand to prevent the equipment from overheating. Power supplied through the cable routing hole to DC power for eSATA hard disk drives. 1-5 Use this jack supplies power to the PC, always use the supplied AC/DC adapter. 7 VGA Port (Optional) - The AC/DC adapter converts AC power to avoid cable spaghetti when connecting devices. 6 Power...
... supported memory cards may support various types of memory card, such as mouse, keyboard, printer, scanner, camera, PDA or other USB-compatible devices. 9 eSATA Port (Optional) - Route the cables through this stand to prevent the equipment from overheating. Power supplied through the cable routing hole to DC power for eSATA hard disk drives. 1-5 Use this jack supplies power to the PC, always use the supplied AC/DC adapter. 7 VGA Port (Optional) - The AC/DC adapter converts AC power to avoid cable spaghetti when connecting devices. 6 Power...

User Guide
Page 18
... Green/ Orange LED Color LED State Condition Left Yellow Off LAN link is provided for microphones. 12 Headphone Jack - On (brighter & pulsing) The computer is provided for digital audio transmission to external speakers through an optical fiber cable. 1-6 This connector is communicating with another computer on a single cable. 14 TV Tuner Antenna Connector (Optional) - You can connect a network cable to the Local Area Network (LAN). This S/PDIF...
... Green/ Orange LED Color LED State Condition Left Yellow Off LAN link is provided for microphones. 12 Headphone Jack - On (brighter & pulsing) The computer is provided for digital audio transmission to external speakers through an optical fiber cable. 1-6 This connector is communicating with another computer on a single cable. 14 TV Tuner Antenna Connector (Optional) - You can connect a network cable to the Local Area Network (LAN). This S/PDIF...
User Guide
Page 19
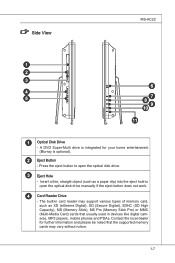
...), MS (Memory Stick), MS Pro (Memory Stick Pro) or MMC (Multi-Media Card) cards that the supported memory cards may vary without notice. 1-7 Press the eject button to open the optical disk drive. 3 Eject Hole - The built-in devices like digital cameras...used in card reader may support various types of memory card, such as a paper clip) into the eject hole to open the optical disk drive manually if the eject button does not work. 4 Card Reader Drive - Side View MS-AC22 1 2 3 6 4 5 7 8 9 10 11 1 Optical Disk Drive - A DVD Super-Multi drive is optional). 2 Eject Button...
...), MS (Memory Stick), MS Pro (Memory Stick Pro) or MMC (Multi-Media Card) cards that the supported memory cards may vary without notice. 1-7 Press the eject button to open the optical disk drive. 3 Eject Hole - The built-in devices like digital cameras...used in card reader may support various types of memory card, such as a paper clip) into the eject hole to open the optical disk drive manually if the eject button does not work. 4 Card Reader Drive - Side View MS-AC22 1 2 3 6 4 5 7 8 9 10 11 1 Optical Disk Drive - A DVD Super-Multi drive is optional). 2 Eject Button...

User Guide
Page 20
... the monitor. 1-8 The power LED glows when the system is turned on or off when the system is provided for attaching USB devices such as mouse, keyboard, printer, scanner, camera, PDA or other USB-compatible devices. 6 System Power Button/ LED - Pressing the system power button will wake the system up from power saving mode. 7 MENU Button - Press this button to view the OSD menu or enter into the sub menu. 8 Right Button - The USB (Universal Serial Bus) port...
... the monitor. 1-8 The power LED glows when the system is turned on or off when the system is provided for attaching USB devices such as mouse, keyboard, printer, scanner, camera, PDA or other USB-compatible devices. 6 System Power Button/ LED - Pressing the system power button will wake the system up from power saving mode. 7 MENU Button - Press this button to view the OSD menu or enter into the sub menu. 8 Right Button - The USB (Universal Serial Bus) port...

User Guide
Page 21
... LCD display with an optimal resolution of 1920 X 1080 and standard proportion of 16:9 widescreen Rear Panel I/O ■ 1 DC power jack ■ 1 VGA-In port (Optional) ■ 4 USB ports ■ 1 HDMI-Out port (Optional) ■ 1 eSATA port (Optional) ■ 1 RJ-45 LAN jack ■ 1 microphone jack ■ 1 headphone/ speaker jack ■ 1 optical S/PDIF-Out jack (Optional) Storage ■ Hard Disk Drive: 3.5", SATAII ■ Optical Disk Drive: Slim DVD Super Multi (Blu-ray is optional) ■ Card Reader: 4 in...
... LCD display with an optimal resolution of 1920 X 1080 and standard proportion of 16:9 widescreen Rear Panel I/O ■ 1 DC power jack ■ 1 VGA-In port (Optional) ■ 4 USB ports ■ 1 HDMI-Out port (Optional) ■ 1 eSATA port (Optional) ■ 1 RJ-45 LAN jack ■ 1 microphone jack ■ 1 headphone/ speaker jack ■ 1 optical S/PDIF-Out jack (Optional) Storage ■ Hard Disk Drive: 3.5", SATAII ■ Optical Disk Drive: Slim DVD Super Multi (Blu-ray is optional) ■ Card Reader: 4 in...
User Guide
Page 22
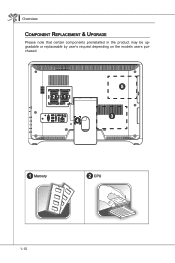
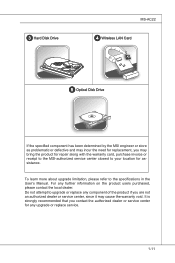
▍ Overview Component Replacement & Upgrade Please note that certain components preinstalled in the product may be upgradable or replaceable by user's request depending on the models users purchased. 21 4 5 3 1 Memory 2 CPU 1-10
▍ Overview Component Replacement & Upgrade Please note that certain components preinstalled in the product may be upgradable or replaceable by user's request depending on the models users purchased. 21 4 5 3 1 Memory 2 CPU 1-10
User Guide
Page 23
... 4 Wireless LAN Card 5 Optical Disk Drive If the specified component has been determined by the MSI engineer or store as problematic or defective and may incur the need for replacement, you are not an authorized dealer or service center, since it may bring the product for repair along with the warranty card, purchase invoice or receipt to the MSI-authorized service center closest to the specifications in...
... 4 Wireless LAN Card 5 Optical Disk Drive If the specified component has been determined by the MSI engineer or store as problematic or defective and may incur the need for replacement, you are not an authorized dealer or service center, since it may bring the product for repair along with the warranty card, purchase invoice or receipt to the MSI-authorized service center closest to the specifications in...

User Guide
Page 31
.... This AIO PC is capable of auto detecting the USB devices installed, and if there is no detection of the devices, please manually enable the USB devices by going to Start Menu/ Control Panel / Add Hardware to the AIO PC. Connecting Peripheral Devices MS-AC22 The I/O (input/output) ports on the rear panel allow you to connect peripheral devices. All devices listed here are for connecting various USB devices, such as mouse, keyboard, digital camera, webcam, printer, external optical storage device,..
.... This AIO PC is capable of auto detecting the USB devices installed, and if there is no detection of the devices, please manually enable the USB devices by going to Start Menu/ Control Panel / Add Hardware to the AIO PC. Connecting Peripheral Devices MS-AC22 The I/O (input/output) ports on the rear panel allow you to connect peripheral devices. All devices listed here are for connecting various USB devices, such as mouse, keyboard, digital camera, webcam, printer, external optical storage device,..
User Guide
Page 32
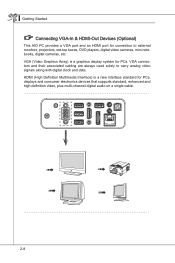
..., displays and consumer electronics devices that supports standard, enhanced and high-definition video, plus multi-channel digital audio on a single cable. 2-8 VGA connectors and their associated cabling are always used solely to external monitors, projectors, set-top boxes, DVD players, digital video cameras, mini notebooks, digital cameras, etc. VGA (Video Graphics Array) is a new interface standard for PCs. ▍ Getting Started Connecting VGA-In & HDMI-Out Devices (Optional) This AIO PC provides a VGA port and an HDMI port for connection...
..., displays and consumer electronics devices that supports standard, enhanced and high-definition video, plus multi-channel digital audio on a single cable. 2-8 VGA connectors and their associated cabling are always used solely to external monitors, projectors, set-top boxes, DVD players, digital video cameras, mini notebooks, digital cameras, etc. VGA (Video Graphics Array) is a new interface standard for PCs. ▍ Getting Started Connecting VGA-In & HDMI-Out Devices (Optional) This AIO PC provides a VGA port and an HDMI port for connection...

User Guide
Page 33
MS-AC22 To connect the VGA/ HDMI device, first make sure the AIO PC and the targeted device are both powered off, and then connect the cable of the device to the VGA/ HDMI port of your AIO PC. 2-9
MS-AC22 To connect the VGA/ HDMI device, first make sure the AIO PC and the targeted device are both powered off, and then connect the cable of the device to the VGA/ HDMI port of your AIO PC. 2-9

User Guide
Page 34
The eSATA standard interface supports "plug-and-play" technology, so that you to the eSATA Connector of the device to connect an external Serial ATA hard disk device. ▍ Getting Started Connecting the External SATA Hard Disk Drive (Optional) The eSATA Connector allows you can connect and remove the eSATA devices without turning off the AIO PC. To connect the eSATA hard disk device, simply connect the cable of your AIO PC. 2-10
The eSATA standard interface supports "plug-and-play" technology, so that you to the eSATA Connector of the device to connect an external Serial ATA hard disk device. ▍ Getting Started Connecting the External SATA Hard Disk Drive (Optional) The eSATA Connector allows you can connect and remove the eSATA devices without turning off the AIO PC. To connect the eSATA hard disk device, simply connect the cable of your AIO PC. 2-10

User Guide
Page 40
...-virus software. Step 13. ▍ System Operations System Booting Setup for the first time For the first-time use, you will take you around 30 minutes. Windows setup starts running . Set a password for your account to continue. Click [Agree] to continue. Select the language of the operating system and click [Next] to join from unwanted users. (Leave this step and set up . Please choose a wireless network...
...-virus software. Step 13. ▍ System Operations System Booting Setup for the first time For the first-time use, you will take you around 30 minutes. Windows setup starts running . Set a password for your account to continue. Click [Agree] to continue. Select the language of the operating system and click [Next] to join from unwanted users. (Leave this step and set up . Please choose a wireless network...

User Guide
Page 60
... sleep mode after a period of user inactivity. Go to control the power management features of electricity as well as deliver environmental benefits. To be energy efficient, turn off your display or set your personal needs. ▍ System Operations Power Management Power management of personal computers (PCs) and monitors has the potential to save significant amounts of your display, hard drive, and battery. Power Management in Windows OS ■ [Power Options] in Windows OS allow you to [Start] > [Control Panel...
... sleep mode after a period of user inactivity. Go to control the power management features of electricity as well as deliver environmental benefits. To be energy efficient, turn off your display or set your personal needs. ▍ System Operations Power Management Power management of personal computers (PCs) and monitors has the potential to save significant amounts of your display, hard drive, and battery. Power Management in Windows OS ■ [Power Options] in Windows OS allow you to [Start] > [Control Panel...

User Guide
Page 65
... appears. The Windows OS starts loading files. Windows is infected with fatal viruses and no solution can be erased while all settings will format the whole HDD. The system recovery menu pops up. [Hard Disk Recovery] will be restored to confirm the selection. Press any key to boot from CD or DVD ... 4. Select the [CD/ DVD] device as the boot device and press [Enter] to manufacturer default. Select [Hard Disk Recovery] only when...
... appears. The Windows OS starts loading files. Windows is infected with fatal viruses and no solution can be erased while all settings will format the whole HDD. The system recovery menu pops up. [Hard Disk Recovery] will be restored to confirm the selection. Press any key to boot from CD or DVD ... 4. Select the [CD/ DVD] device as the boot device and press [Enter] to manufacturer default. Select [Hard Disk Recovery] only when...


