User Guide
Page 3
... it may be noticed that the wireless LAN card, hard disk drive, and optical disk drive preinstalled in the User's Manual. Alternatively, please try the following help resources for FAQ, technical guide, BIOS updates, driver updates and other information: http://www.msi.com/index.php?func=service Contact our technical staff at: http://ocss.msi.com iii It is strongly recommended to upgrade or replace any upgrade or replace service. Do not attempt to contact the...
... it may be noticed that the wireless LAN card, hard disk drive, and optical disk drive preinstalled in the User's Manual. Alternatively, please try the following help resources for FAQ, technical guide, BIOS updates, driver updates and other information: http://www.msi.com/index.php?func=service Contact our technical staff at: http://ocss.msi.com iii It is strongly recommended to upgrade or replace any upgrade or replace service. Do not attempt to contact the...
User Guide
Page 4
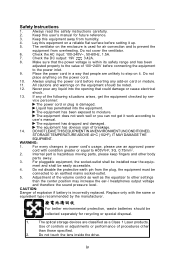
... Instructions 1. vice personnel: The power cord or plug is hazardous moving parts, please keep fingers and other than the center position may increase the ear-/ headphones output voltage and therefore the sound pressure level. Liquid has penetrated into the opening that the power voltage is incorrectly replaced. Do not touch the lens inside the drive. If any liquid into the equipment. Internal part...
... Instructions 1. vice personnel: The power cord or plug is hazardous moving parts, please keep fingers and other than the center position may increase the ear-/ headphones output voltage and therefore the sound pressure level. Liquid has penetrated into the opening that the power voltage is incorrectly replaced. Do not touch the lens inside the drive. If any liquid into the equipment. Internal part...

User Guide
Page 5
...cables and A.C. Micro-Star International Wind Top Series This device complies with the instruction manual, may cause harmful interference to radio communications. These limits are designed to provide reasonable protection against harmful interference in a particular installation. Notice 1 The changes or modifications not expressly approved by turning... of the measures listed below: Reorient or relocate the receiving antenna. VOIR LA NOTICE D'INSTALLATION AVANT DE RACCORDER AU RESEAU. v Connect the equipment into an outlet on , the user is connected. Operation is no guarantee that...
...cables and A.C. Micro-Star International Wind Top Series This device complies with the instruction manual, may cause harmful interference to radio communications. These limits are designed to provide reasonable protection against harmful interference in a particular installation. Notice 1 The changes or modifications not expressly approved by turning... of the measures listed below: Reorient or relocate the receiving antenna. VOIR LA NOTICE D'INSTALLATION AVANT DE RACCORDER AU RESEAU. v Connect the equipment into an outlet on , the user is connected. Operation is no guarantee that...
User Guide
Page 9
... Upgrade and Warranty iii Technical Support iii Safety Instructions iv FCC-B Radio Frequency Interference Statement v WEEE (Waste Electrical and Electronic Equipment) Statement vi Chapter 1 System Overview 1-1 Packing Contents 1-2 System Overview 1-3 Mainboard Specifications 1-10 System Specifications 1-11 Hardware Setup 1-12 Chapter 2 Getting Started 2-1 System Booting Setup for the First Time 2-2 How to Create the System Recovery Disk 2-3 Touch Panel Calibration 2-4 How to Use the Keyboard 2-6 Connecting to a W ireless LAN...
... Upgrade and Warranty iii Technical Support iii Safety Instructions iv FCC-B Radio Frequency Interference Statement v WEEE (Waste Electrical and Electronic Equipment) Statement vi Chapter 1 System Overview 1-1 Packing Contents 1-2 System Overview 1-3 Mainboard Specifications 1-10 System Specifications 1-11 Hardware Setup 1-12 Chapter 2 Getting Started 2-1 System Booting Setup for the First Time 2-2 How to Create the System Recovery Disk 2-3 Touch Panel Calibration 2-4 How to Use the Keyboard 2-6 Connecting to a W ireless LAN...

User Guide
Page 12
MS-6638 System Packing Contents Wind Top AE1900 AIO PC Power Adapter Power Cord MSI LCD Display Wiper Driver & Utility & Blank CD User M anual & Quick Guide Keyboard (Optional) Mouse (Optional) Stylus Touch Pen (Optional) * The blank CD is for system recovery backup. * Please contact us immediately if any of the item is damaged or missing. * The picture is for your reference only and your packing contents may slightly vary depending on the model you purchased. 1-2
MS-6638 System Packing Contents Wind Top AE1900 AIO PC Power Adapter Power Cord MSI LCD Display Wiper Driver & Utility & Blank CD User M anual & Quick Guide Keyboard (Optional) Mouse (Optional) Stylus Touch Pen (Optional) * The blank CD is for system recovery backup. * Please contact us immediately if any of the item is damaged or missing. * The picture is for your reference only and your packing contents may slightly vary depending on the model you purchased. 1-2
User Guide
Page 15
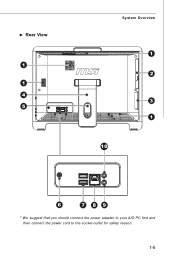
Rear View 1 1 4 5 System Overview 1 2 3 1 10 6 7 89 * We suggest that you should connect the power adapter to your AIO PC first and then connect the power cord to the socket-outlet for safety reason. 1-5
Rear View 1 1 4 5 System Overview 1 2 3 1 10 6 7 89 * We suggest that you should connect the power adapter to your AIO PC first and then connect the power cord to the socket-outlet for safety reason. 1-5

User Guide
Page 16
Do not cover the ventilator. 2 Optical Disk Drive - The power adapter converts AC power to DC power for attaching USB devices such as XD (eXtreme Digital), SD (Secure Digital), SDHC (SD High Capacity), MS (Memory Stick), MS Pro (Memory Stick Pro) or MMC (Multi-Media Card) cards that the supported memory cards may support various types of memory card, such as mouse, keyboard, printer, scanner, camera, PDA or other USB-compatible devices. 1-6 The built-in devices like digital...
Do not cover the ventilator. 2 Optical Disk Drive - The power adapter converts AC power to DC power for attaching USB devices such as XD (eXtreme Digital), SD (Secure Digital), SDHC (SD High Capacity), MS (Memory Stick), MS Pro (Memory Stick Pro) or MMC (Multi-Media Card) cards that the supported memory cards may support various types of memory card, such as mouse, keyboard, printer, scanner, camera, PDA or other USB-compatible devices. 1-6 The built-in devices like digital...
User Guide
Page 17
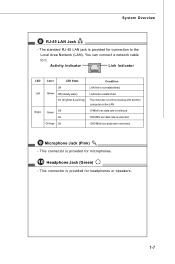
Activity Indicator Link Indicator LED Left Right Color LED State Off Yellow Off (steady state) On (brighter & pulsing) Green Off On Orange On Condition LAN link is established. This connector is provided for headphones or speakers. 1-7 You can connect a network cable to the Local Area Network (LAN). This connector is provided for microphones. 10 Headphone Jack (Green) - LAN link is not established. The...
Activity Indicator Link Indicator LED Left Right Color LED State Off Yellow Off (steady state) On (brighter & pulsing) Green Off On Orange On Condition LAN link is established. This connector is provided for headphones or speakers. 1-7 You can connect a network cable to the Local Area Network (LAN). This connector is provided for microphones. 10 Headphone Jack (Green) - LAN link is not established. The...
User Guide
Page 18
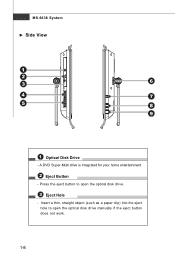
A DVD Super-Multi drive is integrated for your home entertainment. 2 Eject Button - Insert a thin, straight object (such as a paper clip) into the eject hole to open the optical disk drive manually if the eject button does not work. 1-8 MS-6638 System Side View 1 2 3 6 4 7 5 8 9 1 Optical Disk Drive - Press the eject button to open the optical disk drive. 3 Eject Hole -
A DVD Super-Multi drive is integrated for your home entertainment. 2 Eject Button - Insert a thin, straight object (such as a paper clip) into the eject hole to open the optical disk drive manually if the eject button does not work. 1-8 MS-6638 System Side View 1 2 3 6 4 7 5 8 9 1 Optical Disk Drive - Press the eject button to open the optical disk drive. 3 Eject Hole -

User Guide
Page 19
... USB (Universal Serial Bus) port is used in card reader may support various types of memory card, such as mouse, keyboard, printer, scanner, camera, PDA or other USB-compatible devices. 6 Ventilator - Do not cover the ventilator. 7 Power Button - System Overview 4 Card Reader Drive - The volume control button adjusts the sound level. 9 Brightness Control Button +/- - The ventilator on the enclosure is provided for further information and please be noted that usually used for air convection and to turn...
... USB (Universal Serial Bus) port is used in card reader may support various types of memory card, such as mouse, keyboard, printer, scanner, camera, PDA or other USB-compatible devices. 6 Ventilator - Do not cover the ventilator. 7 Power Button - System Overview 4 Card Reader Drive - The volume control button adjusts the sound level. 9 Brightness Control Button +/- - The ventilator on the enclosure is provided for further information and please be noted that usually used for air convection and to turn...

User Guide
Page 20
... chipset - Supports ACPI Power Management Audio - South Bridge: Intel® ICH7 chipset Memory - 1 DDR2 SO-DIMM slot (2 GB Max) for PCI ExpressTM Applications by Realtek® ALC888 - Front Side Bus (FSB) 533 MHz - CPU Frequency 1.6 GHz - Chip integrated by Realtek® RTL8111C - Intel® AtomTM Single/ Dual-Core processor 230/ 330 (Optional) - MS-6638 System Mainboard Specifications Processor - Supports Gigabit Ethernet Controller for AtomTM Single/ Dual-Core CPU only LAN -
... chipset - Supports ACPI Power Management Audio - South Bridge: Intel® ICH7 chipset Memory - 1 DDR2 SO-DIMM slot (2 GB Max) for PCI ExpressTM Applications by Realtek® ALC888 - Front Side Bus (FSB) 533 MHz - CPU Frequency 1.6 GHz - Chip integrated by Realtek® RTL8111C - Intel® AtomTM Single/ Dual-Core processor 230/ 330 (Optional) - MS-6638 System Mainboard Specifications Processor - Supports Gigabit Ethernet Controller for AtomTM Single/ Dual-Core CPU only LAN -
User Guide
Page 21
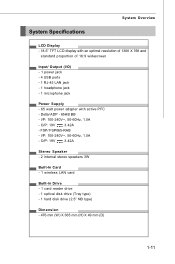
... Overview LCD Display - 18.5" TFT LCD display with an optimal resolution of 1366 X 768 and standard proportion of 16:9 widescreen Input/ Output (I/O) - 1 power jack - 4 USB ports - 1 RJ-45 LAN jack - 1 headphone jack - 1 microphone jack Power Supply - 65 watt power adapter with active PFC - Delta/ ADP - 65HB BB - O/P: 19V 3.42A Stereo Speaker - 2 internal stereo speakers 3W Built-In Card - 1 wireless LAN card Built-In Drive - 1 card reader drive - 1 optical disk drive (Tray type) - 1 hard disk drive (2.5" NB type) Dimension - 476...
... Overview LCD Display - 18.5" TFT LCD display with an optimal resolution of 1366 X 768 and standard proportion of 16:9 widescreen Input/ Output (I/O) - 1 power jack - 4 USB ports - 1 RJ-45 LAN jack - 1 headphone jack - 1 microphone jack Power Supply - 65 watt power adapter with active PFC - Delta/ ADP - 65HB BB - O/P: 19V 3.42A Stereo Speaker - 2 internal stereo speakers 3W Built-In Card - 1 wireless LAN card Built-In Drive - 1 card reader drive - 1 optical disk drive (Tray type) - 1 hard disk drive (2.5" NB type) Dimension - 476...

User Guide
Page 23
Connect the power adapter to the USB ports on the rear panel. Step 3. Step 2. System Overview Connecting Peripheral Devices Step 1. Connect a USB-interfaced mouse and keyboard to the power supply. NOTE: We suggest that you connect the power adapter to your AIO PC first and then connect the power cord to the audio jacks. Connect a network device to the LAN port and connect necessary audio devices to the socket-outlet for safety concerns. 1-13
Connect the power adapter to the USB ports on the rear panel. Step 3. Step 2. System Overview Connecting Peripheral Devices Step 1. Connect a USB-interfaced mouse and keyboard to the power supply. NOTE: We suggest that you connect the power adapter to your AIO PC first and then connect the power cord to the audio jacks. Connect a network device to the LAN port and connect necessary audio devices to the socket-outlet for safety concerns. 1-13

User Guide
Page 25
Furthermore, it is integrated in the realm of home. Getting Started Chapter 2 Getting Started Wind Top AE1900 AIO PC is accompanied with the best computer features, such as instant message, low acoustics, energy saving and 802.11 b/ g/n wireless internet capability so you may roam freely in design, selecting an elegant black or white with a glassy frame, which displays the simplicity of modern individualism and the comfort of cyberspace. 2-1
Furthermore, it is integrated in the realm of home. Getting Started Chapter 2 Getting Started Wind Top AE1900 AIO PC is accompanied with the best computer features, such as instant message, low acoustics, energy saving and 802.11 b/ g/n wireless internet capability so you may roam freely in design, selecting an elegant black or white with a glassy frame, which displays the simplicity of modern individualism and the comfort of cyberspace. 2-1
User Guide
Page 27
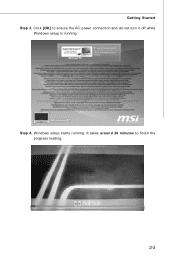
Step 4. Click [OK] to finish the progress loading. 2-3 It takes around 20 minutes to ensure the AC power connection and do not turn it off while W indows setup is running . W indows setup starts running . Getting Started Step 3.
Step 4. Click [OK] to finish the progress loading. 2-3 It takes around 20 minutes to ensure the AC power connection and do not turn it off while W indows setup is running . W indows setup starts running . Getting Started Step 3.
User Guide
Page 31
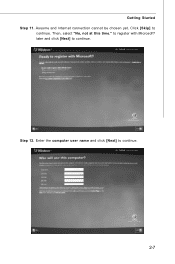
Assume and Internet connection cannot be chosen yet. Step 12. Click [Skip] to continue. to register with Microsoft® later and click [Next] to continue. Then, select "No, not at this time." Enter the computer user name and click [Next] to continue. 2-7 Getting Started Step 11.
Assume and Internet connection cannot be chosen yet. Step 12. Click [Skip] to continue. to register with Microsoft® later and click [Next] to continue. Then, select "No, not at this time." Enter the computer user name and click [Next] to continue. 2-7 Getting Started Step 11.
User Guide
Page 33
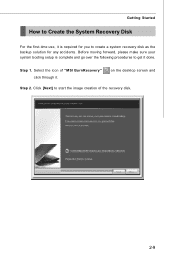
Select the icon of the recovery disk. 2-9 on the desktop screen and Step 2. Click [Next] to create a system recovery disk as the backup solution for you to start the image creation of "M SI BurnRecovery" click through it done. Getting Started How to Create the System Recovery Disk For the first-time use, it is complete and go over the following procedures to get it . Step 1. Before moving forward, please make sure your system booting setup is required for any accidents.
Select the icon of the recovery disk. 2-9 on the desktop screen and Step 2. Click [Next] to create a system recovery disk as the backup solution for you to start the image creation of "M SI BurnRecovery" click through it done. Getting Started How to Create the System Recovery Disk For the first-time use, it is complete and go over the following procedures to get it . Step 1. Before moving forward, please make sure your system booting setup is required for any accidents.
User Guide
Page 37
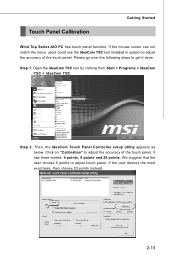
... 2. If the mouse cursor can not match the move, users could use the IdeaCom TSC tool installed in system to adjust the accuracy of the touch panel. Open the IdeaCom TSC tool by clicking from Start > Programs > IdeaCom TSC > IdeaCom TSC. Click on "Calibration" to adjust the accuracy of the touch panel. Then, the IdeaCom Touch Panel Controller setup utility appears as...
... 2. If the mouse cursor can not match the move, users could use the IdeaCom TSC tool installed in system to adjust the accuracy of the touch panel. Open the IdeaCom TSC tool by clicking from Start > Programs > IdeaCom TSC > IdeaCom TSC. Click on "Calibration" to adjust the accuracy of the touch panel. Then, the IdeaCom Touch Panel Controller setup utility appears as...
User Guide
Page 39
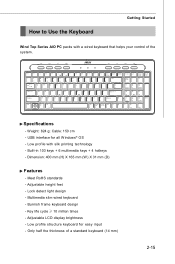
... system. USB interface for easy input - Key life cycle 10 million times - Low profile structure keyboard for all W indows® OS - Dimension: 400 mm (H) X 165 mm (W ) X 31 mm (D) Features - Lock detect light design - Adjustable LCD display brightness - W eight: 824 g; Built-in 103 keys + 6 multimedia keys + 4 hotkeys - Meet RoHS standards - Specifications - Burnish frame keyboard design - How to Use the Keyboard Getting Started Wind Top Series AIO...
... system. USB interface for easy input - Key life cycle 10 million times - Low profile structure keyboard for all W indows® OS - Dimension: 400 mm (H) X 165 mm (W ) X 31 mm (D) Features - Lock detect light design - Adjustable LCD display brightness - W eight: 824 g; Built-in 103 keys + 6 multimedia keys + 4 hotkeys - Meet RoHS standards - Specifications - Burnish frame keyboard design - How to Use the Keyboard Getting Started Wind Top Series AIO...

User Guide
Page 41
Choose a network, and then click Connect. 2-17 Step 2. Right-click the Ralink Wireless LAN Card status icon in the lower right corner, and then click Launch Config Utility. The window displays some available wireless networks. Connecting to a Wireless LAN Getting Started Step 1.
Choose a network, and then click Connect. 2-17 Step 2. Right-click the Ralink Wireless LAN Card status icon in the lower right corner, and then click Launch Config Utility. The window displays some available wireless networks. Connecting to a Wireless LAN Getting Started Step 1.


