
User Guide
Page 1
... under continual improvement and we reserve the right to the correctness of its contents. Trademarks All trademarks in the preparation of this manual are properties of their respective owners. ■ MSI® is registered trademark of Micro-Star Int'l Co.,Ltd. ■ NVIDIA® is registered trademark of NVIDIA Corporation. ■ ATI...
... under continual improvement and we reserve the right to the correctness of its contents. Trademarks All trademarks in the preparation of this manual are properties of their respective owners. ■ MSI® is registered trademark of Micro-Star Int'l Co.,Ltd. ■ NVIDIA® is registered trademark of NVIDIA Corporation. ■ ATI...
User Guide
Page 2
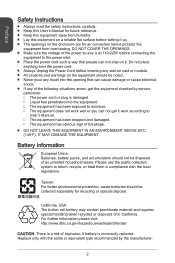
...DO NOT COVER THE OPENINGS. ■ Make sure the voltage of the power source is at 110/220V before connecting the equipment to User's Manual. ◯ The equipment has been dropped and damaged. ◯ The equipment has obvious sign of breakage. ■ DO NOT LEAVE THIS ...system to return, recycle, or treat them in California. Preface Safety Instructions ■ Always read the safety instructions carefully. ■ Keep this User's Manual for future reference. ■ Keep this equipment away from humidity. ■ Lay this equipment on a reliable flat surface before setting it up. ...
...DO NOT COVER THE OPENINGS. ■ Make sure the voltage of the power source is at 110/220V before connecting the equipment to User's Manual. ◯ The equipment has been dropped and damaged. ◯ The equipment has obvious sign of breakage. ■ DO NOT LEAVE THIS ...system to return, recycle, or treat them in California. Preface Safety Instructions ■ Always read the safety instructions carefully. ■ Keep this User's Manual for future reference. ■ Keep this equipment away from humidity. ■ Lay this equipment on a reliable flat surface before setting it up. ...
User Guide
Page 20
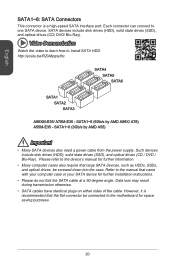
...-degree angle. http://youtu.be screwed down into the case. SATA1~6 (3Gb/s by AMD A88X/ A78) A55M-E35 - Refer to the device's manual for further information. • Many computer cases also require that came with your computer case or your SATA device for space saving purposes. 20 Each... connector can connect to Install SATA HDD. Please refer to the manual that large SATA devices, such as HDDs, SSDs, and optical drives, be /RZsMpqxythc SATA4 SATA5 SATA6 SATA1 SATA2 SATA3 A88XM-E35/ A78M-E35 - Data loss may result during transmission otherwise. • SATA ...
...-degree angle. http://youtu.be screwed down into the case. SATA1~6 (3Gb/s by AMD A88X/ A78) A55M-E35 - Refer to the device's manual for further information. • Many computer cases also require that came with your computer case or your SATA device for space saving purposes. 20 Each... connector can connect to Install SATA HDD. Please refer to the manual that large SATA devices, such as HDDs, SSDs, and optical drives, be /RZsMpqxythc SATA4 SATA5 SATA6 SATA1 SATA2 SATA3 A88XM-E35/ A78M-E35 - Data loss may result during transmission otherwise. • SATA ...
User Guide
Page 24
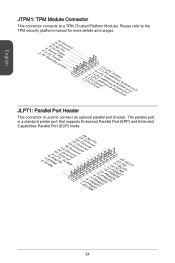
... an optional parallel port bracket. Please refer to a TPM (Trusted Platform Module). English JTPM1: TPM Module Connector This connector connects to the TPM security platform manual for more details and usages. 2.34V.36S..3tS8aVe.n15Prd0iVaob1.NlwyP2I1o.eRopG4rwoPQ.rwGeionreurornudnd 1.L3P.L5CP.LCC7P.loLRC9cP.eLka1CsPd1e1ad.CtL3drPea.dLsdCrPsedasCr&edsFdsd&sraraedt&amsasdpteaa&intpa0dinap1tian2pin3 JLPT1: Parallel...
... an optional parallel port bracket. Please refer to a TPM (Trusted Platform Module). English JTPM1: TPM Module Connector This connector connects to the TPM security platform manual for more details and usages. 2.34V.36S..3tS8aVe.n15Prd0iVaob1.NlwyP2I1o.eRopG4rwoPQ.rwGeionreurornudnd 1.L3P.L5CP.LCC7P.loLRC9cP.eLka1CsPd1e1ad.CtL3drPea.dLsdCrPsedasCr&edsFdsd&sraraedt&amsasdpteaa&intpa0dinap1tian2pin3 JLPT1: Parallel...

User Guide
Page 28
English Overview After entering BIOS, the following screen is not guaranteed, and if done improperly, can void your warranty or severely damage your PC manually is only recommended for easy overclocking. 28 Temperature monitor Language Model name Virtual OC Genie Button BIOS menu selection System information Boot device priority bar BIOS menu selection OC Menu Menu display Important • Overclocking your hardware. • If you are unfamiliar with overclocking, we advise you to use OC Genie for advanced users. • Overclocking is displayed.
English Overview After entering BIOS, the following screen is not guaranteed, and if done improperly, can void your warranty or severely damage your PC manually is only recommended for easy overclocking. 28 Temperature monitor Language Model name Virtual OC Genie Button BIOS menu selection System information Boot device priority bar BIOS menu selection OC Menu Menu display Important • Overclocking your hardware. • If you are unfamiliar with overclocking, we advise you to use OC Genie for advanced users. • Overclocking is displayed.

User Guide
Page 30
... (Serial Presence Detect) of installed memory modules. [Link] Allows user to configure the DRAM timing manually for all memory channel. [UnLink] Allows user to configure the DRAM timing manually for each memory channel. When AMP is Enabled, the XMP will be forced to be disabled....[Profile 2] Uses profile2 over -clocking settings of CPU Base clock. 30 This item will be forced to enter the sub-menu. If it manually. ▶ Spread Spectrum This function reduces the EMI (Electromagnetic Interference) generated by memory module. English ▶ Intel Extreme Memory Profile (XMP)...
... (Serial Presence Detect) of installed memory modules. [Link] Allows user to configure the DRAM timing manually for all memory channel. [UnLink] Allows user to configure the DRAM timing manually for each memory channel. When AMP is Enabled, the XMP will be forced to be disabled....[Profile 2] Uses profile2 over -clocking settings of CPU Base clock. 30 This item will be forced to enter the sub-menu. If it manually. ▶ Spread Spectrum This function reduces the EMI (Electromagnetic Interference) generated by memory module. English ▶ Intel Extreme Memory Profile (XMP)...


