User Guide
Page 6
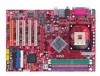
...JFP1 & JFP2 2-18 Front Panel Audio Connector: JAUD1 2-19 D-Bracket™ 2 Connector: JDB1 (Optional 2-20 Jumpers ...2-21 Clear CMOS Jumper: JBAT1 2-21 Slots ...2-22 AGP (Accelerated Graphics Port) Slot 2-22 PCI (Peripheral Component Interconnect) Slots 2-22 PCI Interrupt ......3-2 Selecting the First Boot Device 3-2 Control Keys 3-3 Getting Help 3-3 Main Menu 3-3 Default Settings 3-3 The Main Menu 3-4 Standard CMOS Features 3-6 Advanced BIOS Features 3-8 Advanced Chipset Features 3-11 Power Management Features 3-13 PNP/PCI Configurations 3-16 Integrated Peripherals 3-19 PC...
...JFP1 & JFP2 2-18 Front Panel Audio Connector: JAUD1 2-19 D-Bracket™ 2 Connector: JDB1 (Optional 2-20 Jumpers ...2-21 Clear CMOS Jumper: JBAT1 2-21 Slots ...2-22 AGP (Accelerated Graphics Port) Slot 2-22 PCI (Peripheral Component Interconnect) Slots 2-22 PCI Interrupt ......3-2 Selecting the First Boot Device 3-2 Control Keys 3-3 Getting Help 3-3 Main Menu 3-3 Default Settings 3-3 The Main Menu 3-4 Standard CMOS Features 3-6 Advanced BIOS Features 3-8 Advanced Chipset Features 3-11 Power Management Features 3-13 PNP/PCI Configurations 3-16 Integrated Peripherals 3-19 PC...

User Guide
Page 32
... 1 1 3 Keep Data 3 Clear Data MSI Reminds You... Avoid clearing the CMOS while the system is a CMOS RAM on ; With the CMOS RAM, the system can clear CMOS by shorting 2-3 pin while the system is turned on. it is off. This section will damage the mainboard. 2-21 Hardware Setup Jumpers The motherboard provides the following jumpers for...
... 1 1 3 Keep Data 3 Clear Data MSI Reminds You... Avoid clearing the CMOS while the system is a CMOS RAM on ; With the CMOS RAM, the system can clear CMOS by shorting 2-3 pin while the system is turned on. it is off. This section will damage the mainboard. 2-21 Hardware Setup Jumpers The motherboard provides the following jumpers for...
User Guide
Page 36
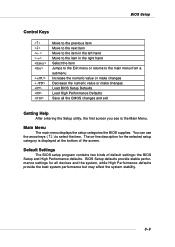
... in the right hand Select the item Jumps to the Exit menu or returns to select the item. The on-line description for all the CMOS changes and exit Getting Help After entering the Setup utility, the first screen you see is displayed at the bottom of default settings: the BIOS...
... in the right hand Select the item Jumps to the Exit menu or returns to select the item. The on-line description for all the CMOS changes and exit Getting Help After entering the Setup utility, the first screen you see is displayed at the bottom of default settings: the BIOS...
User Guide
Page 37
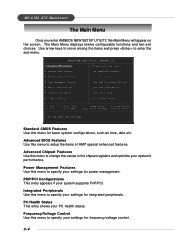
MS-6788 ATX Mainboard The Main Menu Once you enter AMIBIOS NEW SETUP UTILITY, the Main Menu will appear on the screen. Standard CMOS Features Use this menu to enter the sub-menu. PC Health Status This entry shows your system's performance. Advanced BIOS Features Use this menu for ...
MS-6788 ATX Mainboard The Main Menu Once you enter AMIBIOS NEW SETUP UTILITY, the Main Menu will appear on the screen. Standard CMOS Features Use this menu to enter the sub-menu. PC Health Status This entry shows your system's performance. Advanced BIOS Features Use this menu for ...
User Guide
Page 38
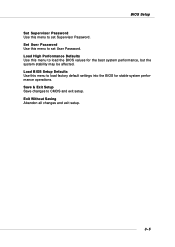
Load BIOS Setup Defaults Use this menu to set Supervisor Password. Set User Password Use this menu to load factory default settings into the BIOS for the best system performance, but the system stability may be affected. Exit Without Saving Abandon all changes and exit setup. 3-5 Load High Performance Defaults Use this menu to set User Password. Save & Exit Setup Save changes to CMOS and exit setup. BIOS Setup Set Supervisor Password Use this menu to load the BIOS values for stable system performance operations.
Load BIOS Setup Defaults Use this menu to set Supervisor Password. Set User Password Use this menu to load factory default settings into the BIOS for the best system performance, but the system stability may be affected. Exit Without Saving Abandon all changes and exit setup. 3-5 Load High Performance Defaults Use this menu to set User Password. Save & Exit Setup Save changes to CMOS and exit setup. BIOS Setup Set Supervisor Password Use this menu to load the BIOS values for stable system performance operations.
User Guide
Page 39
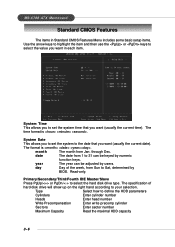
... will show up on the right hand according to select the hard disk drive type. The specification of the week, from Jan. MS-6788 ATX Mainboard Standard CMOS Features The items in each item. month The month from Sun to Sat, determined by numeric function keys. through Dec. year The year can.../Third/Fourth IDE Master/Slave Press PgUp/ or PgDn/ to your selection. Type Select how to set the system time that you want in Standard CMOS Features Menu includes some basic setup items. Use the arrow keys to highlight the item and then use the or keys to select the value...
... will show up on the right hand according to select the hard disk drive type. The specification of the week, from Jan. MS-6788 ATX Mainboard Standard CMOS Features The items in each item. month The month from Sun to Sat, determined by numeric function keys. through Dec. year The year can.../Third/Fourth IDE Master/Slave Press PgUp/ or PgDn/ to your selection. Type Select how to set the system time that you want in Standard CMOS Features Menu includes some basic setup items. Use the arrow keys to highlight the item and then use the or keys to select the value...
User Guide
Page 60
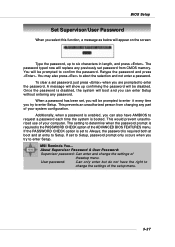
Retype the password and press . When a password has been set password from changing any password. This prevents an unauthorized person from CMOS memory. MSI Reminds You... Additionally, when a password is enabled, you can enter Setup without entering any part of your computer. The setting to determine when the password ...
Retype the password and press . When a password has been set password from changing any password. This prevents an unauthorized person from CMOS memory. MSI Reminds You... Additionally, when a password is enabled, you can enter Setup without entering any part of your computer. The setting to determine when the password ...
User Guide
Page 61
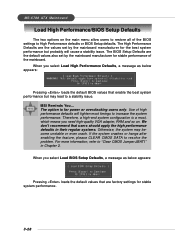
... values that enable the best system performance but probably will tighten most timings to "Clear CMOS Jumper:JBAT1" in their regular systems. Otherwise, the system may lead to High Performance ...defaults or BIOS Setup defaults. Use of high performance defaults will cause a stability issue. MSI Reminds You... For more information, refer to increase the system performance. The BIOS Setup ...factory settings for stable performance of the BIOS settings to a stability issue. MS-6788 ATX Mainboard Load High Performance/BIOS Setup Defaults The two options on . When you need high...
... values that enable the best system performance but probably will tighten most timings to "Clear CMOS Jumper:JBAT1" in their regular systems. Otherwise, the system may lead to High Performance ...defaults or BIOS Setup defaults. Use of high performance defaults will cause a stability issue. MSI Reminds You... For more information, refer to increase the system performance. The BIOS Setup ...factory settings for stable performance of the BIOS settings to a stability issue. MS-6788 ATX Mainboard Load High Performance/BIOS Setup Defaults The two options on . When you need high...

User Guide
Page 13
... connectors for connecting high-speed USB interface peripherals such as USB HDD, digital cameras, MP3 players, printers, modems and the like. Clear CMOS Jumper: JBAT1 There is ideal for electrical connection to 1-2 pin position. You can automatically boot OS 1 1 1 every time it will... technology increases data transfer rate up to a maximum throughput of system configuration. JFP1 is compliant with Intel®Front Panel I/O Connectivity Design Guide. MSI Reminds You... 6 10 Not to connect to the front audio header, pins 5 & 6, 9 & 10 should jumper in order to have sign5al...
... connectors for connecting high-speed USB interface peripherals such as USB HDD, digital cameras, MP3 players, printers, modems and the like. Clear CMOS Jumper: JBAT1 There is ideal for electrical connection to 1-2 pin position. You can automatically boot OS 1 1 1 every time it will... technology increases data transfer rate up to a maximum throughput of system configuration. JFP1 is compliant with Intel®Front Panel I/O Connectivity Design Guide. MSI Reminds You... 6 10 Not to connect to the front audio header, pins 5 & 6, 9 & 10 should jumper in order to have sign5al...

User Guide
Page 15
.... PC Health Status This entry shows your system supports PnP/PCI. BIOS Setup Power on the screen, press key to enter Setup. Main Page Standard CMOS Features Use this menu to setup the items of AMI® special enhanced features.
.... PC Health Status This entry shows your system supports PnP/PCI. BIOS Setup Power on the screen, press key to enter Setup. Main Page Standard CMOS Features Use this menu to setup the items of AMI® special enhanced features.
User Guide
Page 16
... Defaults Use this menu to set Supervisor Password. It is the automatic overclocking function, included in the low load balance, it will speed up to CMOS and exit setup. Set User Password Use this menu to load the BIOS values for stable system performance operations. Load BIOS Setup Defaults Use this.... Use this menu to load factory default settings into the BIOS for the best system performance, but the system stability may be affected. When the motherboard detects CPU is temporarily suspending or staying in the MSITM newly developed CoreCellTM Technology.
... Defaults Use this menu to set Supervisor Password. It is the automatic overclocking function, included in the low load balance, it will speed up to CMOS and exit setup. Set User Password Use this menu to load the BIOS values for stable system performance operations. Load BIOS Setup Defaults Use this.... Use this menu to load factory default settings into the BIOS for the best system performance, but the system stability may be affected. When the motherboard detects CPU is temporarily suspending or staying in the MSITM newly developed CoreCellTM Technology.

User Guide
Page 57
...2 个 USB2.0 的接口 JUSB2 和 JUSB3,符合 Intel®l I/O USB USB1- CMOS RAM CMOS RAM 是在每 CMOS RAM 中的 1 JBAT1(清除 CMOS 1 1 3 3 Kee pD at a Clear D ata 2-3 CMOS 1-2 CMOS Serial ATA HDD 接口:SATA1, SATA2 2 ATA 150 MB/s ATA1.0 ATA 1 RXN GN D GN ...G ND US BOC 2.0 480Mbps,是 USB1.1 的 40 2 1 10 9 率的 USB USB HDD MP3 KE Y VC C G ND US B0 + 清除 CMOS 跳线:JBAT1 USB0-
...2 个 USB2.0 的接口 JUSB2 和 JUSB3,符合 Intel®l I/O USB USB1- CMOS RAM CMOS RAM 是在每 CMOS RAM 中的 1 JBAT1(清除 CMOS 1 1 3 3 Kee pD at a Clear D ata 2-3 CMOS 1-2 CMOS Serial ATA HDD 接口:SATA1, SATA2 2 ATA 150 MB/s ATA1.0 ATA 1 RXN GN D GN ...G ND US BOC 2.0 480Mbps,是 USB1.1 的 40 2 1 10 9 率的 USB USB HDD MP3 KE Y VC C G ND US B0 + 清除 CMOS 跳线:JBAT1 USB0-

User Guide
Page 60
Set Supervisor Password Set User Password Load High Performance Defaults BIOS Load BIOS Setup Defaults(载入 BIOS BIOS Save & Exit Setup CMOS Setup 程序。 Exit Without Saving CMOS Setup 程序。 Dynamic OverClocking Dynamic Overclocking Technology MSITM 全新的 CoreCellTM CPU CPU 到 CPU CPU CPU DOT PC 3D CPU [Disabled] [Private] 第 1 [Sergeant] 第 2 [Captain] 第 3 Load High Performance Defaults [Colonel] 第 4 56
Set Supervisor Password Set User Password Load High Performance Defaults BIOS Load BIOS Setup Defaults(载入 BIOS BIOS Save & Exit Setup CMOS Setup 程序。 Exit Without Saving CMOS Setup 程序。 Dynamic OverClocking Dynamic Overclocking Technology MSITM 全新的 CoreCellTM CPU CPU 到 CPU CPU CPU DOT PC 3D CPU [Disabled] [Private] 第 1 [Sergeant] 第 2 [Captain] 第 3 Load High Performance Defaults [Colonel] 第 4 56

User Guide
Page 74
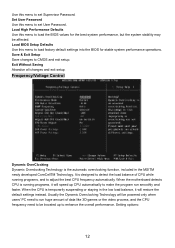
Frequency /Voltage Control Set Supervisor Password Set User Password Load High Performance Defaults BIOS Load BIOS Setup Defaults BIOS Save & Exit Setup CMOS Exit Without Saving CMOS Dynamic OverClocking Dynamic Overclocking Technology CoreCellTM 新技 3D Disabled Private Sergeant Captain Load High Performance Defaults 70
Frequency /Voltage Control Set Supervisor Password Set User Password Load High Performance Defaults BIOS Load BIOS Setup Defaults BIOS Save & Exit Setup CMOS Exit Without Saving CMOS Dynamic OverClocking Dynamic Overclocking Technology CoreCellTM 新技 3D Disabled Private Sergeant Captain Load High Performance Defaults 70

User Guide
Page 104
BIOS の設定 POST(Power On Self Test DEL DEL: Setup F11: Boot Menu F12: Network boot TAB: Logo ... 、、
BIOS の設定 POST(Power On Self Test DEL DEL: Setup F11: Boot Menu F12: Network boot TAB: Logo ... 、、

User Guide
Page 105
Integrated Peripherals IDE I/O PC Health Status Frequency/Voltage Control Set Supervisor Password Set User Password Load High Performance Defaults BIOS Load BIOS Setup Defaults BIOS Save & Exit Setup CMOS Exit Without Saving CMOS 101
Integrated Peripherals IDE I/O PC Health Status Frequency/Voltage Control Set Supervisor Password Set User Password Load High Performance Defaults BIOS Load BIOS Setup Defaults BIOS Save & Exit Setup CMOS Exit Without Saving CMOS 101


