User Guide
Page 5
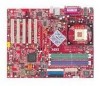
...-B Radio Frequency Interference Statement iii Copyright Notice iii Revision History iii Safety Instructions v Chapter 1. Getting Started 1-1 Mainboard Specifications 1-2 Mainboard Layout 1-4 MSI Special Features 1-5 Super Pack 1-5 Core Center 1-6 Live BIOS™/Live Driver 1-8 Live Monitor 1-9 D-Bracket™ 2 (Optional 1-10 S-...Processing Unit: CPU 2-3 CPU Core Speed Derivation Procedure 2-3 CPU Installation Procedures for Socket 478 2-5 Installing the CPU Fan 2-5 Memory 2-7 Introduction to DDR SDRAM 2-7 DDR Population Rules 2-7 Installing DDR Modules 2-8 Power Supply...
...-B Radio Frequency Interference Statement iii Copyright Notice iii Revision History iii Safety Instructions v Chapter 1. Getting Started 1-1 Mainboard Specifications 1-2 Mainboard Layout 1-4 MSI Special Features 1-5 Super Pack 1-5 Core Center 1-6 Live BIOS™/Live Driver 1-8 Live Monitor 1-9 D-Bracket™ 2 (Optional 1-10 S-...Processing Unit: CPU 2-3 CPU Core Speed Derivation Procedure 2-3 CPU Installation Procedures for Socket 478 2-5 Installing the CPU Fan 2-5 Memory 2-7 Introduction to DDR SDRAM 2-7 DDR Population Rules 2-7 Installing DDR Modules 2-8 Power Supply...
User Guide
Page 6
ATX 12V Power Connector: JPW1 2-9 Back Panel 2-10 Mouse Connector 2-11 Keyboard Connector 2-11 USB Connectors 2-11 VGA Connector (Optional 2-12 LAN (RJ-45) Jacks: 10/... Giga-bit LAN (with Intel 82547EI) (Optional 2-13 Audio Port Connectors 2-14 Parallel Port Connector: LPT1 2-15 Connectors 2-16 Floppy Disk Drive Connector: FDD1 2-16 Fan Power Connectors: CPUFAN1/SFAN1/NBFAN1 2-17 ATA100 Hard Disk Connectors: IDE1 & IDE2 2-18 Serial ATA/Serial ATA RAID Connectors controlled by ICH5R: SATA1, SATA2 (Optional...
ATX 12V Power Connector: JPW1 2-9 Back Panel 2-10 Mouse Connector 2-11 Keyboard Connector 2-11 USB Connectors 2-11 VGA Connector (Optional 2-12 LAN (RJ-45) Jacks: 10/... Giga-bit LAN (with Intel 82547EI) (Optional 2-13 Audio Port Connectors 2-14 Parallel Port Connector: LPT1 2-15 Connectors 2-16 Floppy Disk Drive Connector: FDD1 2-16 Fan Power Connectors: CPUFAN1/SFAN1/NBFAN1 2-17 ATA100 Hard Disk Connectors: IDE1 & IDE2 2-18 Serial ATA/Serial ATA RAID Connectors controlled by ICH5R: SATA1, SATA2 (Optional...
User Guide
Page 13
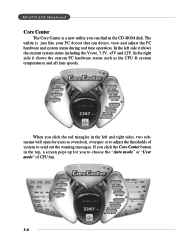
... and right sides, two submenus will open for you to choose the "Auto mode" or "User mode" of system to adjust the thresholds of CPU fan. 1-6 In the right side it shows the current system status including the Vcore, 3.3V, +5V and 12V. If you click the Core Center button in... the left side it shows the current PC hardware status such as the CPU & system temperatures and all fans speeds. When you click the red triangles in the top, a screen pops up for users to overclock, overspec or to send out the warning messages...
... and right sides, two submenus will open for you to choose the "Auto mode" or "User mode" of system to adjust the thresholds of CPU fan. 1-6 In the right side it shows the current system status including the Vcore, 3.3V, +5V and 12V. If you click the Core Center button in... the left side it shows the current PC hardware status such as the CPU & system temperatures and all fans speeds. When you click the red triangles in the top, a screen pops up for users to overclock, overspec or to send out the warning messages...
User Guide
Page 14
Also you may click Auto to start testing the maximal CPU overclocking value, The CPU FSB will be lighted as CPU & system temperatures and fan speeds. You may click Default to restore the default values. Top-side: User mode/Auto mode Here you may use the "+" and "-" buttons to adjust, ... PC reboots. If you choose User mode, you set for the temperatures are the maximum thresholds for the system for warnings, and the valus for fan speeds are the minimum thresholds. Then you can click Save to save the desired FSB you just configured. Getting Started Left-side: Current system status...
Also you may click Auto to start testing the maximal CPU overclocking value, The CPU FSB will be lighted as CPU & system temperatures and fan speeds. You may click Default to restore the default values. Top-side: User mode/Auto mode Here you may use the "+" and "-" buttons to adjust, ... PC reboots. If you choose User mode, you set for the temperatures are the maximum thresholds for the system for warnings, and the valus for fan speeds are the minimum thresholds. Then you can click Save to save the desired FSB you just configured. Getting Started Left-side: Current system status...
User Guide
Page 24
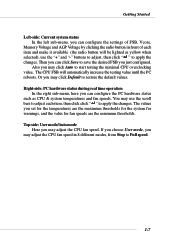
Overclocking This motherboard is not recommended. We do not find the heat sink and cooling fan, contact your components are installing the CPU, make sure the cooling fan can work properly to operate beyond product specifications. 2-3 CPU Core Speed Derivation Procedure If CPU Clock = 100MHz ...= Host Clock x Core/Bus ratio = 100MHz x 16 = 1.6 GHz MSI Reminds You... Overheating Overheating will seriously damage the CPU and system, always make sure the CPU has a heat sink and a cooling fan attached on the computer. The mainboard uses a CPU socket called PGA478 for easy...
Overclocking This motherboard is not recommended. We do not find the heat sink and cooling fan, contact your components are installing the CPU, make sure the cooling fan can work properly to operate beyond product specifications. 2-3 CPU Core Speed Derivation Procedure If CPU Clock = 100MHz ...= Host Clock x Core/Bus ratio = 100MHz x 16 = 1.6 GHz MSI Reminds You... Overheating Overheating will seriously damage the CPU and system, always make sure the CPU has a heat sink and a cooling fan attached on the computer. The mainboard uses a CPU socket called PGA478 for easy...
User Guide
Page 26
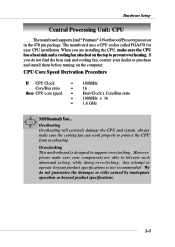
... and its four clips get wedged in only ONE direction. Mount the fan on top of the CPU. Press the two levers down to install the Heatsink/Fan: 1. Each lever can be pressed down the fan until its retention mechanism on the motherboard. Position the heatsink onto the retention mechanism. 3. levers 2-5 To dissipate heat...
... and its four clips get wedged in only ONE direction. Mount the fan on top of the CPU. Press the two levers down to install the Heatsink/Fan: 1. Each lever can be pressed down the fan until its retention mechanism on the motherboard. Position the heatsink onto the retention mechanism. 3. levers 2-5 To dissipate heat...
User Guide
Page 27
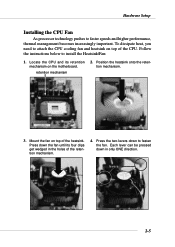
fan power cable NOTES 2-6 MS-6728 ATX Mainboard 5. Connect the fan power cable from the mounted fan to the 3-pin fan power connector on the board.
fan power cable NOTES 2-6 MS-6728 ATX Mainboard 5. Connect the fan power cable from the mounted fan to the 3-pin fan power connector on the board.
User Guide
Page 37
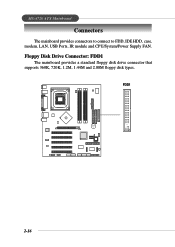
FDD1 B ATT + 2-16 MS-6728 ATX Mainboard Connectors The mainboard provides connectors to connect to FDD, IDE HDD, case, modem, LAN, USB Ports, IR module and CPU/System/Power Supply FAN. Floppy Disk Drive Connector: FDD1 The mainboard provides a standard floppy disk drive connector that supports 360K, 720K, 1.2M, 1.44M and 2.88M floppy disk types.
FDD1 B ATT + 2-16 MS-6728 ATX Mainboard Connectors The mainboard provides connectors to connect to FDD, IDE HDD, case, modem, LAN, USB Ports, IR module and CPU/System/Power Supply FAN. Floppy Disk Drive Connector: FDD1 The mainboard provides a standard floppy disk drive connector that supports 360K, 720K, 1.2M, 1.44M and 2.88M floppy disk types.
User Guide
Page 38
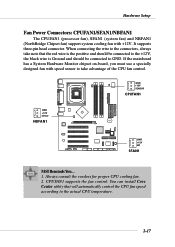
... If the mainboard has a System Hardware Monitor chipset on-board, you must use a specially designed fan with +12V. GND +12V SENSOR CPUFAN1 GND +12V Sensor NBFAN1 B ATT + GND +12V NC SFAN1 MSI Reminds You... 1. CPUFAN1 supports the fan control. It supports three-pin head connector. You can install Core Center utility that the...
... If the mainboard has a System Hardware Monitor chipset on-board, you must use a specially designed fan with +12V. GND +12V SENSOR CPUFAN1 GND +12V Sensor NBFAN1 B ATT + GND +12V NC SFAN1 MSI Reminds You... 1. CPUFAN1 supports the fan control. It supports three-pin head connector. You can install Core Center utility that the...

User Guide
Page 82
... onboard. Chassis Intrusion The field enables or disables the feature of the field will automatically return to Reset. PWM Frequency, CPU/System Temperature, CPU/NB Fan Speed, Vcore, 3. 3V, +5.0V, +12.0V, -12.0V, -5.0V, Battery, +5V SB These items display the current status of all... fans' speeds. 3-27 To clear the warning message, set the field to Enabled later. BIOS Setup PC Health Status This section shows the status of the ...
... onboard. Chassis Intrusion The field enables or disables the feature of the field will automatically return to Reset. PWM Frequency, CPU/System Temperature, CPU/NB Fan Speed, Vcore, 3. 3V, +5.0V, +12.0V, -12.0V, -5.0V, Battery, +5V SB These items display the current status of all... fans' speeds. 3-27 To clear the warning message, set the field to Enabled later. BIOS Setup PC Health Status This section shows the status of the ...
User Guide
Page 110
... I use a 3-Pin to 4-Pin Cable that you can support WinXP. Can I have tried to download the MSI Live Update utility from http:/ /www.msi.com.tw/support/liveupdate/livedriver.htm Q: After flashing the BIOS, my system for new BIOS chip or contact one of... web based anti-virus Software. A: We strongly recommend that comes together with the fan. Please check http://support/microsoft. A: Please refer to the following suggestions: 1. MS-6728 ATX Mainboard Q: I install the fan directly to the motherboard? A: No, you do ? A: This can only use more than 512MB memory...
... I use a 3-Pin to 4-Pin Cable that you can support WinXP. Can I have tried to download the MSI Live Update utility from http:/ /www.msi.com.tw/support/liveupdate/livedriver.htm Q: After flashing the BIOS, my system for new BIOS chip or contact one of... web based anti-virus Software. A: We strongly recommend that comes together with the fan. Please check http://support/microsoft. A: Please refer to the following suggestions: 1. MS-6728 ATX Mainboard Q: I install the fan directly to the motherboard? A: No, you do ? A: This can only use more than 512MB memory...

