
Operation Manual
Page 1
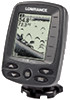
X-4 Pro Fish-Finding Sonar Installation and Operation Instructions
X-4 Pro Fish-Finding Sonar Installation and Operation Instructions

Operation Manual
Page 6
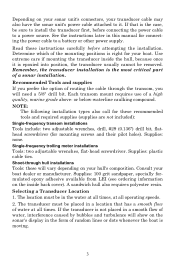
... where to route the cables for mounting it there. 6. These are inside a hull. Determine the location of your boat. Installation These instructions will damage the liquid crystal display in your vehicle or vessel! 1. Your Skimmer transducer typically comes packaged with a one-piece stainless steel...the sonar unit, so you have enough cable length for the transducer and its cable route. 3. phone numbers are all instructions before drilling any installation. Determine the location for the desired configuration. 2. Connect the transducer/power cable to the sonar unit. 5.
... where to route the cables for mounting it there. 6. These are inside a hull. Determine the location of your boat. Installation These instructions will damage the liquid crystal display in your vehicle or vessel! 1. Your Skimmer transducer typically comes packaged with a one-piece stainless steel...the sonar unit, so you have enough cable length for the transducer and its cable route. 3. phone numbers are all instructions before drilling any installation. Determine the location for the desired configuration. 2. Connect the transducer/power cable to the sonar unit. 5.
Operation Manual
Page 7
See the instructions later in this manual for connecting the power cable to it is epoxied into position, the transducer usually cannot be sure to install the transducer ... or manufacturer. Determine which of the mounting positions is the most critical part of a sonar installation. NOTE: The following installation types also call for these instructions carefully before connecting the power cable to a power source. Supplies: plastic cable ties.
See the instructions later in this manual for connecting the power cable to it is epoxied into position, the transducer usually cannot be sure to install the transducer ... or manufacturer. Determine which of the mounting positions is the most critical part of a sonar installation. NOTE: The following installation types also call for these instructions carefully before connecting the power cable to a power source. Supplies: plastic cable ties.

Operation Manual
Page 20
...the sonar unit on the top of the fuse holder directly to the battery or power buss. This will provide the best isolation from www.lowrance.com. 16 Red is the positive lead, black is disconnected from other boat wiring, especially the engine's wires. For example, if you... Power connections for cutting out the mounting hole. This unit has reverse polarity protection. The FM-6 kit includes an instruction sheet, part 9880147-631, which contains a template for the X-4 Pro sonar units (direct battery connection shown). Make sure to attach the in the event of a short. Failure to ...
...the sonar unit on the top of the fuse holder directly to the battery or power buss. This will provide the best isolation from www.lowrance.com. 16 Red is the positive lead, black is disconnected from other boat wiring, especially the engine's wires. For example, if you... Power connections for cutting out the mounting hole. This unit has reverse polarity protection. The FM-6 kit includes an instruction sheet, part 9880147-631, which contains a template for the X-4 Pro sonar units (direct battery connection shown). Make sure to attach the in the event of a short. Failure to ...
Operation Manual
Page 28
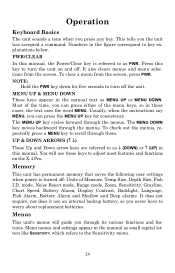
... does it use these keys to adjust most features and functions on and off. NOTE: Hold the PWR key down for consistency. Usually, when the instructions say MENU, you press any key. You will guide you the unit has accepted a command. Press this manual. Most of the time, you never ...key for five seconds to as PWR. UP & DOWN ARROWS (↑ ↓) 3 These Up and Down arrow keys are2referred to turn the unit on the X-4 Pro. 1 Memory This unit has permanent memory that saves the following user settings when power is referred to as ↓ (DOWN) or ↑ (UP) in this...
... does it use these keys to adjust most features and functions on and off. NOTE: Hold the PWR key down for consistency. Usually, when the instructions say MENU, you press any key. You will guide you the unit has accepted a command. Press this manual. Most of the time, you never ...key for five seconds to as PWR. UP & DOWN ARROWS (↑ ↓) 3 These Up and Down arrow keys are2referred to turn the unit on the X-4 Pro. 1 Memory This unit has permanent memory that saves the following user settings when power is referred to as ↓ (DOWN) or ↑ (UP) in this...
