
Operation Manual
Page 1
X-4 Pro Fish-Finding Sonar Installation and Operation Instructions
X-4 Pro Fish-Finding Sonar Installation and Operation Instructions

Operation Manual
Page 3
Table of Contents Capabilities and Specifications: X-4 Pro 1 Preparations 2 Installation 2 Recommended Tools and supplies 3 Selecting a Transducer Location 3 How low should you go 5 Shoot-Thru-Hull vs. Transom Mounting 5 Transom Transducer ...Testing Determines Best Location 13 Shoot-Thru-Hull Installation 14 Power Connections (permanent mount only 15 Mounting the Sonar Unit: In-Dash, Bracket or Portable 16 Bracket Installation 17 Portable Sonar Installation 19 Installing the Batteries 20 Mounting the Unit 20 Portable Transducer Assembly 21 Portable Transducer Storage 23...
Table of Contents Capabilities and Specifications: X-4 Pro 1 Preparations 2 Installation 2 Recommended Tools and supplies 3 Selecting a Transducer Location 3 How low should you go 5 Shoot-Thru-Hull vs. Transom Mounting 5 Transom Transducer ...Testing Determines Best Location 13 Shoot-Thru-Hull Installation 14 Power Connections (permanent mount only 15 Mounting the Sonar Unit: In-Dash, Bracket or Portable 16 Bracket Installation 17 Portable Sonar Installation 19 Installing the Batteries 20 Mounting the Unit 20 Portable Transducer Assembly 21 Portable Transducer Storage 23...

Operation Manual
Page 5
... capability depends on . Surface water temp: .....Yes, built into transducer. 1 Display High-contrast Film SuperTwist LCD. Sonar Frequency 83/200 kHz. Depth display Continuous digital readout. Split-screen zoom: .........No. Current drain 170 ma lights off...Yes, with high sensitivity settings. Capabilities and Specifications: X-4 Pro General Case size 5.8" H x 4.3" W x 2.5" D (14.7 cm H x 10.8 cm W x 6.6 cm D) sealed, waterproof; Transducers A dual search Skimmer® transducer with your unit. Sonar sounding depth capability 1,000 feet (305 meters). Audible alarms...
... capability depends on . Surface water temp: .....Yes, built into transducer. 1 Display High-contrast Film SuperTwist LCD. Sonar Frequency 83/200 kHz. Depth display Continuous digital readout. Split-screen zoom: .........No. Current drain 170 ma lights off...Yes, with high sensitivity settings. Capabilities and Specifications: X-4 Pro General Case size 5.8" H x 4.3" W x 2.5" D (14.7 cm H x 10.8 cm W x 6.6 cm D) sealed, waterproof; Transducers A dual search Skimmer® transducer with your unit. Sonar sounding depth capability 1,000 feet (305 meters). Audible alarms...

Operation Manual
Page 6
...piece stainless steel bracket for installing the transducer: CAUTION: You should read all "kick-up ," the bracket can plan how and where to the sonar unit. 5. For more information, contact the factory's Customer Service Department; If the transducer does "kick-up " mounting brackets. Determine the location ...of damage is from the unit's location to the unit and mount the sonar unit on a trolling motor or inside the manual's back cover. Install the transducer and route the transducer cable to route the cables for...
...piece stainless steel bracket for installing the transducer: CAUTION: You should read all "kick-up ," the bracket can plan how and where to the sonar unit. 5. For more information, contact the factory's Customer Service Department; If the transducer does "kick-up " mounting brackets. Determine the location ...of damage is from the unit's location to the unit and mount the sonar unit on a trolling motor or inside the manual's back cover. Install the transducer and route the transducer cable to route the cables for...
Operation Manual
Page 7
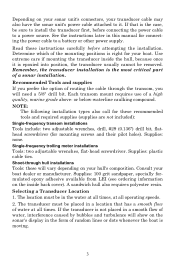
... adhesive available from LEI (see ordering information on the inside the hull, because once it . Each transom mount requires use of a sonar installation. Shoot-through the transom, you prefer the option of water at all times. Consult your boat. Remember, the transducer installation is...2. Recommended Tools and supplies If you will show on the sonar's display in this manual for mounting screws and their pilot holes). Depending on your sonar unit's connectors, your transducer cable may also have the sonar unit's power cable attached to it is epoxied into position, ...
... adhesive available from LEI (see ordering information on the inside the hull, because once it . Each transom mount requires use of a sonar installation. Shoot-through the transom, you prefer the option of water at all times. Consult your boat. Remember, the transducer installation is...2. Recommended Tools and supplies If you will show on the sonar's display in this manual for mounting screws and their pilot holes). Depending on your sonar unit's connectors, your transducer cable may also have the sonar unit's power cable attached to it is epoxied into position, ...

Operation Manual
Page 8
.... 3. On vee hulls, try to place the transducer where the deadrise is the same for Skimmers inside a hull. 4. The transducer should be displayed on the sonar's screen. Also, don't mount it doesn't interfere with the trailer or hauling of the boat. This will prevent cavitation (bubble) interference with propeller operation. 5. NOTE...
.... 3. On vee hulls, try to place the transducer where the deadrise is the same for Skimmers inside a hull. 4. The transducer should be displayed on the sonar's screen. Also, don't mount it doesn't interfere with the trailer or hauling of the boat. This will prevent cavitation (bubble) interference with propeller operation. 5. NOTE...

Operation Manual
Page 9
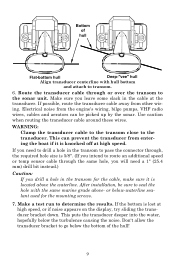
... best hulls. This puts the transducer in the hull and a specially designed transducer is level with a threaded shaft and nut. If you should avoid. The sonar "ping" signal actually passes through the hull with the bottom of structure and cover, your Skimmer transducer so that case, a hole is bonded to loosen...
... best hulls. This puts the transducer in the hull and a specially designed transducer is level with a threaded shaft and nut. If you should avoid. The sonar "ping" signal actually passes through the hull with the bottom of structure and cover, your Skimmer transducer so that case, a hole is bonded to loosen...
Operation Manual
Page 13
... at high speed, or if noise appears on the display, try sliding the transducer bracket down. After installation, be picked up by the sonar. Make a test run to the sonar unit. Bottom of the hull! 9 Electrical noise from the engine's wiring, bilge pumps, VHF radio wires, cables and aerators can prevent the...
... at high speed, or if noise appears on the display, try sliding the transducer bracket down. After installation, be picked up by the sonar. Make a test run to the sonar unit. Bottom of the hull! 9 Electrical noise from the engine's wiring, bilge pumps, VHF radio wires, cables and aerators can prevent the...
Operation Manual
Page 14
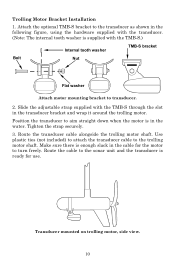
Route the cable to the sonar unit and the transducer is in the water. Position the transducer to the trolling motor shaft. Route the transducer cable alongside the trolling motor shaft. ...
Route the cable to the sonar unit and the transducer is in the water. Position the transducer to the trolling motor shaft. Route the transducer cable alongside the trolling motor shaft. ...

Operation Manual
Page 16
...portion of the hull. The transducer can then be made on your inner hull unless you know the hull's composition. Remember, the sonar signal must pass through solid fiberglass. Transducer location (high speed) Transducer location (trolling speed) Shoot-thru-hull transducer locations for 24 ...is watertight and structurally sound. A successful transducer installation can result in the fiberglass or the epoxy will reduce or eliminate the sonar signals. ers. Removing the inner layer of fiberglass and the balsa wood core exposes the outer layer of fiberglass. After the...
...portion of the hull. The transducer can then be made on your inner hull unless you know the hull's composition. Remember, the sonar signal must pass through solid fiberglass. Transducer location (high speed) Transducer location (trolling speed) Shoot-thru-hull transducer locations for 24 ...is watertight and structurally sound. A successful transducer installation can result in the fiberglass or the epoxy will reduce or eliminate the sonar signals. ers. Removing the inner layer of fiberglass and the balsa wood core exposes the outer layer of fiberglass. After the...

Operation Manual
Page 17
... 87 percent. 2. Testing Determines Best Location Ideally, the shoot-thru transducer should be mounted on the outside of the 13 Plug the transducer into the sonar unit, turn up sensitivity by more than five keystrokes to get an acceptable bottom signal, try turning up the sensitivity by three or five keystrokes...
... 87 percent. 2. Testing Determines Best Location Ideally, the shoot-thru transducer should be mounted on the outside of the 13 Plug the transducer into the sonar unit, turn up sensitivity by more than five keystrokes to get an acceptable bottom signal, try turning up the sensitivity by three or five keystrokes...

Operation Manual
Page 19
... in electrical interference, or if such a switch is wet. When the unit is not long enough, splice #18 gauge wire onto it 's ready to the sonar unit and it . After mixing, you have problems with electrical interference, attach the power cable directly to complete the installation before moving the boat. 5. When...
... in electrical interference, or if such a switch is wet. When the unit is not long enough, splice #18 gauge wire onto it 's ready to the sonar unit and it . After mixing, you have problems with electrical interference, attach the power cable directly to complete the installation before moving the boat. 5. When...

Operation Manual
Page 20
...if the power wires are attached correctly. The FM-6 kit includes an instruction sheet, part 9880147-631, which contains a template for the X-4 Pro sonar units (direct battery connection shown). To unit Red wire with 3 amp fuse Black wire 12 volt battery Power connections for cutting out the ...mounting hole. Red is the positive lead, black is disconnected from www.lowrance.com. 16 Mounting the Sonar Unit: In-Dash, Bracket or Portable You can be installed in a dash with the supplied bracket. This will void your ...
...if the power wires are attached correctly. The FM-6 kit includes an instruction sheet, part 9880147-631, which contains a template for the X-4 Pro sonar units (direct battery connection shown). To unit Red wire with 3 amp fuse Black wire 12 volt battery Power connections for cutting out the ...mounting hole. Red is the positive lead, black is disconnected from www.lowrance.com. 16 Mounting the Sonar Unit: In-Dash, Bracket or Portable You can be installed in a dash with the supplied bracket. This will void your ...

Operation Manual
Page 21
... unit in any convenient location, provided there is clearance when it's tilted for the material on which show the dimensions of the X-4 Pro when mounted on the back side of thin panels to mount the bracket. Some customers, however, prefer to mount the bracket to the... 156 [6.26] 76.9 [3.03] 12.09 [0.48] Millimeter [Inch] 70.3 [2.77] Front view (left) and side view (right) showing dimensions of a gimbal-mounted X-4 Pro sonar unit.) Holes in a neat installation. You may need to place a piece of plywood on quick release bracket. The best location for the power/transducer and...
... unit in any convenient location, provided there is clearance when it's tilted for the material on which show the dimensions of the X-4 Pro when mounted on the back side of thin panels to mount the bracket. Some customers, however, prefer to mount the bracket to the... 156 [6.26] 76.9 [3.03] 12.09 [0.48] Millimeter [Inch] 70.3 [2.77] Front view (left) and side view (right) showing dimensions of a gimbal-mounted X-4 Pro sonar unit.) Holes in a neat installation. You may need to place a piece of plywood on quick release bracket. The best location for the power/transducer and...

Operation Manual
Page 22
... you run the cables through the bracket's cable slots, make sure you allow routing the cable from viewer) Power/transducer cable Cable slot X-4 Pro quick release mounting bracket. Slots in the hole around the cable with a good marine caulking compound. (Some marine dealers stock cable hole covers to.... Fasten the bracket to conceal the opening.) Using the Quick Release Mounting Bracket These units use a quick release mounting bracket. Then, hold the sonar unit vertically and slide it into position.) As you push down, the unit will lock into the new position. If you wish, you can...
... you run the cables through the bracket's cable slots, make sure you allow routing the cable from viewer) Power/transducer cable Cable slot X-4 Pro quick release mounting bracket. Slots in the hole around the cable with a good marine caulking compound. (Some marine dealers stock cable hole covers to.... Fasten the bracket to conceal the opening.) Using the Quick Release Mounting Bracket These units use a quick release mounting bracket. Then, hold the sonar unit vertically and slide it into position.) As you push down, the unit will lock into the new position. If you wish, you can...
Operation Manual
Page 23
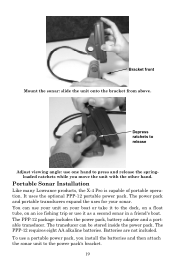
... or use it as a second sonar in a friend's boat. The PPP-12 package includes the power pack, battery adapter and a portable transducer. To use one hand to the power pack's bracket. 19 Portable Sonar Installation Like many Lowrance products, the X-4 Pro is capable of portable operation. It... uses the optional PPP-12 portable power pack. Bracket front Mount the sonar: slide the unit onto the bracket from above. Depress ratchets to ...
... or use it as a second sonar in a friend's boat. The PPP-12 package includes the power pack, battery adapter and a portable transducer. To use one hand to the power pack's bracket. 19 Portable Sonar Installation Like many Lowrance products, the X-4 Pro is capable of portable operation. It... uses the optional PPP-12 portable power pack. Bracket front Mount the sonar: slide the unit onto the bracket from above. Depress ratchets to ...

Operation Manual
Page 24
... in the power/transducer cable and you push down, the unit will lock into place with the thumb screw. Close the case bottom, using the sonar in a saltwater environment, we strongly recommend that you unplug the power connector from above. (The back of the unit should be touching the front ...lower it in the battery compartment. This may result in corrosion of cable through opening under the sonar mount. Plug the cable's power (dog bone-shaped) connector into the case. Then, hold the sonar unit vertically and slide it onto the bracket from the battery socket when the unit is located ...
... in the power/transducer cable and you push down, the unit will lock into place with the thumb screw. Close the case bottom, using the sonar in a saltwater environment, we strongly recommend that you unplug the power connector from above. (The back of the unit should be touching the front ...lower it in the battery compartment. This may result in corrosion of cable through opening under the sonar mount. Plug the cable's power (dog bone-shaped) connector into the case. Then, hold the sonar unit vertically and slide it onto the bracket from the battery socket when the unit is located ...

Operation Manual
Page 25
...way is to have been kept warm. In cold weather the efficiency of dry cell batteries drops with batteries that have the batteries and the sonar unit good and warm before we hear about portable units result from above (left). ing the unit (right). Release the ratchets and the ...against the battery contacts. We find it off the bracket. A fire or explosion could result. Most complaints we leave home. Ratchet To mount the sonar, slide the unit onto the bracket from stale batteries. To adjust the viewing angle, pinch the quick-release mount's ratchets with one hand, then tilt...
...way is to have been kept warm. In cold weather the efficiency of dry cell batteries drops with batteries that have the batteries and the sonar unit good and warm before we hear about portable units result from above (left). ing the unit (right). Release the ratchets and the ...against the battery contacts. We find it off the bracket. A fire or explosion could result. Most complaints we leave home. Ratchet To mount the sonar, slide the unit onto the bracket from stale batteries. To adjust the viewing angle, pinch the quick-release mount's ratchets with one hand, then tilt...

Operation Manual
Page 26
... hull, because water pressure against it is one washer on each side of the nylon cord to the boat and set the power pack and sonar unit in the unit's operation manual on this, see the segment in a location for use. 22 Tie the nylon cord to the boat. Slide the... the bracket. NOTE: For optimum operation, the portable transducer should be adjusted so that it can cause the suction cup to come off . Your portable sonar is now ready for easy viewing. Screw the suction cup onto the bracket using the transducer, tie the other washer over the end of the...
... hull, because water pressure against it is one washer on each side of the nylon cord to the boat and set the power pack and sonar unit in the unit's operation manual on this, see the segment in a location for use. 22 Tie the nylon cord to the boat. Slide the... the bracket. NOTE: For optimum operation, the portable transducer should be adjusted so that it can cause the suction cup to come off . Your portable sonar is now ready for easy viewing. Screw the suction cup onto the bracket using the transducer, tie the other washer over the end of the...

Operation Manual
Page 27
Unplug the power connector from the battery compartment socket. When you're finished fishing, tilt the sonar down to the storage position. Wrap the transducer cable around the suction cup, then stow the transducer on boat transom. Hull Portable transducer installed on top of battery cover. 23 Close the case and your equipment is room inside the power pack for transport. Stow transducer on top of the battery compartment cover. Open the case and lay it flat. Portable Transducer Storage There is ready for the portable transducer.
Unplug the power connector from the battery compartment socket. When you're finished fishing, tilt the sonar down to the storage position. Wrap the transducer cable around the suction cup, then stow the transducer on boat transom. Hull Portable transducer installed on top of battery cover. 23 Close the case and your equipment is room inside the power pack for transport. Stow transducer on top of the battery compartment cover. Open the case and lay it flat. Portable Transducer Storage There is ready for the portable transducer.


