User Guide
Page 4
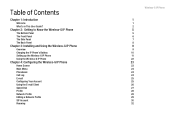
... Front Panel The Side Panel The Back Panel Chapter 3: Installing and Using the Wireless-G IP Phone Overview Charging the IP Phone's Battery Setting up the Wireless-G IP Phone Using the Wireless-G IP Phone Chapter 4: Configuring the Wireless-G IP Phone Home Screen Main Menu Phonebook Call Log E-mail Configuring Your Account Using the E-mail Client Speed Dial Profile Network Profile Editing a Network...
... Front Panel The Side Panel The Back Panel Chapter 3: Installing and Using the Wireless-G IP Phone Overview Charging the IP Phone's Battery Setting up the Wireless-G IP Phone Using the Wireless-G IP Phone Chapter 4: Configuring the Wireless-G IP Phone Home Screen Main Menu Phonebook Call Log E-mail Configuring Your Account Using the E-mail Client Speed Dial Profile Network Profile Editing a Network...
User Guide
Page 10
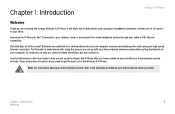
... can be all of the Wireless-G IP Phone. Networks are useful in your Internet phone service provider. It connects to your wireless router or access point to the materials provided by your office. Chapter 1: Introduction 1 Welcome So, networks not only are useful tools for choosing the Linksys Wireless-G IP Phone. Chapter 1: Introduction Wireless-G IP Phone Welcome Thank you need...
... can be all of the Wireless-G IP Phone. Networks are useful in your Internet phone service provider. It connects to your wireless router or access point to the materials provided by your office. Chapter 1: Introduction 1 Welcome So, networks not only are useful tools for choosing the Linksys Wireless-G IP Phone. Chapter 1: Introduction Wireless-G IP Phone Welcome Thank you need...

User Guide
Page 11
... this User Guide. • Chapter 2: Getting to Know the Wireless-G IP Phone Describes the physical features of the IP Phone. • Chapter 3: Installing and Using the Wireless-G IP Phone Explains how to install the IP Phone and use it. • Chapter 4: Configuring the Wireless-G IP Phone Discusses how to configure the IP Phone's settings. • Appendix A: Troubleshooting Describes potential problems and...
... this User Guide. • Chapter 2: Getting to Know the Wireless-G IP Phone Describes the physical features of the IP Phone. • Chapter 3: Installing and Using the Wireless-G IP Phone Explains how to install the IP Phone and use it. • Chapter 4: Configuring the Wireless-G IP Phone Discusses how to configure the IP Phone's settings. • Appendix A: Troubleshooting Describes potential problems and...
User Guide
Page 18
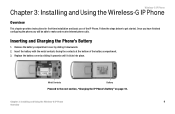
... get started. Chapter 3: Installing and Using the Wireless-G IP Phone 9 Overview Once you have finished configuring the phone you will be able to make and receive Internet phone calls. Remove the battery compartment cover by sliding it upwards until it downwards. 2. Wireless-G IP Phone Chapter 3: Installing and Using the Wireless-G IP Phone Overview This chapter provides instructions for first...
... get started. Chapter 3: Installing and Using the Wireless-G IP Phone 9 Overview Once you have finished configuring the phone you will be able to make and receive Internet phone calls. Remove the battery compartment cover by sliding it upwards until it downwards. 2. Wireless-G IP Phone Chapter 3: Installing and Using the Wireless-G IP Phone Overview This chapter provides instructions for first...

User Guide
Page 20
... the Wireless-G IP Phone You see a message asking you are configuring the Phone, press any key to turn on and continue configuring the Phone. 1. Chapter 3: Installing and Using the Wireless-G IP Phone 11 Setting up the Wireless-G IP Phone Wireless-G IP Phone Before you begin, make sure you have an active Internet connection and the account information provided by your Internet phone service...
... the Wireless-G IP Phone You see a message asking you are configuring the Phone, press any key to turn on and continue configuring the Phone. 1. Chapter 3: Installing and Using the Wireless-G IP Phone 11 Setting up the Wireless-G IP Phone Wireless-G IP Phone Before you begin, make sure you have an active Internet connection and the account information provided by your Internet phone service...

User Guide
Page 31
Press the Navigation button to "Chapter 4: Configuring the Wireless-G IP Phone." 22 Chapter 3: Installing and Using the Wireless-G IP Phone Using the Wireless-G IP Phone For additional information about your Wireless-G IP Phone, proceed to mute the Phone's microphone. To return to the call . Press the OnHook Soft Key to end ...Navigation button to save the new volume level or the Back Soft Key to cancel. Wireless-G IP Phone Using the Wireless-G IP Phone To make a call, enter the phone number you can select the following options: Option Hold Mute OnHook Volume Description Press the ...
Press the Navigation button to "Chapter 4: Configuring the Wireless-G IP Phone." 22 Chapter 3: Installing and Using the Wireless-G IP Phone Using the Wireless-G IP Phone For additional information about your Wireless-G IP Phone, proceed to mute the Phone's microphone. To return to the call . Press the OnHook Soft Key to end ...Navigation button to save the new volume level or the Back Soft Key to cancel. Wireless-G IP Phone Using the Wireless-G IP Phone To make a call, enter the phone number you can select the following options: Option Hold Mute OnHook Volume Description Press the ...
User Guide
Page 32
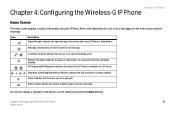
... are on the home screen and their meanings: Icon Description Signal Strength: Indicates the signal strengh of information about the IP Phone. Alarm: Indicates that 's currently enabled. Chapter 4: Configuring the Wireless-G IP Phone 23 Home Screen Refer to the table below for a list of icons that has encryption enabled. SIP Registered/Not Registered: Indicates...
... are on the home screen and their meanings: Icon Description Signal Strength: Indicates the signal strengh of information about the IP Phone. Alarm: Indicates that 's currently enabled. Chapter 4: Configuring the Wireless-G IP Phone 23 Home Screen Refer to the table below for a list of icons that has encryption enabled. SIP Registered/Not Registered: Indicates...

User Guide
Page 33
... contact. Clears all call the contact, press the Call button, then press the Call Soft Key. To call lists. 24 Chapter 4: Configuring the Wireless-G IP Phone Main Menu Call Log The IP Phone keeps a list of options available in the Phonebook: Option Search Edit Delete New Description Search for a list of options available in...
... contact. Clears all call the contact, press the Call button, then press the Call Soft Key. To call lists. 24 Chapter 4: Configuring the Wireless-G IP Phone Main Menu Call Log The IP Phone keeps a list of options available in the Phonebook: Option Search Edit Delete New Description Search for a list of options available in...

User Guide
Page 34
...display date and time information for more information about a call in the call list you're viewing. If an e-mail account has not been configured, you see the E-mail menu. If necessary, press the Menu Soft Key, scroll to E-mail, then press the Navigation button to activate the... e-mail account information, press the Back Soft Key until you see the New account menu. 2. Contact your e-mail service. 3. Chapter 4: Configuring the Wireless-G IP Phone 25 E-mail Enter the information provided by your e-mail service for the call. Press the Back Soft Key until you see the Option menu...
...display date and time information for more information about a call in the call list you're viewing. If an e-mail account has not been configured, you see the E-mail menu. If necessary, press the Menu Soft Key, scroll to E-mail, then press the Navigation button to activate the... e-mail account information, press the Back Soft Key until you see the New account menu. 2. Contact your e-mail service. 3. Chapter 4: Configuring the Wireless-G IP Phone 25 E-mail Enter the information provided by your e-mail service for the call. Press the Back Soft Key until you see the Option menu...

User Guide
Page 35
...to create a new e-mail message, then enter a subject, the recipients, and content of the e-mail messages in your Outbox. 26 Chapter 4: Configuring the Wireless-G IP Phone Using the E-mail Client When you are viewing a sent e-mail message, you can press the Option Soft Key to select the following options: •...mail message when you to delete all of the e-mail messages in your e-mail, select Send Mail or Save To Draft to save it . Wireless-G IP Phone Using the E-mail Client Refer to the table below for a list of options availbe in the e-mail client. When you are viewing a ...
...to create a new e-mail message, then enter a subject, the recipients, and content of the e-mail messages in your Outbox. 26 Chapter 4: Configuring the Wireless-G IP Phone Using the E-mail Client When you are viewing a sent e-mail message, you can press the Option Soft Key to select the following options: •...mail message when you to delete all of the e-mail messages in your e-mail, select Send Mail or Save To Draft to save it . Wireless-G IP Phone Using the E-mail Client Refer to the table below for a list of options availbe in the e-mail client. When you are viewing a ...

User Guide
Page 36
Wireless-G IP Phone Speed Dial The Speed Dial menu allows you to assign up to nine phone numbers you frequently call to view the contacts in your Phonebook. Press the Option Soft Key to the number keys on the phone. If you already have a contact assigned to the speed... contact you want to assign to the speed dial location you selected, highlight Phonebook, then press the Navigation button. 4. Chapter 4: Configuring the Wireless-G IP Phone 27 Speed Dial Option Draft Account Settings Description View e-mail messages that contact. Allows you to the speed dial location, then press ...
Wireless-G IP Phone Speed Dial The Speed Dial menu allows you to assign up to nine phone numbers you frequently call to view the contacts in your Phonebook. Press the Option Soft Key to the number keys on the phone. If you already have a contact assigned to the speed... contact you want to assign to the speed dial location you selected, highlight Phonebook, then press the Navigation button. 4. Chapter 4: Configuring the Wireless-G IP Phone 27 Speed Dial Option Draft Account Settings Description View e-mail messages that contact. Allows you to the speed dial location, then press ...

User Guide
Page 37
... is able to make changes to your SIP accounts, network profiles, roaming options, profile password, or configure your IP Phone to connect to. Move the current network profile up to six wireless access points for your IP phone using the numeric keypad, then press the Navigation button to save the password. Refer to table...
... is able to make changes to your SIP accounts, network profiles, roaming options, profile password, or configure your IP Phone to connect to. Move the current network profile up to six wireless access points for your IP phone using the numeric keypad, then press the Navigation button to save the password. Refer to table...

User Guide
Page 38
... Choice NAT Settings Description View a summary of the current network profie. Assign a SIP account to acquire IP settings for your network. Chapter 4: Configuring the Wireless-G IP Phone 29 Editing a Network Profile Edit wireless network settings. Highlight Wireless Settings, then press the Select Soft Key to select the following options: • ESSID: Allows you to select...
... Choice NAT Settings Description View a summary of the current network profie. Assign a SIP account to acquire IP settings for your network. Chapter 4: Configuring the Wireless-G IP Phone 29 Editing a Network Profile Edit wireless network settings. Highlight Wireless Settings, then press the Select Soft Key to select the following options: • ESSID: Allows you to select...

User Guide
Page 39
... an account, press the Navigation button. ID Enter your IP Phone. Proxy Address Enter the address of your Internet phone service account's authorization password. Phone Number Enter your Internet phone service provider's proxy server. 30 Chapter 4: Configuring the Wireless-G IP Phone SIP Account Password Enter your Intenet phone service provider's SIP domain. Auth. SIP Domain Enter the address...
... an account, press the Navigation button. ID Enter your IP Phone. Proxy Address Enter the address of your Internet phone service account's authorization password. Phone Number Enter your Internet phone service provider's proxy server. 30 Chapter 4: Configuring the Wireless-G IP Phone SIP Account Password Enter your Intenet phone service provider's SIP domain. Auth. SIP Domain Enter the address...

User Guide
Page 40
...the account you to the SIP account. Chapter 4: Configuring the Wireless-G IP Phone 31 SIP Account Press the Select Soft Key to select from the following advanced options: • Proxy Port: Allows you to enter the network port of your Internet phone service provider's proxy server. • Outbound Address:...Time(ms): Allows you to change the audio packet size. • OutBand DTMF: Allows you to change the amount of -band DTMF. Wireless-G IP Phone To rename a SIP account, highlight the account you would like to rename, press the Option Soft Key, highlight Rename, then press the ...
...the account you to the SIP account. Chapter 4: Configuring the Wireless-G IP Phone 31 SIP Account Press the Select Soft Key to select from the following advanced options: • Proxy Port: Allows you to enter the network port of your Internet phone service provider's proxy server. • Outbound Address:...Time(ms): Allows you to change the audio packet size. • OutBand DTMF: Allows you to change the amount of -band DTMF. Wireless-G IP Phone To rename a SIP account, highlight the account you would like to rename, press the Option Soft Key, highlight Rename, then press the ...

User Guide
Page 41
... The Roaming menu allows you are finished entering the password, press the Navigation button to save it. 32 Chapter 4: Configuring the Wireless-G IP Phone Roaming Refer to table below to change the password used to access the Profile menu. Specify the RSSI threshold for a list of probes per channel ...
... The Roaming menu allows you are finished entering the password, press the Navigation button to save it. 32 Chapter 4: Configuring the Wireless-G IP Phone Roaming Refer to table below to change the password used to access the Profile menu. Specify the RSSI threshold for a list of probes per channel ...

User Guide
Page 42
... you to quickly access the Secure Setup feature from the IP Phone's home screen. If you have a Linksys wireless router or access point that supports SecureEasySetup, you can also press and hold the Clear button to configure your IP Phone's wireless network settings with the wireless router or access point. 1. Language The Language menu allows you begin...
... you to quickly access the Secure Setup feature from the IP Phone's home screen. If you have a Linksys wireless router or access point that supports SecureEasySetup, you can also press and hold the Clear button to configure your IP Phone's wireless network settings with the wireless router or access point. 1. Language The Language menu allows you begin...

User Guide
Page 43
... and date settings. Option Alarm Time Mode Description Set the time you want the alarm to go off at a specified time. Wireless-G IP Phone Clock The Clock menu allows you to set an alarm to go off at . Enable or disable automatic Daylight Savings time adjustment. You can also ... the alarm to the table below for a list of options available in the Clock menu. Refer to go off once, daily, or weekly. 34 Chapter 4: Configuring the Wireless-G IP Phone Clock Set the date displayed on the IP Phone's home screen. Alarm Clock The Alarm Clock allows you to 12-
... and date settings. Option Alarm Time Mode Description Set the time you want the alarm to go off at a specified time. Wireless-G IP Phone Clock The Clock menu allows you to set an alarm to go off at . Enable or disable automatic Daylight Savings time adjustment. You can also ... the alarm to the table below for a list of options available in the Clock menu. Refer to go off once, daily, or weekly. 34 Chapter 4: Configuring the Wireless-G IP Phone Clock Set the date displayed on the IP Phone's home screen. Alarm Clock The Alarm Clock allows you to 12-

User Guide
Page 44
...the Beep Notification feature. Select SIP or DTMF Flash as the method used for a list of how long you to change the way the phone's speed dial function works. Chapter 4: Configuring the Wireless-G IP Phone 35 Call Settings Speed Dial c The Speed Dial menu allows you 've been on the IP... Phone. Press the Select Soft Key to select from callers with a private caller id. When this feature is busy. • Cancel All: Allows you ...
...the Beep Notification feature. Select SIP or DTMF Flash as the method used for a list of how long you to change the way the phone's speed dial function works. Chapter 4: Configuring the Wireless-G IP Phone 35 Call Settings Speed Dial c The Speed Dial menu allows you 've been on the IP... Phone. Press the Select Soft Key to select from callers with a private caller id. When this feature is busy. • Cancel All: Allows you ...

User Guide
Page 45
... Settings The Sound Settings menu allows you to customize the IP Phone's display. Option Description Speaker Volume Set the IP Phone's speaker volume. Ring Tone Set the IP Phone's ring tone and volume. Enable or disable configuration tips. 36 Chapter 4: Configuring the Wireless-G IP Phone Sound Settings Refer to the table below for a list of time it...
... Settings The Sound Settings menu allows you to customize the IP Phone's display. Option Description Speaker Volume Set the IP Phone's speaker volume. Ring Tone Set the IP Phone's ring tone and volume. Enable or disable configuration tips. 36 Chapter 4: Configuring the Wireless-G IP Phone Sound Settings Refer to the table below for a list of time it...
