User Guide
Page 4
... Bottom Panel The Front Panel The Side Panel The Back Panel Chapter 3: Installing and Using the Wireless-G IP Phone Overview Charging the IP Phone's Battery Setting up the Wireless-G IP Phone Using the Wireless-G IP Phone Chapter 4: Configuring the Wireless-G IP Phone Home Screen Main Menu Phonebook Call Log E-mail Configuring Your Account Using the E-mail Client Speed Dial Profile...
... Bottom Panel The Front Panel The Side Panel The Back Panel Chapter 3: Installing and Using the Wireless-G IP Phone Overview Charging the IP Phone's Battery Setting up the Wireless-G IP Phone Using the Wireless-G IP Phone Chapter 4: Configuring the Wireless-G IP Phone Home Screen Main Menu Phonebook Call Log E-mail Configuring Your Account Using the E-mail Client Speed Dial Profile...

User Guide
Page 7
... Insert the Battery 7 Figure 3-26: Standby Screen 19 Figure 3-3: Connect the Power 8 Figure 3-27: Call Connected 20 Figure 3-4: Front Panel 9 Figure 3-28: Line Options 20 Figure 3-5: Scan for Wireless Networks 10 Figure 3-29: Second Call 21 Figure 3-6: Select Wireless Network 10 Figure... 3-30: Unlock Keys 21 Figure 3-7: Connect to Wireless Network 11 Figure 4-1: Front Panel of IP Phone 23 Figure 3-8: Enter WEP Key (for Secured Networks...
... Insert the Battery 7 Figure 3-26: Standby Screen 19 Figure 3-3: Connect the Power 8 Figure 3-27: Call Connected 20 Figure 3-4: Front Panel 9 Figure 3-28: Line Options 20 Figure 3-5: Scan for Wireless Networks 10 Figure 3-29: Second Call 21 Figure 3-6: Select Wireless Network 10 Figure... 3-30: Unlock Keys 21 Figure 3-7: Connect to Wireless Network 11 Figure 4-1: Front Panel of IP Phone 23 Figure 3-8: Enter WEP Key (for Secured Networks...
User Guide
Page 14
Wireless-G IP Phone Chapter 2: Getting to charge its battery. Use the USB mini-B port to connect the included AC adapter to the IP Phone to Know the Wireless-G IP Phone The Bottom Panel The IP Phone's USB mini-B port is located on the bottom panel of the Phone. USB mini-B Port Chapter 2: Getting to Know the Wireless-G IP Phone 5 The Bottom Panel
Wireless-G IP Phone Chapter 2: Getting to charge its battery. Use the USB mini-B port to connect the included AC adapter to the IP Phone to Know the Wireless-G IP Phone The Bottom Panel The IP Phone's USB mini-B port is located on the bottom panel of the Phone. USB mini-B Port Chapter 2: Getting to Know the Wireless-G IP Phone 5 The Bottom Panel

User Guide
Page 17
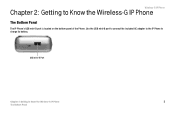
Battery compartment 8 Chapter 2: Getting to "Chapter 3: Installing and Using the Wireless-G IP Phone". For directions on the back panel of the IP Phone. Wireless-G IP Phone The Back Panel The IP Phone's battery compartment is located on how to insert the battery, refer to Know the Wireless-G IP Phone The Back Panel
Battery compartment 8 Chapter 2: Getting to "Chapter 3: Installing and Using the Wireless-G IP Phone". For directions on the back panel of the IP Phone. Wireless-G IP Phone The Back Panel The IP Phone's battery compartment is located on how to insert the battery, refer to Know the Wireless-G IP Phone The Back Panel
User Guide
Page 18
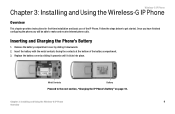
... the next section, "Charging the IP Phone's Battery" on page 10. Inserting and Charging the Phone's Battery 1. Metal Contacts Battery Proceed to get started. Chapter 3: Installing and Using the Wireless-G IP Phone 9 Overview Once you have finished configuring the phone you will be able to make and receive Internet phone calls. Remove the battery compartment cover by sliding it upwards...
... the next section, "Charging the IP Phone's Battery" on page 10. Inserting and Charging the Phone's Battery 1. Metal Contacts Battery Proceed to get started. Chapter 3: Installing and Using the Wireless-G IP Phone 9 Overview Once you have finished configuring the phone you will be able to make and receive Internet phone calls. Remove the battery compartment cover by sliding it upwards...
User Guide
Page 19
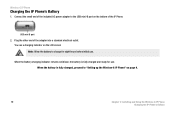
You see a charging indicator on the LCD screen Note: Allow the battery to charge for use . Wireless-G IP Phone Charging the IP Phone's Battery 1. Connect the small end of the included AC power adapter to "Setting up the Wireless-G IP Phone" on the bottom of the adapter into a standard electrical outlet. Plug the other end of the IP...
You see a charging indicator on the LCD screen Note: Allow the battery to charge for use . Wireless-G IP Phone Charging the IP Phone's Battery 1. Connect the small end of the included AC power adapter to "Setting up the Wireless-G IP Phone" on the bottom of the adapter into a standard electrical outlet. Plug the other end of the IP...
User Guide
Page 32
... or forwarding a call. You can also display a summary of the IP Phone's connection to a SIP server. Chapter 4: Configuring the Wireless-G IP Phone 23 Home Screen SIP Registered/Not Registered: Indicates the status of the phone's current status by pressing the Status Soft Key. Battery Level: Indicates the amount of icons that the alarm you have...
... or forwarding a call. You can also display a summary of the IP Phone's connection to a SIP server. Chapter 4: Configuring the Wireless-G IP Phone 23 Home Screen SIP Registered/Not Registered: Indicates the status of the phone's current status by pressing the Status Soft Key. Battery Level: Indicates the amount of icons that the alarm you have...

User Guide
Page 45
...8226; Ring Volume: Allows you to Silent, Ring, Vibrate, or Ring + Vibrate. Refer to the table below for the IP Phone to the table below for a list of options available in the Sound Setting menu. Change the brightness of options available in the ... the home screen. Warning Tone Enable or disable the IP Phone's warning tones, such as low battery. Wireless-G IP Phone Sound Settings The Sound Settings menu allows you to customize the IP Phone's display. Option Description Speaker Volume Set the IP Phone's speaker volume. Enable or disable configuration tips. 36 Chapter ...
...8226; Ring Volume: Allows you to Silent, Ring, Vibrate, or Ring + Vibrate. Refer to the table below for the IP Phone to the table below for a list of options available in the Sound Setting menu. Change the brightness of options available in the ... the home screen. Warning Tone Enable or disable the IP Phone's warning tones, such as low battery. Wireless-G IP Phone Sound Settings The Sound Settings menu allows you to customize the IP Phone's display. Option Description Speaker Volume Set the IP Phone's speaker volume. Enable or disable configuration tips. 36 Chapter ...
User Guide
Page 47
... Version Upgrade Back to their factory defaults. View the IP Phone's network and codec statistics. Reset all the wireless access points in the Tools menu. View the IP Phone's battery status. Perform a site survey of all of the IP Phone's settings back to Default Restart Description View signal status information for the options available in...
... Version Upgrade Back to their factory defaults. View the IP Phone's network and codec statistics. Reset all the wireless access points in the Tools menu. View the IP Phone's battery status. Perform a site survey of all of the IP Phone's settings back to Default Restart Description View signal status information for the options available in...

User Guide
Page 55
Wireless-G IP Phone Option Call Waiting Forward Number Forward All No Answer Block Caller ID Refuse Private Busy Beep Notification Hold Transfer Regional Tone Description Check to enable Call Waiting, uncheck to disable Enter a phone number or IP address to forward your phone is busy Enable or disable the Beep ...calls to the Forward Number Check to send calls to Forward Number when there is enabled, the phone will beep every 50 seconds so that display Private Call as low battery 46 Chapter 5: Using the Web-based Utility Settings Refer to the table below for transferring calls Set...
Wireless-G IP Phone Option Call Waiting Forward Number Forward All No Answer Block Caller ID Refuse Private Busy Beep Notification Hold Transfer Regional Tone Description Check to enable Call Waiting, uncheck to disable Enter a phone number or IP address to forward your phone is busy Enable or disable the Beep ...calls to the Forward Number Check to send calls to Forward Number when there is enabled, the phone will beep every 50 seconds so that display Private Call as low battery 46 Chapter 5: Using the Web-based Utility Settings Refer to the table below for transferring calls Set...

User Guide
Page 64
...Save Settings button. 4. The power LED does not light up. Wireless-G IP Phone Appendix A: Troubleshooting 55 Common Problems and Solutions Repeat steps 5-7 until your problem is the one included with the IP Phone. 8. Go through this checklist until you have entered all four...while the IP Phone resets itself. Insert the battery and power on the IP Phone. • You may be using is solved: • Remove the IP Phone's battery from its compartment. Check the Enable option for the IP Phone. Application Internet phone 1 Internet phone 2 Internet phone 3 Internet phone 4 Start and...
...Save Settings button. 4. The power LED does not light up. Wireless-G IP Phone Appendix A: Troubleshooting 55 Common Problems and Solutions Repeat steps 5-7 until your problem is the one included with the IP Phone. 8. Go through this checklist until you have entered all four...while the IP Phone resets itself. Insert the battery and power on the IP Phone. • You may be using is solved: • Remove the IP Phone's battery from its compartment. Check the Enable option for the IP Phone. Application Internet phone 1 Internet phone 2 Internet phone 3 Internet phone 4 Start and...

User Guide
Page 71
... Jitter Buffer Control Comfortable Noise Generation Packet Loss Concealment 1.84" x 5.32" x 0.74" (46.7 mm x 135.2 mm x 18.8 mm) 4.20 oz. (0.12 kg) 3.7V, 1250mAh Lithium Battery, 5V, 1A AC Adapter FCC, cUL, CE 32ºF to 113ºF (0ºC to 45ºC) -4ºF to 131ºF (-20ºC to 55º...;C) 10% to 85% Relative Humidity, Non-Condensing 10% to 95% Non-Condensing 62 Appendix C: Specifications Wireless-G IP Phone DTMF Transmission Voice Quality Dimensions (W x H x D) Unit Weight Power Certifications Operating Temp.
... Jitter Buffer Control Comfortable Noise Generation Packet Loss Concealment 1.84" x 5.32" x 0.74" (46.7 mm x 135.2 mm x 18.8 mm) 4.20 oz. (0.12 kg) 3.7V, 1250mAh Lithium Battery, 5V, 1A AC Adapter FCC, cUL, CE 32ºF to 113ºF (0ºC to 45ºC) -4ºF to 131ºF (-20ºC to 55º...;C) 10% to 85% Relative Humidity, Non-Condensing 10% to 95% Non-Condensing 62 Appendix C: Specifications Wireless-G IP Phone DTMF Transmission Voice Quality Dimensions (W x H x D) Unit Weight Power Certifications Operating Temp.
